2XKO Fundamentals Guide: Neutral, Teamplay & Training
2XKO Fundamentals: A Timeless Guide to Neutral, Teamwork, and Real Improvement
2XKO is built around something fighting game players love and fear at the same time: decision-making under pressure. You’re not just choosing what button to press—you’re choosing when, why, and what it sets up next, while your partner and tag/assist options add extra layers of creativity.
This guide is designed to stay useful for the long run. It avoids patch-dependent “top character” lists and instead teaches the evergreen skills that carry across seasons: neutral, defense, pressure, teamwork, and practice structure. If you build these fundamentals, you will improve even as the roster grows and the meta shifts.
Quick takeaways (read this first)
- Neutral wins games. Not by “doing nothing,” but by forcing safer, higher-value decisions than your opponent.
- Defense is an active skill. Great defenders don’t guess less—they guess better and lose less when wrong.
- Teamwork multiplies your damage. Assist timing, safe tags, and role clarity create “unfair” turns.
- Simple plans beat fancy combos. A repeatable gameplan + consistent confirms is stronger than highlight clips.
- Practice needs structure. 20–40 minutes of targeted drills beats 3 hours of autopilot matches.
Table of Contents
1) What this guide covers (and what it doesn’t)
Fighting game guides often fail because they do one of two extremes: they either stay so general that nothing changes in your matches, or they go so specific that the advice dies after the next update. This guide stays in the sweet spot: specific enough to train, general enough to stay relevant.
What you’ll learn here
- How to build a neutral plan that creates safe openings.
- How to defend without “coin flipping” every time you get pressured.
- How to run offense that doesn’t die to one wrong guess.
- How to use tag/assist options to create advantage instead of chaos.
- A practice routine that improves execution and decision-making.
What you won’t see here
- “Top 5 characters” lists (these age badly).
- Patch-specific combo routes that only work in one version.
- Matchup charts with zero context.
- Advice that assumes you have perfect reactions or perfect internet.
If you want official game details, patch notes, or system explanations, keep Riot’s official hub bookmarked: 2XKO Official Site. For terminology you’ll hear in streams and guides, two “evergreen” resources are: The Fighting Game Glossary (Infil) and Dustloop General Strategies.
2) How strong players think: the “decision stack”
New players usually ask: “What combo should I learn?” Strong players ask: “What decision do I want to force, and what do I get if I’m right?”
Think of every moment as a stack of decisions:
- Space: Where are we standing, and what options reach from here?
- Time: Who can act first? Who is recovering? Who is ready to assist/tag?
- Risk: What happens if I’m wrong—do I lose a little or lose the round?
- Reward: What do I gain—small poke, pressure, knockdown, tag conversion?
- Information: What has my opponent shown me in the last 30 seconds?
The #1 timeless skill: trade “random” for “repeatable”
If your wins come from unpredictable scrambles, you’ll plateau fast. Why? Because scrambles don’t scale—you can’t reliably recreate them under stress. Repeatable wins come from repeatable advantages: spacing, safe pressure, and consistent confirms.
A strong player’s goal is not “press more buttons.” It’s to create situations where: their worst outcome is small and their best outcome is huge. In a team-based fighter, this matters even more because one clean opening can snowball into tag pressure, assist coverage, and another knockdown.
“Plan A / Plan B / Plan C” (the universal gameplan template)
| Plan | When you use it | What it tries to achieve |
|---|---|---|
| Plan A | Neutral is stable | Safe pokes → confirm → pressure → knockdown |
| Plan B | You’re losing neutral | Slow it down: better spacing, safer checks, bait approaches |
| Plan C | You’re pressured / knocked down | Survive: block, escape smart, reset to neutral with minimal damage |
Your job is to refine these plans until they feel automatic. That’s what “fundamentals” really means: you execute good decisions without needing perfect focus every second.
3) Neutral for 2XKO: space, time, and risk
Neutral is the phase where neither player has a guaranteed advantage. It’s not “standing still.” It’s the constant fight to control space and timing while staying safe enough to not hand away free damage.
In 2XKO, neutral is extra interesting because tag/assist mechanics can change what “safe” looks like. A move that would be punishable in a solo fighter might become safe if covered by an assist. That means your neutral goal is often: force contact on your terms, with coverage.
Neutral is built from 4 tools
- Movement: walking, dashing, jumps, short hops (if applicable), micro-steps.
- Buttons: pokes, long-range checks, fast interrupts.
- Threats: throws, overhead/low threats, whiff punishes, callouts.
- Coverage: assists, tag movement, spacing that makes retaliation hard.
The “three questions” that win neutral
Ask these constantly:
- What range is my opponent trying to play at? (Close scramble? Mid-range pokes? Full screen?)
- What do they do when they feel uncomfortable? (Jump? Dash? Call assist? Swing a big button?)
- What do they do after they touch my block? (Throw? Back off? Re-press? Tag?)
If you can answer these, neutral stops being chaos and starts being prediction with evidence.
Spacing fundamentals you can train today
Most players mis-space because they don’t use “spacing checkpoints.” Use these three:
- Outside their best poke: you can bait whiffs and punish.
- Inside your best poke: you can check movement and start pressure.
- Assist-ready range: where your assist can cover your approach or your retreat.
Don’t guess these distances. Go into training mode and learn them visually. Stand at a range, press the poke, look at the character’s feet relative to stage markings. Create a mental “map” so you know where you are without thinking.
Risk management: stop donating full combos
Here is a painful truth: many players don’t lose because the opponent is “better.” They lose because they choose high-risk options too often.
A simple neutral upgrade is to split your moves into three categories:
- Safe checks: low-risk pokes, movement feints, quick buttons to stop dashes.
- Commitments: bigger moves that win harder but can be punished if wrong.
- Hard reads: expensive callouts used rarely, when you have evidence.
A timeless rule: start the round with safe checks. Earn the right to commit. If you open every round with “hard read,” you’ll look brilliant sometimes—but you’ll also lose quickly and never learn.
4) Anti-air and “stop the skip” fundamentals
In every fighting game era, there’s a version of the same problem: players want to avoid neutral by using an approach that “skips” the hard part. It might be a jump-in, a fast dash, a long-range special, or an assist-covered entry.
Your timeless counter is the same: build a wall.
Anti-air is not one button—it’s a system
Good anti-air comes from:
- Positioning: standing at ranges where jump arcs are easier to hit.
- Readiness: expecting the jump based on opponent habits.
- Simple response: one or two consistent anti-air options.
Beginners fail anti-air because they want to “react” to everything. Instead, learn to “predict with proof.” If your opponent has jumped three times to escape pressure, you are not guessing anymore—you’re responding to a pattern.
A practical drill: “two jumps per round”
In your next 20 matches, set a micro-goal: anti-air at least two jumps per round. If you miss it, you don’t get to blame matchups, teammates, or lag. You focus on the skill you chose to build.
Over time, opponents will stop jumping as freely, which automatically improves your neutral— because now they have to walk into your space, where your pokes and assists matter.
Stop panic dashes with “checks”
Many players dash when they feel behind. Your answer is a fast check: a quick button or movement + button that tags the dash start.
The timeless concept is simple: if an approach is fast, your answer must be ready before it happens. That doesn’t mean “always mash.” It means you hold a default stance where your fastest check is available, and you only switch gears when the opponent proves they’ll respect it.
5) Defense that wins: blocking, patience, and exits
Defense is where most players leak points. Not because they never block, but because they treat defense like a lottery: “maybe I’ll guess right and escape.”
Great defenders use a layered approach: block first, gather info, then escape with intent.
The “defensive priority ladder”
When you’re under pressure, your priorities should look like this:
- Don’t get hit. Blocking is success. Surviving is success.
- Identify the threat. Are they representing throw? overhead? stagger pressure?
- Reduce damage when wrong. Choose options that don’t lose the round instantly.
- Exit at the right moment. Escape when you see a gap, not because you feel nervous.
If you reverse these priorities (“escape first, think later”), you’ll get opened up constantly.
Three timeless defensive mistakes
- Mashing at random: You press because you’re scared, not because you saw a gap.
- Jumping to escape: You “feel trapped,” so you jump—then get anti-aired into pressure again.
- Overusing invulnerable options: The opponent baits it once and you lose momentum (or worse).
Defense as a decision tree (simple version)
Use this tree:
- Step 1: Block and watch. Count their rhythm: fast-fast-pause? fast-pause-throw?
- Step 2: If they stagger (leave gaps), challenge with your fastest interrupt once.
- Step 3: If they throw often, be ready to tech or backdash (if your gameplan supports it).
- Step 4: If they commit to long strings, look for the end—then reset to neutral.
Your goal is not “escape every time.” Your goal is: make the opponent work harder to open you up than it’s worth. When their offense feels “expensive,” they start taking risks—and that’s where you win.
Don’t defend alone: use team resources intelligently
In a team-based fighter, you often have more resources than you realize: assists, tag options, and spacing resets can all change defensive outcomes. The timeless principle is: spend your team resources to avoid worst-case damage, not to avoid small discomfort.
If you burn everything the moment you feel pressured, you’ll have nothing left when the truly dangerous moment arrives.
6) Pressure and turn-taking: make your offense safe
Offense in fighting games is turn-based—even if it doesn’t look like it. When you press a button, you spend time. If you’re safe demonstrating pressure, you keep your turn. If you’re unsafe, the opponent takes it back.
“Frame data” is the language used to describe this turn-taking: how long moves take, and who recovers first. If you want a clear, evergreen explanation, Infil’s glossary and Dustloop’s frame data pages are the classics: Frame Data (Infil), Using Frame Data (Dustloop).
Two kinds of pressure: “honest” and “supported”
In a team fighter, your pressure can be:
- Honest pressure: safe strings, plus frames, spacing traps, throws—no external help needed.
- Supported pressure: pressure that becomes safe or extended because an assist covers you.
You want both. Honest pressure keeps you stable when your resources are unavailable. Supported pressure is how you create explosive momentum swings.
A timeless pressure recipe (beginner-proof)
Use this sequence template:
- Start with a safe starter. Something quick and hard to punish.
- Show a strike. Make them want to block.
- Threaten throw. If they block too long, make them pay.
- Back off safely. Reset to neutral if you don’t get the opening.
The key is that you don’t force the opening at step 2 or 3. You apply pressure, gather info, and only commit when you have a reason.
Hit confirms: the “real” execution skill
Beginners practice combos. Strong players practice confirms. A confirm is converting a hit into advantage reliably—whether that means damage, knockdown, or a safe tag situation.
A timeless way to build confirms:
- Pick one bread-and-butter confirm from a common poke.
- Practice it from both sides until it’s boring.
- Then practice it after movement (dash in, micro-walk, jump-in) so it works in real matches.
If you only learn “max damage lab combos,” your match damage will stay low. If you learn confirms, your match damage climbs immediately.
7) Knockdowns and okizeme: win the next moment
Many players treat a knockdown as the end of a combo. It’s not. A knockdown is a setup opportunity—a chance to control what happens next.
“Okizeme” (often shortened to “oki”) refers to wake-up offense: what you do as the opponent rises. If you want the evergreen definition and examples, see: Okizeme (Infil) and Okizeme Strategy (Dustloop).
The timeless oki goal: cover options, not guesses
The strongest wake-up plans don’t rely on guessing what the opponent does. They rely on coverage:
- Meaty timing: your attack hits as they become vulnerable.
- Safe spacing: you stand where certain wake-up options whiff or become punishable.
- Layered threats: if they block, you throw; if they swing, they get counter-hit; if they jump, you anti-air.
Your first oki plan should be simple: one meaty option and one throw option. Your second oki plan adds a bait (step back) for opponents who panic reversal. That’s enough to win a lot of games.
Okizeme is also defensive: don’t lose after you land a hit
A classic beginner mistake is getting a knockdown, then overextending and giving the opponent a free escape. Timeless fix: after your oki attempt, be ready to return to neutral.
Think in two beats:
- Beat 1: Apply oki with coverage.
- Beat 2: If you don’t open them, reset safely and keep your space.
This makes your offense feel “inevitable,” because you aren’t gambling everything on one moment.
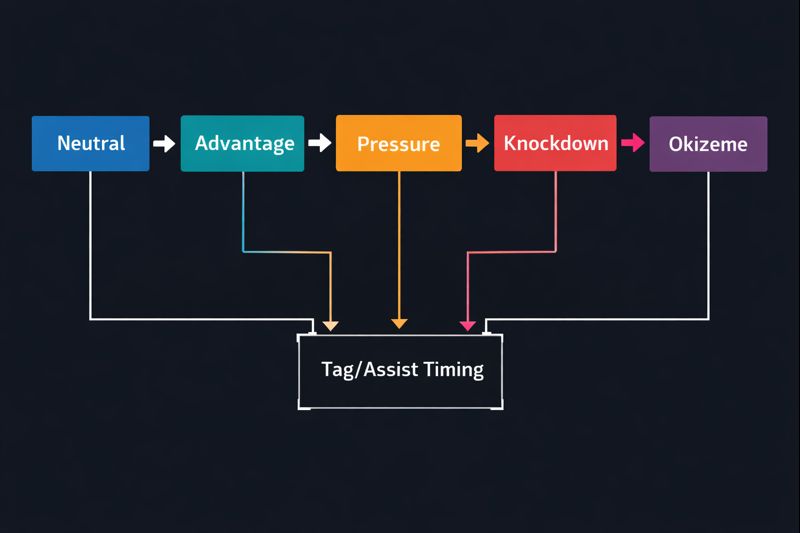
8) Tag & assist teamplay: timing, roles, and safety
Team mechanics are where 2XKO becomes its own game. You can win neutral, win pressure, or win defense using tag/assist timing—not just raw buttons.
Even if specific system names evolve over time, the fundamentals of teamplay remain the same. Here are the evergreen principles that apply to almost every tag-based fighter.
Principle 1: Don’t call assist “because you can”
Treat assists like resources with two jobs:
- Cover a commitment (approach, big poke, pressure reset).
- Extend a win (confirm into better damage, tag safety, or knockdown).
If you call assists randomly, you’ll often create two problems: you become predictable, and you lose access to your best coverage when you truly need it.
Principle 2: “Safe tag” is the difference between climbing and stalling
Tagging is powerful, but unsafe tags can donate momentum. Timeless safe-tag concept: tag when something is covering you—a knockdown, an assist hit/block, or a situation where the opponent must respect.
If you tag raw in neutral, you’re often betting that the opponent won’t respond correctly. That’s not a plan. A plan is: “I will tag after I force block with coverage.”
Principle 3: Roles simplify decisions
Many players lose team fights because they haven’t decided who does what. Give each character a role based on your comfort and their toolkit:
- Opener: starts rounds, plays neutral, creates first touch.
- Pressure engine: excels at safe offense and repeated turns.
- Converter: turns hits into damage or knockdowns consistently.
- Stabilizer: helps you recover when behind (defense, space control, safe resets).
Your team doesn’t need all roles perfectly. But it needs clarity. When you know your opener’s job is “get the first clean touch,” you stop forcing risky situations with the wrong character.
Principle 4: Build “assist habits” you can explain
A simple way to improve teamplay quickly is to create two assist habits:
- Neutral habit: “When I reach mid-range, I call assist and take space.”
- Pressure habit: “When I get block contact, I call assist to extend safely.”
You can refine later. The key is starting with a repeatable pattern. Random assist calls are hard to improve because you don’t know what you’re trying to do.
9) Team building: choosing partners that actually help
“Pick two characters you like” is fine advice for day one. But if you want long-term improvement, you should choose teams that support your learning: teams that make your neutral clearer, your defense safer, and your confirms more consistent.
The timeless synergy checklist
When evaluating a team, ask:
- Do I have a reliable way to start pressure? (safe entry, good poke, or coverage assist)
- Do I have a reliable way to keep pressure safe? (assist that covers gaps, safe reset tool)
- Do I have a reliable way to convert hits? (easy confirm paths, stable knockdown routes)
- Do I have a “panic plan” when behind? (space control, defensive options, stable neutral)
Common team-building traps
- Two “commitment” characters: both need hard reads to start offense, so you lose neutral often.
- No coverage: your approach always risks getting stuffed because you can’t protect it.
- Lab-only conversions: your damage exists only in training mode, not in matches.
A timeless team-building approach for real players
If you want a practical method:
- Pick one character you love and will stick with.
- Choose a partner whose assist helps your biggest weakness (neutral entry, pressure safety, or defense).
- Learn two conversions: one simple confirm, one knockdown route.
- Play 50 matches before changing anything.
Consistency beats constant switching. Team mastery is partly muscle memory and partly decision memory. Both require repetition.
10) A timeless training plan (beginner → intermediate)
The best training plan is the one you can repeat. Here’s a structure that works even if you only have 30 minutes a day. Adjust the time, but keep the order.
30-minute daily session
- 5 minutes — warm-up: movement, basic inputs, both sides of the screen.
- 10 minutes — confirms: one bread-and-butter confirm you’ll actually use.
- 5 minutes — defense: block practice and one escape option timing.
- 10 minutes — matches or replay review: apply the day’s focus.
Weekly focus rotation (simple and effective)
| Day | Focus | Goal |
|---|---|---|
| Mon | Neutral checks | Stop dashes/jumps with one consistent tool |
| Tue | Hit confirms | Convert 70% of clean hits into advantage |
| Wed | Pressure safety | End strings safely instead of gambling |
| Thu | Defense patience | Block longer; escape only on real gaps |
| Fri | Assist discipline | Use assists for coverage, not randomness |
| Sat | Replay review | Find the top 1 mistake and fix it next week |
| Sun | Free play | Play for fun and reinforce habits |
Three evergreen drills that change your gameplay fast
Drill A: “Whiff punish awareness”
Pick one poke you use in neutral. Practice walking in and out of its range. Your goal is to make the poke barely whiff, then punish with a simple confirm. This teaches spacing and patience.
Drill B: “Anti-air autopilot”
Set the training dummy to jump at random intervals (if your training mode supports it). Use the same anti-air response every time. The goal is not flash—it’s consistency.
Drill C: “Pressure exit”
Practice a short blockstring that ends safely. Then practice two variations: one that ends early, and one that adds a throw attempt. This builds a simple strike/throw structure without becoming predictable.
If you do only these three drills for two weeks, you will feel your neutral stabilize, your defense improve, and your offense become less “hope-based.”
11) Match review checklist: fix the right problems
Replay review is the fastest improvement tool most players refuse to use. You don’t need hours. You need one honest question: “Why did I get hit?”
The 10-question checklist
- Did I lose neutral because of spacing or because of impatience?
- Did I get hit trying to start offense unsafely?
- Did I fail to anti-air a predictable jump?
- Did I mash when I should have blocked?
- Did I block correctly but fail to exit when it was safe?
- Did I drop confirms because of execution or because I wasn’t ready?
- Did my assist calls have a purpose?
- Did I tag safely, or did I donate momentum?
- Did I adapt after seeing a pattern, or repeat the same mistake?
- What is the single easiest change that would have won one more interaction?
Don’t try to fix five things at once. Fix one. Improvement is compounding: one better decision repeated 50 times becomes a rank difference.
12) Ranked mindset: consistency beats “peak”
Ranked feels emotional because it compresses your performance into a number. But improvement is not linear. You will have sessions where you play better and lose, and sessions where you play worse and win.
The timeless ranked mindset is: measure yourself by decisions, not by points.
Three rules that prevent tilt spirals
- Stop after two “angry losses.” If your hands are tense, you’re not learning.
- Play in sets. Treat ranked like first-to-3 practice, not endless gambling.
- Keep one focus goal. If today’s goal is “anti-air,” you win even if you lose the match.
What “good improvement” looks like
If you’re improving, you’ll notice:
- You get opened up less by the same trick.
- You convert more hits into knockdowns or safe pressure.
- You lose rounds “closer,” because you stop donating huge damage.
- You can explain why you lost without blaming randomness.
That’s real progress. Rank will follow.
13) Getting help faster: coaching, duo practice, and support
Some players love the solo grind. Others prefer feedback and structure. If you want to shorten the learning curve, the fastest path is usually: someone experienced identifies your biggest leak and gives you a drill.
If you’re looking for hands-on improvement support (structured practice, duo sessions, or rank progression help), you can check Boosteria’s 2XKO options here: https://boosteria.org/2xko-boosting/prices.
Whatever route you choose—self-study, practice partner, coaching, or structured services—use this guide as your foundation. Fundamentals are what make any help “stick,” because you understand why a solution works, not just what to do.
14) FAQ
Do I need to memorize frame data to improve?
No. You need a basic understanding of “who recovers first” and which of your tools are safe. Start with practical knowledge: one safe pressure ender, one punish starter, one consistent interrupt. Over time, you’ll naturally learn more specifics.
What’s the fastest way to get better at neutral?
Stop trying to “win immediately.” Build a stable neutral around safe checks, anti-air consistency, and punishing obvious commitments. Neutral improves fastest when you reduce your own risk.
How many characters should I learn?
Two—your team. If you constantly switch, you reset your decision memory. Stick with one team long enough to build real habits, then experiment later.
How do I deal with players who feel “random”?
“Random” usually means: they repeat risky approaches and you aren’t punishing them consistently. Your fix is boring but effective: anti-air more, check dashes more, block more, and punish unsafe moves. When you remove their free wins, they stop feeling random.
What should I focus on first as a complete beginner?
(1) movement comfort, (2) one simple confirm, (3) anti-air consistency, (4) blocking longer than you want to. Those four skills alone can carry you far.
Final note: fundamentals are forever
The meta will change. New characters will arrive. Balance will evolve. But the player who controls space, defends intelligently, uses team resources with purpose, and practices with structure will always climb.
If you want, copy this guide into WordPress, then later expand it with a few “evergreen companion posts” like: “How to Review Replays,” “Neutral Drills for Beginners,” and “Assist Timing Patterns.” Those interlink well and keep traffic steady over time.