Dota 2 Lane Fundamentals: Equilibrium, Trading & Pulls
Dota 2 — Lane Fundamentals: Equilibrium, Trading, and When to Pull
Laning in Dota 2 looks chaotic, but the best players repeat a small set of rules with near-perfect discipline: keep the wave where you want it, trade when the map says it’s efficient, and use pulls (and stacks) as a reset button—not as a habit.
This guide is designed to be timeless. Patch details change (damage numbers, camp boxes, specific meta heroes), but the underlying logic of equilibrium, creep behavior, and resource trading stays the same. If you master these fundamentals, you can lane confidently in any patch, in any bracket, with almost any hero.
Trusted references and tools you can explore alongside this guide: Dota 2 (official), Liquipedia, Dotabuff, OpenDota.
If you want your fundamentals applied by high-MMR players (or you want to climb faster with structured coaching/boosting), you can check Dota 2 options here: Boosteria Dota 2 Boosting Prices.
Table of Contents
- What “Winning Lane” Actually Means
- Lane Equilibrium: The Core Concept
- Creep Behavior: Aggro, Focus, and Why Waves Move
- Last-Hitting Under Pressure (Without Losing the Wave)
- Trading Fundamentals: Damage, Resources, and Tempo
- Role Checklists: Carry, Support, Offlane, Mid
- Pulling Basics: What Pulls Do and When They Backfire
- Pull Timing and Patterns: Single, Half, and Stacked Pulls
- How to Contest Pulls and Punish Bad Pulls
- Lane Reset Toolkit: Fixing a Bad Wave
- Reading Matchups: Who Should Trade, Who Should Farm
- Common Laning Mistakes (and the Fix)
- Practice Drills: 15 Minutes a Day to Sharpen Laning
- FAQ
- Quick Summary Cheat Sheet
1) What “Winning Lane” Actually Means
Most players define winning lane as “getting kills” or “having more last hits.” Those are outcomes—not the skill. The real skill is controlling the lane so that your hero gains more reliable value per minute than the enemy. Value includes:
- Gold (last hits, denies indirectly, camps from pulls, bounty control)
- Experience (staying in range, denying enemy range creeps, forcing them out)
- Health/Mana resources (trading efficiently so the opponent must spend more regen)
- Tempo (forcing the opponent to respond—TP, salves, rotations, defensive posture)
- Wave position (equilibrium, lane safety, access to pulls/stacks)
You can “win” lane without a single kill if you: (1) keep the wave in a safe spot, (2) secure your key level timings, (3) drain enemy regen, and (4) deny their ability to pressure your tower or invade your jungle.
A timeless goal: Stabilize your lane, then squeeze theirs. Stabilize means you can last-hit without dying. Squeeze means the enemy must choose between missing creeps and taking bad trades.
2) Lane Equilibrium: The Core Concept
Lane equilibrium is where the creep waves meet, and whether that meeting point stays stable. Most of the lane is decided by this one detail because it determines:
- How exposed your core is to ganks and long chases
- How easy last hits and denies are
- Whether supports can trade without tanking full creep waves
- Whether pulls are available and safe
- Whether kills are realistic or only “hope kills”
2.1 The “Safe Equilibrium” Zone
In side lanes, the safest equilibrium for your core is usually: closer to your tower, but not under it. Under tower, last hits become harder, and your support becomes busy “fixing” the wave instead of trading or stacking.
Think in zones:
- Under your tower: safer, but can damage last-hit rhythm and often rebounds into a push.
- In front of your tower: ideal for stable farming and denying enemy aggression.
- Middle of lane: neutral risk, often dictated by matchup strength.
- Near enemy tower: dangerous unless you are stronger, have vision, and can punish.
2.2 What Actually Moves a Wave
The wave shifts when one side’s creeps die faster. Causes:
- One side is auto-attacking creeps (especially supports “helping” too much).
- Spells used on the wave (even “accidentally”).
- Denies changing how long a wave lasts.
- A pull removing creeps from lane.
- Dragging aggro to change which creeps hit which targets.
Timeless rule: Every extra hit you do to creeps is a vote to push the lane. Push intentionally—never by accident.
2.3 The Range Creep Rule
The ranged creep contributes significant damage to the wave and is also a major chunk of lane experience. When you want to stabilize the lane:
- Prioritize securing your ranged creep last hit.
- Deny enemy ranged creep if possible.
- Be careful using AoE spells that accidentally kill ranged creeps and cause wave swings.
If you remember only one thing about equilibrium: control ranged creeps and avoid “free pushing.”
3) Creep Behavior: Aggro, Focus, and Why Waves Move
You don’t need to memorize hidden numbers to use creep behavior. You need the practical uses: protect yourself while trading and pull creeps to fix equilibrium.
3.1 Creep Aggro as a Defensive Tool
When enemy creeps switch to hit you, your harassment becomes expensive because the wave amplifies damage. Good laners avoid “standing inside the enemy wave” while hitting heroes.
Use this awareness in trades:
- Take quick hits from the side, then step out so creeps retarget.
- Don’t commit deep into the wave unless you’re forcing a kill.
- Use terrain and fog edges to break follow-up damage.
3.2 Aggro as a Wave Control Tool 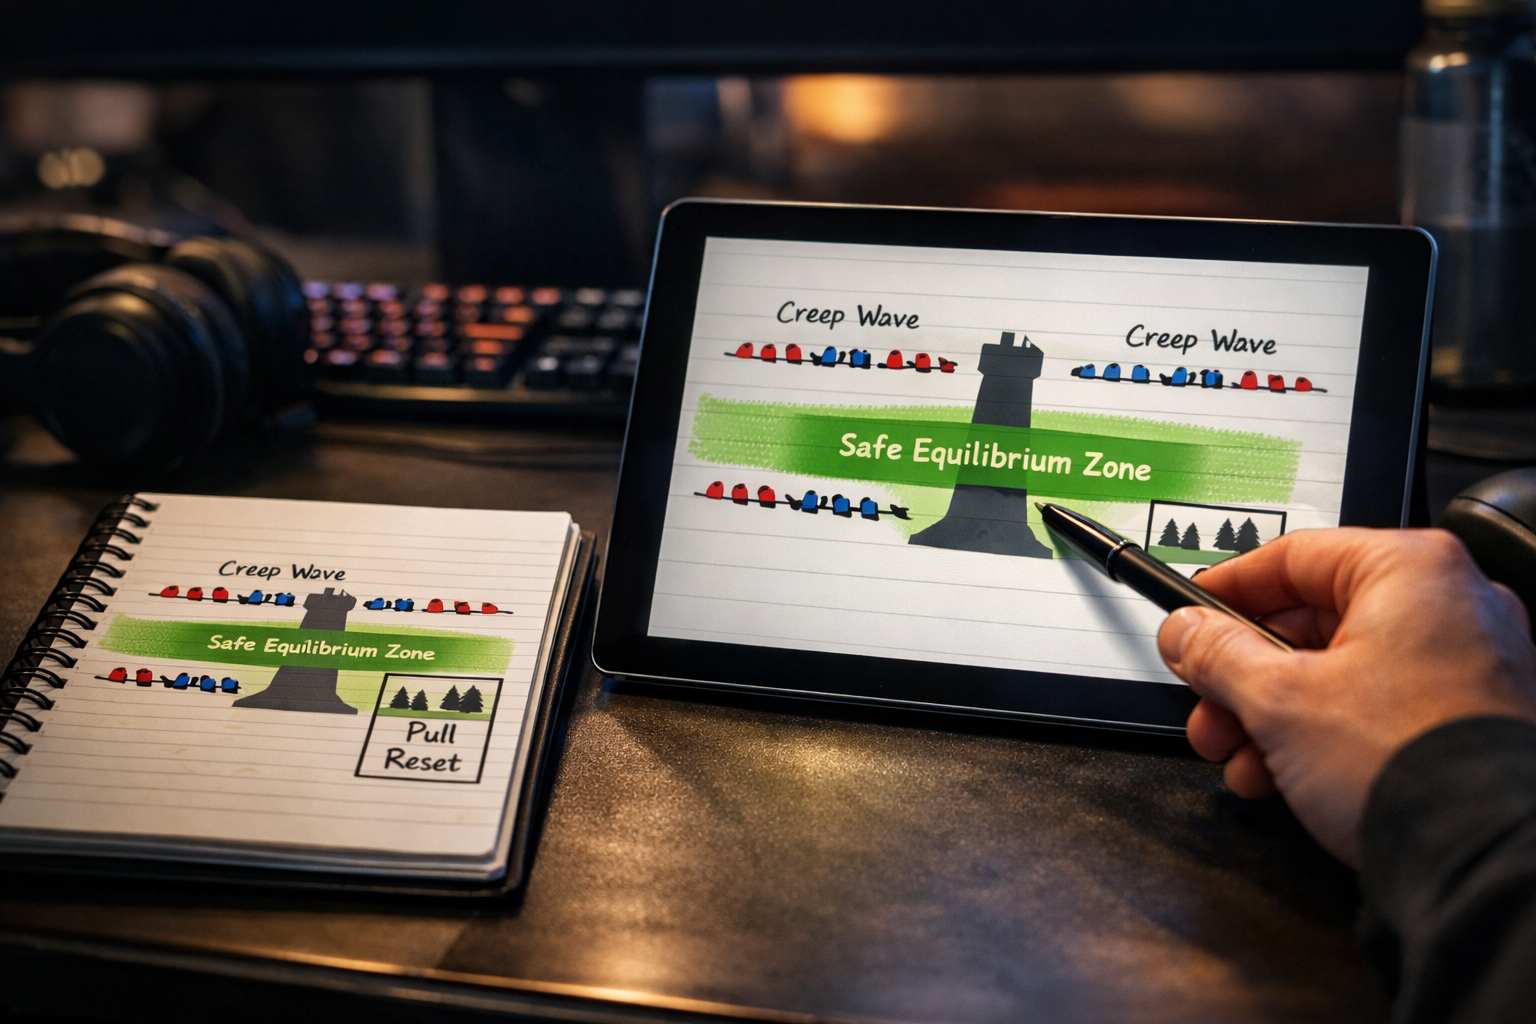
You can intentionally cause enemy creeps to walk toward you, which helps keep the wave closer to your side. The concept is simple: Make enemy creeps take a few steps toward you, so the meeting point drifts back.
Practical applications:
- Fix a slightly pushed lane: pull enemy creeps closer to your ranged creep so their wave advances less.
- Protect your carry: if the carry is weak, you can help by keeping the wave closer without pushing it under tower.
- Set up denies: repositioning creeps can create better deny opportunities.
3.3 Drawing Aggro Without Ruining Last Hits
The biggest mistake is “aggroing” and then losing your own last hits because you dragged creeps too far or too often. Use aggro in small doses:
- One short pull of creeps, then let them settle.
- Don’t drag them into tower unless you want to reset and are confident in tower last-hitting.
- Coordinate with your core: they should know you are “holding” the wave, not pushing it.
4) Last-Hitting Under Pressure (Without Losing the Wave)
Last-hitting is not just mechanics—it’s decision-making under pressure. The best laners prioritize secure gold while keeping the lane where it benefits them.
4.1 The “Don’t Auto-Attack” Discipline
If you auto-attack creeps repeatedly, you will push the wave. Pushing might be fine if you can: (1) dive, (2) hit tower, or (3) rotate quickly. If not, pushing only increases your risk.
A simple habit that scales forever: only hit creeps to last-hit or deny unless you are intentionally pushing.
4.2 Farming While Being Harassed
When supports harass you, you have two options: fight back or minimize damage. Minimizing damage is often better than “winning the trade” if it keeps your CS stable.
- Stand where the enemy must choose: hit you or secure last hits.
- Use fog and trees to reduce free right-clicks.
- Don’t chase supports into their wave—your creeps will punish you.
4.3 When to Give a Creep
Timeless truth: HP is a resource, but it is not infinite. If taking a creep costs too much HP and forces an expensive regen cycle, it can be correct to give it up. This is especially true when:
- The enemy has a strong level timing (a stun + nuke combo).
- Your support is absent or pulling and you’re temporarily 1v2.
- The wave is already in a good spot and you only need to survive.
A creep you miss is a small loss. A death often flips the lane completely (wave position, XP, tower pressure).
5) Trading Fundamentals: Damage, Resources, and Tempo
“Trading” is the art of doing damage in a way that costs you less than it costs the enemy. In Dota 2, the true currency is regen and time. If you force the enemy to spend more regen, or walk back to base, you are winning—even without kills.
5.1 The 3 Questions Before Any Trade
- Wave: Do I have creep advantage or am I about to tank a wave?
- Cooldowns: Do we have spells available and are theirs on cooldown?
- Position: If this goes wrong, where do I retreat to safely?
If you can’t answer these quickly, take a smaller trade or skip it.
5.2 Short Trades vs Long Trades
Most lanes favor short trades: one or two right-clicks, a spell if it’s efficient, then reset. Short trades avoid creep damage and prevent the enemy from counter-committing.
Long trades (extended chasing) are only good when:
- You have a clear numbers advantage (2v1, strong slow, strong sustain).
- The enemy is out of position and cannot retreat safely.
- You are converting the trade into a kill or forcing them out permanently.
5.3 Trading as Support: “Make Them Pay to Touch Creeps”
Supports often waste their lane by only pulling or only “clicking heroes” without a plan. The highest-value harassment is targeted:
- Hit the enemy when they step forward for a last hit.
- Force them to choose between taking damage and getting gold.
- Chain small wins until they burn regen or must retreat.
Great supports think in patterns: harass → secure ranged creep → reset wave → harass again.
5.4 Trading as Core: Keep Your HP Above “All-in Threshold”
Many core players lose lanes not because they miss last hits, but because they allow their HP to drop into a threshold where the enemy can all-in with spells.
A timeless lane discipline: Stay above the enemy’s “combo kill range.” If you don’t know that range, assume it’s higher than you think.
5.5 Regen Economics: Win the Lane at the Shop
Buying regen is not shameful. It’s how you keep your lane stable. If you are low HP and trying to “save gold,” you’re often actually losing gold by missing creeps or dying.
The best laners spend regen proactively:
- Use small regen early to stay in lane and protect equilibrium.
- Don’t wait until you’re one spell away from death.
- Recognize when you must reset (walk back, TP, or ask for help).
6) Role Checklists: Carry, Support, Offlane, Mid
Fundamentals are universal, but the “correct” decision depends on your role and your lane’s win condition. Use these checklists as a pre-lane plan.
6.1 Safelane Carry Checklist
- Wave goal: keep equilibrium in front of your tower.
- Priority: secure ranged creep, avoid deaths, hit your first item timing.
- Trade rule: only trade if it doesn’t cost CS or push wave into danger.
- When to ask for pull: lane is pushing and you cannot walk up safely.
- When to push: you have advantage and can hit tower or rotate after shoving.
6.2 Safelane Support Checklist
- Wave job: don’t auto-attack creeps; stabilize equilibrium.
- Trade job: punish enemy steps to last hit; protect your carry’s HP.
- Vision: secure basic lane vision to prevent wraps and to see pull contests.
- Pulling: pull to reset lane when it pushes; don’t abandon carry into 1v2 danger.
- Stacking: stack when the lane is stable and your carry can farm safely.
6.3 Offlane Core Checklist
- Wave goal: deny, disrupt equilibrium, and make their carry uncomfortable.
- Priority: secure key levels and sustain; don’t over-die for “pressure.”
- Trade rule: win trades when your support is with you and creeps favor you.
- Pull defense: contest their pulls or force them to spend time protecting them.
- When to cut or drag: only if you understand the risk and it improves your lane state.
6.4 Offlane Support Checklist
- Harass: make their carry pay for every last hit.
- Block/contest pulls: prevent easy resets; punish greedy pulls with pressure.
- Wave manipulation: help create a favorable equilibrium so your offlaner can stand in lane.
- Vision: protect your offlaner from ganks, especially if you are pressuring.
6.5 Mid Checklist (Short Version)
- Equilibrium: keep wave near your ramp when possible for safety.
- Trading: focus on rune timings and resource efficiency.
- Wave control: shove when you want to secure runes or rotate; don’t shove “by accident.”
For stats and replay-based improvement, Dotabuff and OpenDota are excellent tools: Dotabuff, OpenDota.
7) Pulling Basics: What Pulls Do and When They Backfire
Pulling is one of the most misunderstood mechanics in Dota 2. Many supports pull because “it’s time to pull,” not because the lane state demands it.
A pull is a tool that can do four valuable things:
- Reset equilibrium (bring the lane back toward your tower).
- Deny lane creeps (enemy misses XP/gold if your creeps die to neutrals).
- Create safe farm for your core (lane becomes less exposed).
- Generate extra resources (camp gold/XP, especially if stacked).
But pulls have risks:
- Abandoning your core into a temporary 1v2 where they can be bullied or killed.
- Breaking equilibrium the wrong way (accidentally pushing after the pull ends).
- Feeding neutrals to the enemy if they contest and steal last hits.
- Losing lane pressure because you’re in the jungle while the enemy trades freely.
7.1 The Only “Real” Reason to Pull
The timeless reason to pull is simple: the lane is pushing away from your tower and you need to reset it.
Secondary reasons (only if safe):
- Deny a big wave when your core can’t approach it safely.
- Connect a stacked camp to fully reset and generate resources.
- Force enemy supports to respond (creating space elsewhere).
7.2 “Bad Pull” Warning Signs
- Your core is low HP and would die 1v2 if you leave.
- The enemy lane is strong and ready to dive.
- The wave is already in a safe spot (no reset needed).
- Your pull will likely be contested and you can’t defend it.
If you pull in these situations, you often gift the enemy what they want: a free window to pressure your core.
8) Pull Timing and Patterns: Single, Half, and Stacked Pulls
Exact seconds can vary across map versions, but the concept stays stable: you pull by drawing a neutral camp’s attention so that your lane creeps fight neutrals instead of marching forward.
8.1 Single Pull: The Basic Reset
A single pull is the standard reset when the lane is pushing. Best case outcomes:
- Your lane creeps die to neutrals → enemy misses XP.
- The next enemy wave meets closer to your tower.
- Your core gets a safer lane for the next minute.
The problem: a single pull can sometimes “bounce” the lane (after the pull ends, your wave may return bigger and push again). That’s why experienced supports learn to combine pulls with denies, partial pulls, or stacking.
8.2 Half Pull (Partial Pull): Small Adjustment, Less Risk
A half pull is when only part of your wave gets pulled (often just the ranged creep or a couple of creeps). Why it’s valuable:
- It nudges equilibrium without completely abandoning the lane.
- It’s harder for the enemy to punish your core because your wave is still partly present.
- It reduces the “bounce” effect compared to a full pull.
The goal is not perfection; the goal is control. Small corrections repeated often are safer than big resets that can be punished.
8.3 Stacked Pull: The Clean Reset + Economy Boost
Pulling into a stacked camp is one of the highest-value support plays in lane because it:
- Denies more of your wave (bigger neutral damage).
- Resets equilibrium more reliably.
- Gives your lane more gold/XP if you last-hit neutrals properly.
The risk is also higher: the enemy is more likely to contest a stacked pull because it’s worth more. If you can’t defend it, stacking may turn into “donating a camp.”
8.4 Pull + Connect (Chaining Camps)
In some lane states, you can connect creeps from one camp to another to deny even more creeps and fully reset. The timeless principle: the more of your wave dies outside lane, the harder you reset the lane.
9) How to Contest Pulls and Punish Bad Pulls
If the enemy support pulls, you have two broad responses: contest the pull or punish the lane. Which is correct depends on safety and timing.
9.1 Contesting a Pull
Contesting means you try to:
- Stop the pull from happening (interrupt, body-block, force them away).
- Steal last hits from neutrals (deny them economy and reset).
- Drag creeps back into lane (prevent the equilibrium reset).
Contest when:
- Your lane can safely move into the jungle area.
- You have spells or numbers to win a small skirmish.
- The enemy core cannot punish your core during the move.
9.2 Punishing a Pull (Often the Better Option)
If the enemy support leaves lane to pull, the lane can become temporarily 2v1 in your favor. Punish by:
- Trading aggressively onto the enemy core (drain regen or force them out).
- Denying creeps and controlling the wave so they return to a worse lane.
- Threatening a kill if your heroes can chain disables/slow.
Timeless rule: Don’t chase the support if the core is free. A support you hit once is fine; a core you force to miss a full wave is a lane win.
9.3 The “Bad Pull” Punish Window
The most punishable pulls happen when:
- The pulling support cannot defend the camp and will lose the contest.
- The enemy core is weak alone and will be zoned or killed.
- The pull happens when the wave is already stable (so they abandoned lane for no reason).
10) Lane Reset Toolkit: Fixing a Bad Wave
Even perfect laners get bad waves. A spell hits the wave, a fight spills into creeps, or a catapult wave changes pace. The difference is that good players know how to reset quickly and safely.
10.1 If the Wave Is Pushing Away From You
- Option A: Pull to reset (if your core is safe).
- Option B: Aggro drag to bring creeps back (small correction).
- Option C: Deny more aggressively to reduce your wave size.
- Option D: If you are strong, shove the wave fully and do something with the shove (tower damage, rune, stack, rotate).
10.2 If the Wave Is Under Your Tower
Under tower waves often “bounce” back into pushing. Your objective is to:
- Secure last hits cleanly (don’t panic-click and push harder).
- Keep your next wave from becoming too large (deny, avoid extra AoE).
- Consider a small pull/half pull after the tower clears to prevent rebound pushing.
10.3 If You’re Getting Zoned Off the Wave
If your core cannot safely approach creeps:
- Use pulls to bring the wave back.
- Bring regen so the core can stand lane longer.
- Adjust positioning and vision so harassment is not “free.”
- Sometimes, you must call for a rotation or change lanes—dying repeatedly is never the fix.
11) Reading Matchups: Who Should Trade, Who Should Farm
Matchups decide what “correct” looks like. Two lanes can follow the same fundamentals and still play differently. Instead of memorizing hero lists, learn the timeless categories:
11.1 Sustain Lanes vs Burst Lanes
- Sustain lanes want many small trades over time (chip damage, regen advantage).
- Burst lanes want specific moments (level spikes, cooldown windows) to all-in.
If you’re against burst: keep HP high and don’t “walk into combo range.” If you’re against sustain: prevent free hits and avoid long, losing trades.
11.2 Range Advantage vs Melee Advantage
Range often controls the first minutes, but melee heroes can win lanes by:
- Holding wave near tower.
- Choosing moments to commit when creeps favor them.
- Using supports to protect the approach.
11.3 Kill Lanes vs Farm Lanes
A kill lane should play for: positioning + cooldown windows. A farm lane should play for: equilibrium + efficiency.
If you are a farm lane trying to “out-fight” a kill lane, you usually lose. If you are a kill lane that never pressures, you waste your advantage.
12) Common Laning Mistakes (and the Fix)
12.1 Supports Auto-Attack the Wave
This pushes equilibrium into danger and forces unnecessary pulls. Fix: only hit creeps for last hits, denies, or intentional shoves.
12.2 Pulling on Autopilot
Pulling when the wave is already stable often creates a punish window. Fix: pull only to reset a pushing lane or to deny a dangerous wave.
12.3 Trading Inside Enemy Creeps
Your “harass” becomes self-damage. Fix: trade from angles; take short hits; step out to drop creep focus.
12.4 Chasing the Wrong Target
Hitting the tanky offlaner while the support free-casts is common. Fix: identify the weak link and punish the hero who must step up to secure creeps.
12.5 Ignoring the Ranged Creep
Missing ranged creeps loses XP and shifts waves. Fix: prioritize ranged creep last hits and denies.
12.6 Not Respecting Level Timings
Many lanes flip at level 2/3/5/6 depending on heroes. Fix: track your lane’s spike and theirs; play safe when they spike first.
13) Practice Drills: 15 Minutes a Day to Sharpen Laning
Fundamentals improve fastest with short, repeatable drills. You don’t need marathon sessions—just consistency.
13.1 Equilibrium Drill (Solo Lobby)
- Enter a solo lobby with no bots.
- Practice keeping the wave in front of your tower for 5 minutes.
- Rule: do not auto-attack creeps except to last-hit/deny.
- Reset the wave if it drifts: use small aggro drags, not random pushing.
Goal: you should be able to “hold” the wave without thinking.
13.2 Trading Drill (Focus on Short Trades)
- Pick a support and a core hero you play often.
- In real games, commit to only short trades for one week (1–2 hits then reset).
- Track how often you tank a full creep wave while trading. Reduce it daily.
13.3 Pull Decision Drill
For each pull attempt, ask: “Is the lane pushing away from us, and is my core safe if I leave?” If either answer is no, don’t pull.
13.4 Replay Review Checklist (10 Minutes)
- Where was equilibrium at minute 1, 3, 5?
- Did we pull because we needed a reset—or because it felt routine?
- How much regen did each side spend by minute 5?
- Did we miss ranged creeps? Why?
- Did we punish enemy pulls by pressuring core or contesting?
If you want deeper performance tracking, browse match data and lane stats on OpenDota or Dotabuff.
14) FAQ
14.1 What is lane equilibrium in Dota 2?
Lane equilibrium is where your creep wave meets the enemy wave and how stable that meeting point stays. Holding it closer to your tower (but not under it) generally makes last-hitting safer and reduces enemy pressure.
14.2 When should I pull as a support?
Pull when the lane is pushing away from your tower and you need to reset the meeting point. Pulling is strongest when your core is safe alone and you can defend the pull from being contested.
14.3 How do I win trades without forcing kills?
Win trades by taking short, efficient hits when you have creep advantage and good positioning. Stop trading as soon as it becomes negative, and use regen early so you can stay in lane longer.
14.4 What is creep aggro and why does it matter?
Creep aggro is when lane creeps switch targets to attack you. It matters because it changes last-hit timing, punishes harassment inside waves, and can be used intentionally to pull creeps toward you to stabilize equilibrium.
14.5 Should supports always stack while laning?
Stack when the lane is stable and your core can safely farm. If stacking forces your core into a dangerous 1v2 or loses equilibrium, it’s often better to stay and protect the lane first.
15) Quick Summary Cheat Sheet
- Equilibrium wins lanes: keep the wave in front of your tower whenever possible.
- Ranged creep is premium: secure yours, deny theirs.
- Trade smart: short trades from angles, avoid tanking full waves.
- Regen is power: spend it early to stay in lane and protect wave control.
- Pull with purpose: pull to reset a pushing lane, not on autopilot.
- Punish enemy pulls: pressure their core or steal the pull—don’t chase supports mindlessly.
- Fix bad waves: pull, aggro-drag, deny, or shove with a plan.
If you want to accelerate your climb with experienced help, check: Boosteria Dota 2 Boosting Prices.