Marvel Rivals Teamfight Mistakes: Overcommit & Spacing Fixes
Avoiding Common Teamfight Mistakes in Marvel Rivals (2026): Overcommitment and Spacing Fixes
Teamfights decide most matches in Marvel Rivals—not because everyone suddenly aims better, but because decision-making compresses. Cooldowns get traded, angles appear and disappear, cover breaks, and one player overreaches by a meter and turns a winning fight into a staggered wipe.
This guide is built to be timeless: instead of chasing patch-specific meta, we’ll focus on the repeatable mistakes that cause throws in every season—especially overcommitment and spacing. You’ll get practical “if/then” rules, role-based checklists (Vanguard / Duelist / Strategist), and drills you can run in Quickplay, Competitive, or scrims.
If you want faster progress (or you’re stuck in a rank where fights feel chaotic), you can also check Boosteria’s Marvel Rivals boosting & coaching pricing to get structured support and VOD review tailored to your role and hero pool.
1) The Teamfight Model: Space, Information, Cooldowns
Most players describe teamfights as “messy,” but the mess has structure. Nearly every teamfight outcome can be explained by three layers:
- Space: who controls the angles, cover, and objective area; who is forced to cross open ground; who has safe exits.
- Information: who sees what (enemy positions, flank threats, cooldown usage, low HP targets), and who is guessing.
- Cooldowns: the “spend” that converts space + information into eliminations or objective progress.
In Marvel Rivals, these layers move faster because fights are built around team-based synergies and high-tempo engagements. A good fight is rarely “everyone presses everything.” It’s usually: create an advantage → spend enough to secure it → stop spending → reset before the counter-punch.
What “Winning a Teamfight” Actually Means
A common trap is thinking “winning” equals “getting kills.” Kills matter, but the true objective is winning the next 10–20 seconds: map control, payload/zone progress, denying enemy setup, or securing a re-engage timing that snowballs the round.
This is why overcommitment and spacing are so lethal: they don’t just lose the current fight, they ruin the next fight by causing staggered deaths, poor ult economy, and broken formation.
2) Mistake #1: Overcommitment (Why It Happens)
Overcommitment is spending too much time, health, mobility, or cooldowns to chase a result that is no longer efficient. It usually looks like:
- Chasing a low HP target into enemy cover (or into their respawn path).
- Diving past your team’s effective range and losing line-of-sight to heals or peel.
- Staying in after you’ve already “won” the first trade—then losing the counter-engage.
- Burning your escape tool to secure a kill, then dying for it and creating a stagger.
The Hidden Cost: Not the Death, the Desync
The biggest penalty for overcommitment isn’t always the death itself. It’s the formation collapse: your team has to choose between following you (also overcommitting) or abandoning you (splitting resources). Either way, your spacing breaks, and you stop trading cooldowns efficiently.
Why Good Players Still Overcommit
- Adrenaline bias: once the fight “turns,” players mentally lock into “finish mode” and stop tracking exits and timers.
- Kill value illusion: one elimination feels like it must be correct, even when it costs two cooldowns and a respawn timer.
- Hero identity: divers and brawlers feel like they must always be “in,” even when the best play is to hold space and wait for the enemy to break.
- Communication gap: if nobody calls “reset” or “hold,” the default becomes “keep pushing.”
Overcommitment Red Flags You Can Detect Mid-Fight
| Red Flag | What It Usually Means | Immediate Fix |
|---|---|---|
| You can’t see your Strategist / support line | You’ve left your team’s sustain range | Re-anchor to cover that reconnects line-of-sight |
| You used your mobility “in” | Your exit plan is gone | Stop pushing; convert to cover control or reset |
| You’re chasing past the objective | You’re trading win condition for ego | Turn back; hold the point and force them to re-enter |
| You’re fighting alone for 2+ seconds | Your team cannot trade with you | Break contact; return to team’s effective range |
| Enemy is retreating into fresh angles | You’re walking into a counter-trap | Hold the choke/cover; make them come back through you |
3) Overcommitment Fixes: Rules You Can Actually Follow
“Don’t overcommit” is useless advice unless you have decision rules you can execute under pressure. Here are the highest-signal rules used in coaching across team-based shooters and brawlers.
Rule #1: The Commit Budget (Spend Like It’s Currency)
Before contact, decide what you are willing to spend to win the fight: HP, mobility, one key cooldown, or ultimate. Your budget should match the fight context:
- Neutral fight: spend small first (poke, angle, force cooldowns).
- Advantage fight (pick / enemy cooldown down): spend medium to secure and stabilize.
- Must-win fight (overtime / last defense): spend large, but only with a clear sequence.
Overcommitment happens when you keep paying after the fight is already decided. If you got the pick and the point, stop buying extra kills that cost your reset timing.
Rule #2: Two-Step Commit (Enter → Confirm → Full Commit)
Replace “all-in or nothing” with a two-step pattern:
- Enter: take space safely—use cover, a short dash, a corner, or a shield window.
- Confirm: check if your team can see you and if the enemy has already spent key defense tools.
- Full commit (only if confirmed): spend the bigger cooldowns to finish the fight.
This reduces the classic throw: you dash deep, then realize your team can’t follow, and you die “for free.”
Rule #3: The Exit Plan Must Exist Before You Enter
Every commit needs one of these exits:
- Cover exit: a wall/corner you can re-peek from.
- Mobility exit: a dash/leap you haven’t used yet.
- Team exit: your Vanguard/Strategist line is in range to peel or sustain you.
- Objective exit: retreat across the point/payload so enemies must chase into your team.
If none of these exist, your “aggression” is often just a delayed death. This is especially important in Marvel Rivals because destructible environments can remove the cover you assumed would be there—so your exit must be flexible.
Rule #4: Don’t Chase Past the “Commit Line”
Create an imaginary line: the furthest point your team can support with damage, heals, and peel. Past that line, your team cannot trade efficiently. Chasing past the line converts a coordinated fight into a series of 1v1s.
A simple callout helps: “Hold line.” It tells the team: we keep pressure, but we don’t cross into isolated territory.
Rule #5: Win the Fight, Then Win the Reset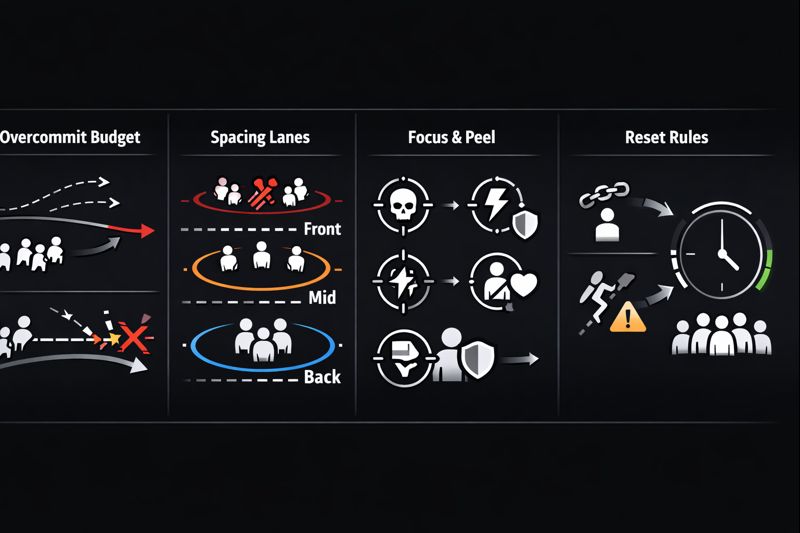
After you get an advantage (pick, cooldown bait, enemy forced out), your next goal is: reset faster than they can. That means:
- Stop spending ultimates after the win condition is secured.
- Don’t stagger chase into enemy respawns.
- Rebuild formation around your Strategists and key angles.
- Reload, refresh cooldowns, and be ready for the re-contest.
Quick Drill: The “3-Second Rule” for Chasing
If you haven’t secured the elimination within 3 seconds of chase, your probability of being counter-engaged rises sharply. Practice calling: “3 seconds—stop chase.”
4) Spacing Basics: How Teams Lose Without Realizing
Spacing is the invisible structure of a teamfight. It’s how far apart teammates stand (and on which angles) so that:
- your Strategists can see and support the people taking damage,
- your Duelists can threaten multiple angles (not one predictable lane),
- your Vanguards can hold a “front” without blocking your own damage,
- your whole team can reset without leaving someone behind.
The Two Spacing Failures That Cause Most Throws
Failure A: “Stacked” Spacing (Everyone on the Same Pixel)
When everyone plays the same corner, you become vulnerable to: burst combos, area denial, and simple line pressure. You also lose the ability to trade: if the enemy takes one off-angle, you have no crossfire.
Failure B: “Shattered” Spacing (Everyone Doing Their Own Thing)
This is the opposite problem: your team is spread so wide that: the Strategists can’t see you, peel is late, and the enemy picks you off one by one.
Good spacing lives between those extremes: connected, but not stacked.
The “Connected Triangle” Formation
A timeless mental model:
- Front (Vanguard / brawler line): controls the doorway/choke and absorbs first contact.
- Mid (flex damage / peel line): trades damage into the front and protects the back line from dives.
- Back (Strategists + long-range pressure): maintains vision, sustain, and fight tempo.
The triangle is “connected” if the back line can see the front line and the mid line can peel either direction. If the triangle breaks, you get either overcommitment (front goes alone) or a collapse (back line gets dived with no peel).
5) Spacing Fixes: Angles, Depth, and Line-of-Sight Discipline
Fix #1: “Same Screen” Rule (If You Can’t Help, You’re Not Connected)
A simple standard: if your teammate is fighting and you cannot affect that fight within a second (damage, peel, heal line-of-sight, or body-block), you’re effectively not in the teamfight.
This doesn’t mean stacking. It means your positioning should allow fast impact: one quick rotation, one dash, one corner change—without crossing open ground alone.
Fix #2: Depth Spacing (Stagger Your Team in Layers)
Many teams only think in left/right angles. Depth matters just as much: front/mid/back should be staggered so that when the front is pressured, they fall back into mid support, and mid can fall back into back support.
If everyone is on the same depth line, one enemy push forces a full retreat or a full collapse. Depth gives you “gears”: you can concede a small amount of space without losing the fight.
Fix #3: Off-Angles with a Tether (Not a Solo Mission)
Off-angles are essential for breaking enemy formation. But the right way to off-angle is with a tether: you should always have a path back to your team that is: short, covered, and predictable to your Strategist.
A good off-angle threatens crossfire while still being peelable. A bad off-angle is just a flank that starts a 1v5.
Fix #4: Protect the Healer Line-of-Sight (The Most Under-Called Concept)
In most team comps, Strategists can’t help what they can’t see. So spacing is not just “where you stand,” it’s “what you allow your support line to see.”
- If you are a Vanguard diving deep, you must call it early so your Strategists can reposition to keep line-of-sight.
- If you are a Duelist taking an off-angle, you must avoid breaking your own line-of-sight from your support unless you have a self-sufficient exit.
- If you are a Strategist, you must anchor where you can see the front and have an immediate fallback cover.
Fix #5: Spacing vs Burst (Respect “Stack Punish” Windows)
In any hero shooter, there are windows where stacked positioning gets punished: crowd control chains, burst combos, and area denial. The timeless fix is to practice “stagger spacing” in calm moments:
- Two players hold the corner.
- One holds a short off-angle (still connected).
- One anchors deeper as the reset and peel point.
- One floats between mid/back as the “glue.”
This keeps you connected without presenting one easy target cluster.
6) Target Focus & Threat Priority Without Tunnel Vision
Many throws look like “bad aim,” but are actually bad target logic. The team shoots different targets, or everyone tunnels a low HP enemy while the real threat deletes the back line.
The Timeless Target Priority Framework
Instead of memorizing “always kill X hero,” use a simple rule-of-thumb order:
- Immediate threats: enemies who can kill someone now (divers on your Strategist, high burst in your face).
- Finishables: targets you can realistically secure with the tools currently available.
- Enablers: targets enabling the enemy’s win condition (sustain, shields, key peel, objective control).
- Objective pressure: if kills are too costly, win by forcing space and progress.
The best teams constantly switch between these priorities as information changes. That’s not “indecision”— it’s adaptation.
“Focus Fire” That Doesn’t Break Spacing
A common mistake is trying to focus a target that is positioned behind enemy cover, which forces your team to overcommit and break spacing. Your focus target should be:
- visible to at least 2–3 teammates,
- reachable without crossing open space alone,
- valuable enough to justify the spend (cooldowns/HP),
- likely to be secured before the enemy counter-engage lands.
Callout Template That Helps Everyone Instantly
The most useful focus call includes three parts:
- Who: “Front left Vanguard” / “Backline Strategist” / “Flanker on our heal.”
- Where: “Corner / stairs / behind broken wall.”
- Why now: “No escape used” / “low HP” / “isolated.”
This keeps your team aligned without creating tunnel vision.
7) Cooldown / Ultimate Economy: Stop “Dumping” Fights
Teamfight economy is the hidden rank divider. Two teams can have identical mechanical skill, but one climbs because they spend efficiently.
Common Economy Throw Patterns
- Late ultimate: you use a big tool after two teammates are already down.
- Win-more spend: you use a big tool after the fight is already won (and lose the next fight).
- Uncoordinated burst: your team’s key tools overlap on the same target, wasting value.
- Panic defense: you spend defensive tools too early, then have nothing for the real engage.
The “Two-Wave Fight” Mindset
Many fights happen in two waves:
- Wave 1 (setup): poke, angles, force a defensive cooldown, bait mobility.
- Wave 2 (conversion): spend the key tools that secure eliminations or decisive space.
Overcommitment happens when you try to do wave 2 before wave 1 is complete. Spacing collapses when you try to do both waves from one tight position.
Simple Economy Rule: One Big Tool Per Advantage
If you secure a clear advantage (pick, enemy escape forced, or strong positional win), try to spend one big tool to lock it in, not three. Save the rest for the re-contest.
Team-Up Synergy Without Overcommitment
Team synergies are powerful, but they can bait you into “combo addiction.” A strong combo is only correct if:
- your team is connected (spacing intact),
- you can follow up immediately,
- you have a reset path after the spend.
If your combo requires everyone to stand in the same lane and push past the commit line, it’s not a combo—it’s a gamble.
8) Timing the Engage: When to Go, When to Hold, When to Reset
Timing is the bridge between spacing and overcommitment. Great teams don’t “fight more”— they fight at better times.
Green Light Triggers (Good Times to Engage)
- Pick advantage: enemy down a player or forced out of position.
- Cooldown advantage: enemy used a key defensive/mobility tool.
- Angle advantage: your Duelist has a safe off-angle that forces enemy to split.
- Objective pressure: enemy must step into your space to contest.
Yellow Light Triggers (Hold, Don’t Hard Commit)
- Your team is not fully present (one player respawning or far).
- Your Strategist line-of-sight is unstable (moving, forced off cover).
- You don’t know where an enemy flanker is.
- Your strongest tools are on cooldown.
Red Light Triggers (Reset Immediately)
- Two teammates down and no immediate trade is possible.
- Your formation is broken and you’re fighting isolated duels.
- Your exit paths are gone (cover destroyed / choke lost / mobility burned).
- Enemy has a clean re-engage angle while you are low resources.
The Reset Call That Saves Matches
Most teams reset too late because nobody says it clearly. A good reset call is: short, directional, and shared: “Reset back left corner,” “Fall to point,” “Back to spawn door,” “Hold line, don’t chase.”
Resetting is not surrender—it’s preserving your economy and preventing stagger, which is often the true reason teams lose entire rounds.
9) Destructible Cover: Spacing in a Breakable World
Destructible environments change how you should think about spacing: the “safe” corner you used last fight might not exist next fight.
Three Timeless Rules for Destructible Maps
- Always have a second anchor: if your team’s formation relies on one wall, you will get punished when it breaks.
- Don’t stack behind fragile cover: if it disappears, your whole team gets exposed at once.
- Build spacing around sightlines, not objects: control the lane and the angle; let cover be a bonus, not the plan.
Spacing Upgrade: Rotating Anchors
Instead of “we hold this wall,” use “we hold this lane with rotating anchors.” That means:
- Strategists anchor where they can see both the lane and the retreat lane.
- Vanguards contest the lane edge, not the deep interior.
- Duelists take off-angles that keep a tether to the lane’s retreat path.
This prevents the classic breakable-cover throw: the wall falls, your back line is exposed, and your front line overcommits trying to “fix it” with hero plays.
10) Role Checklists: Vanguard, Duelist, Strategist
Marvel Rivals roles create predictable teamfight responsibilities. If everyone tries to do everything, spacing collapses and overcommitment spikes. Use these checklists to stabilize your fights.
Vanguard Checklist (Frontline Control Without Feeding)
- Before engage: identify your hold line and your fallback cover.
- On engage: create space with presence (body + pressure), not with solo dives.
- During fight: track your Strategist line-of-sight—if they can’t see you, you are overextended.
- Peel timing: if your back line is threatened, peeling often wins harder than chasing kills.
- After win: stop chasing; anchor the objective and deny re-entry angles.
Vanguard Anti-Overcommit Rule
If you used your mobility to enter and your team is not within trade range, your next action is almost always re-anchor (find a corner) or retreat (reset). Don’t “push through” hoping it works out.
Duelist Checklist (Angles, Picks, and Clean Resets)
- Before engage: choose one off-angle that is tethered to your team (short covered return path).
- On engage: pressure the enemy’s back/mid line so they must split attention.
- During fight: avoid “finish mania”—if the target escapes behind cover, swap to a new reachable target.
- Spacing discipline: stay connected enough that peel/heals can reach you, unless you have a guaranteed exit.
- After win: take a forward angle to deny re-contest, but do not cross the commit line alone.
Duelist Anti-Overcommit Rule
If the elimination requires you to burn your only escape tool, ask: “Does this kill win the objective immediately?” If not, the safer play is usually to hold your angle and farm pressure for the next conversion.
Strategist Checklist (Line-of-Sight, Tempo, and Survival)
- Before engage: pick an anchor position with (1) cover, (2) vision to frontline, (3) a second escape.
- During fight: prioritize keeping your team connected—call “I can’t see you” when line-of-sight breaks.
- Anti-dive: save one defensive tool for the moment the diver commits, not for the poke phase.
- Spacing management: reposition early so your team doesn’t overcommit trying to stay in range of you.
- After win: stabilize and reset—heal up, reload formation, and prepare for the re-contest timing.
Strategist Anti-Overcommit Rule
Don’t follow a diver into danger to maintain heals. Your job is to keep the team’s fight tempo stable. If someone crosses the commit line without support, call reset and preserve yourself for the next fight.
11) Practice Plan: Drills + VOD Review Template
Fixing overcommitment and spacing isn’t about willpower—it’s about building automatic habits. Here’s a simple training plan you can repeat each week.
7-Day Micro Plan (30–45 Minutes/Day)
- Day 1: Commit Budget practice — call your “spend” before each fight.
- Day 2: Two-Step Commit — enter, confirm, then commit (or reset).
- Day 3: Spacing focus — “connected, not stacked” (one tethered off-angle every fight).
- Day 4: Reset discipline — practice early resets; eliminate stagger deaths.
- Day 5: Target logic — call “who/where/why now” for focus.
- Day 6: Economy — aim for one big tool per advantage; stop win-more ult usage.
- Day 7: Review — 20 minutes of VOD notes + 1–2 specific goals for next week.
VOD Review Template (Fast, High-Impact)
Pick one lost fight and answer these questions:
- Space: Where was our hold line? Did we cross it?
- Spacing: Were we stacked or shattered? Could Strategists see the front line?
- Information: Did we know where the flank threat was?
- Spend: What did we spend first? Was it too early, too late, or too much?
- Overcommitment: Who died last, and why weren’t they able to reset?
- Next time: What is one sentence we could call earlier (e.g., “hold line,” “reset,” “no chase”)?
If You Want Faster Progress
If you’re serious about climbing, the fastest shortcut is feedback. A coach can spot your commit line, spacing errors, and economy leaks within a single session—especially if you share a few losses where you felt “we should have won that fight.”
See Boosteria’s Marvel Rivals boosting & coaching pricing for structured help, role-specific plans, and VOD review.
12) FAQ
How do I stop overcommitting when I’m “one shot” from a kill?
Use the 3-second chase rule and the commit budget. If the kill requires your escape tool and doesn’t immediately win objective progress, treat it as a trap. Hold the angle, reload formation, and force the enemy to re-enter your space.
What’s the simplest spacing rule for ranked games?
Connected but not stacked. Stay close enough that you can affect each other’s fights instantly, but never let all five/six players occupy the same lane/cover piece unless it’s a final “must win” moment.
My team always staggers after losing a fight. What’s the fix?
Make resetting a team habit. Call “reset” early, fall back together, and stop trickling in. The goal is to take the next fight 6v6 with resources, not 2v6 while everyone is respawning.
Should Vanguards always be the first ones in?
Usually they create first contact, but not always by hard diving. In many fights, the Vanguard’s best job is holding the edge so Duelists can take angles and Strategists can stabilize. If the Vanguard crosses the commit line alone, the fight often becomes an overcommitment story.
How do I know when to use a big ultimate (or big cooldown)?
Use big tools to convert an advantage or prevent a collapse—not as a reflex. Ask: “Does this win space or secure a pick right now?” If you can’t answer yes, hold it, stabilize spacing, and look for a better timing.