CS2 Peeking & Angle Advantage: Timing, Pre-Aim, Off-Angles
CS2 — Peeking & Angle Advantage: Timing, Pre-Aim, and Off-Angles
Peeking is where CS2 rounds are decided. The difference between “I swung and died” and “I swung and won” is rarely luck. It’s usually angle advantage, timing, pre-aim, and a few repeatable habits that top players do without thinking. This guide breaks those habits into clear rules you can practice—so your peeks become consistent, your duels cleaner, and your entries smarter.
You’ll learn how to create favorable fights (even against better aimers), how to avoid giving opponents free first shots, how to hold and clear angles with less risk, and how to build a peeking “toolbox” for different situations: dry swings, jiggles, shoulder baits, wide peeks, contact peeks, and off-angle holds.
If your goal is faster rank progress, pairing good mechanics with good decision-making matters. If you want structured help for climbing, you can check Boosteria’s CS2 pricing here: https://boosteria.org/cs2-boosting/prices. For theory references and up-to-date tournament meta examples, reliable sites include HLTV and Liquipedia. For official updates, use Valve’s channels and CS2 news pages.
Table of Contents
- 1) The Core Idea: You’re Not “Taking a Duel,” You’re Building One
- 2) Angle Advantage Explained (Why the Same Peek Feels Different)
- 3) Timing: When to Peek (and When Not to)
- 4) Pre-Aim & Crosshair Placement: Your Real “Reaction Time”
- 5) Peek Types (Jiggle, Shoulder, Wide, Contact, Jump, etc.)
- 6) Slicing the Pie: Clearing Angles Without Donating Your Head
- 7) Off-Angles: How to Create “Unfair” Fights
- 8) Holding Angles: Micro-Movements, Crosshair Discipline, Repositioning
- 9) Utility + Peeking: Making Every Swing Safer
- 10) Entry & Trading: Team Peeks That Actually Work in Solo Queue
- 11) Common Mistakes (and the Fix for Each)
- 12) Drills: 15–25 Minutes a Day to Level Up Peeking
- 13) Duel Mindset: Risk, Information, and “Worth It” Peeks
- 14) Quick Checklist & Round Templates
- 15) FAQ
1) The Core Idea: You’re Not “Taking a Duel,” You’re Building One
Most players treat a peek like a coin flip: step out, hope your crosshair lands first, and pray the enemy misses. Strong players treat peeking as construction. They build a duel that is:
- Predictable (they know where the enemy is likely holding)
- Isolated (they minimize multi-angle exposure)
- Timed (they peek when the defender is least ready)
- Prepared (crosshair is already near the head before the target is visible)
- Escapable (they can fall back if the fight is bad)
If you remember one principle from this guide, make it this: Don’t peek to “find out.” Peek because you already have a plan for what happens next.
Information first, bullets second
A “good” peek doesn’t always mean a kill. Sometimes a good peek: identifies the AWPer, forces a shot, confirms a stack, baits utility, or creates a timing window for a teammate. The best players switch between info peeks and commit peeks intentionally.
One fight at a time
The easiest way to lose is to expose yourself to two angles. That turns your peek into a lottery where two defenders can shoot you. Your goal is to reduce the duel to a single opponent, then take it with advantage.
2) Angle Advantage Explained (Why the Same Peek Feels Different)
“Angle advantage” is a bundle of small geometry effects that decide who sees who first and how much of a model is exposed. You don’t need math to apply it—you need a few rules you can feel in-game.
2.1 The three simplest rules
- Closer to the wall = you get seen sooner. If you’re hugging the corner, your body appears earlier to the defender.
- Further from the wall = you reveal less. If you back up from the corner before peeking, you “slice” the angle better.
- Wider swing = faster target appearance. A committed wide peek changes the defender’s required tracking speed and can break their hold.
In practice: if you keep dying the instant you peek, you’re often too close to the wall and too predictable with your step-out.
2.2 “Head-first” vs “shoulder-first” exposure
Your peek shape matters. If you drift diagonally or walk forward into the angle, your model can reveal more than your crosshair is ready for. A clean peek is usually a lateral movement (left/right strafe) with crosshair already set. You want the first visible frame of your body to be aligned with your first accurate shot.
2.3 The “pixel gap” lesson
Small gaps between objects (doors, boxes, rails) can create unexpected visibility. Treat them like full angles. If an angle exists, someone will hold it. If you can see them, assume they can see you—then clear it properly with a micro-peek, a pre-aim, or utility.
2.4 Why defenders often “feel” advantaged
Defenders usually start with:
- Crosshair already placed
- Cover nearby
- Less movement required to shoot
Attackers need to manufacture advantage: timing, off-angles, isolations, and utility. Your peeking toolkit is how you balance that equation.
3) Timing: When to Peek (and When Not to)
Timing is the hidden multiplier. Two identical peeks can have opposite outcomes depending on when they happen. Timing isn’t “random”—it’s patterns you can learn: reloads, utility pulls, rotations, footsteps, and attention shifts.
3.1 The three best timing windows
- After utility pops: a flash detonation, smoke bloom, molly spread—defenders often adjust crosshair or reposition.
- After sound cues: a teammate jumps, runs, breaks a door, or throws utility—attention shifts for a moment.
- After a fight: if a defender shoots, gets a kill, or gets tagged, they frequently reset their aim or retreat.
3.2 The worst timing windows
- Right after your footsteps (especially predictable paths)
- When you’ve repeated the same peek two rounds in a row
- When you’re isolated with no trade
3.3 “Beat the hold” vs “force the miss”
Some peeks try to beat the defender’s crosshair placement with timing (catch them moving or looking elsewhere). Other peeks try to force a miss (jiggle bait, shoulder bait, wide swing, jump spot). Decide which one you’re doing before you move. Mixing them mid-peek usually makes you messy.
3.4 The repeat-peek penalty
If you peek the same angle multiple times, defenders will prefire, hold tighter, or change height. You need variation: change distance from wall, change swing width, change pace (walk/contact vs run/commit), or use utility.
4) Pre-Aim & Crosshair Placement: Your Real “Reaction Time”
Many players blame reaction time. In CS2, most “fast” kills come from pre-aim—your crosshair is already near the head when the enemy becomes visible. Reaction time becomes minor because the aim movement is tiny.
4.1 The head-level rule (and the height exceptions)
Keep your crosshair at head height as your default. Then adjust for:
- Stairs / ramps (heads rise/fall)
- Off-angles (defender may be deeper/closer)
- Crouch spots (common behind low cover)
- Jump/boost spots (less frequent but high impact)
4.2 “Next angle” thinking
When you clear, your crosshair should glide to the next likely head, not float in the middle. A clean path looks like: angle → angle → angle (each stop at a head position). A messy path looks like: random center screen, then a panic flick.
4.3 Micro-corrections over flick addiction
Flicks are flashy, but most consistent fragging is micro-corrections: small, controlled adjustments as you move. Focus on:
- Entering the angle with your crosshair already close
- Correcting just a few pixels
- Shooting only when your movement and aim are stable
4.4 Pre-aim maps and pro VODs (how to use them correctly)
Pre-aim training is most effective when you’re not just “running around shooting bots.” Instead, pick a route and rehearse specific clears: “I clear this corner, then this head spot, then this swing.”
Watching VODs helps when you look for crosshair routes, not highlights. Pause and ask: “Where is their crosshair before the enemy appears?” That’s the real lesson.
5) Peek Types (Jiggle, Shoulder, Wide, Contact, Jump, etc.)
Different peeks solve different problems. The mistake is using one peek for everything. Here’s a practical toolkit you can apply immediately.
5.1 Jiggle peek (info + bait)
Goal: Get information or bait a shot with minimal risk.
- Strafe out just enough to see (or be seen), then instantly strafe back.
- Keep crosshair where the defender would be, but don’t over-commit to shooting.
- Best vs: AWP holds, unknown angles, early-round info gathering.
Common error: lingering too long and turning an info peek into a full duel while exposed.
5.2 Shoulder peek (shot bait)
Goal: Force an AWP shot or a prefire without showing your head. It’s similar to jiggle but you expose more shoulder and less head, depending on angle and distance.
- Back up from the wall slightly to control how much of your model is shown.
- Do it once or twice, then change rhythm—don’t become predictable.
- Once the shot happens, punish with a wide swing or utility.
5.3 Wide peek (commit + break the hold)
Goal: Beat a tight hold by moving far enough that the defender must track, not just click.
- Use when you expect a stationary defender holding a common angle.
- Pair with a flash or teammate pressure for best results.
- Pre-aim the exact head spot, then commit—no hesitation mid-swing.
Common error: wide peeking without isolation and getting deleted by a second angle.
5.4 Contact peek (silent timing)
Goal: Peek with minimal sound to catch a defender complacent.
- Walk into range, then take a controlled peek.
- Great for late-round lurks, post-plant retakes (as T), or when defenders rotate away.
- Works best when combined with “off timing” created by teammates elsewhere.
5.5 Swing-to-trade (team peek)
Goal: Guarantee value even if the first player dies. The first player commits to a fight knowing the second player is ready to instantly trade.
- Spacing matters: too close = blocked movement; too far = no trade.
- Second player’s crosshair must be set for the likely kill position.
- Communicate: “I’m swinging; be ready.” Even in solo queue, one sentence helps.
5.6 Jump spot / jump peek (info with risk control)
Goal: Gather info while reducing head exposure time. Use carefully; jump peeks can be punished by good timing, spam, or utility.
- Best used to confirm presence, not to start a duel.
- If you get information, convert it into a plan (smoke, flash, rotate, group).
5.7 Counter-peek (punish after they shoot)
Goal: Swing right after the defender shoots (or is likely to reset). This is especially strong when an AWP fires or a rifler sprays.
- Listen for the shot, then swing immediately with pre-aim.
- Even if the defender has time to recover, their rhythm is interrupted.
6) Slicing the Pie: Clearing Angles Without Donating Your Head
“Slicing the pie” means clearing an area by revealing one angle at a time, gradually. This is how you reduce multi-angle exposure and stop dying to the “second guy.”
6.1 The order of operations
- Set distance from the wall (don’t hug corners).
- Pick the first angle you want to reveal (usually the closest threat).
- Strafe in a controlled line so only that angle becomes visible.
- Crosshair locks on the head spot.
- Clear, then move to the next angle.
6.2 Why players fail at clearing
- They peek too close and expose too much at once.
- They move diagonally (forward + strafe) and lose control of exposure.
- They “check corners” with their eyes but not their crosshair.
6.3 “Clear deep” vs “clear close”
Some angles are dangerous because the defender can be both close and deep. Your crosshair must decide which threat is more likely. A simple rule:
- If you’re loud, expect deeper holds (they heard you coming).
- If you’re silent, expect closer ambush holds.
6.4 Micro-peeks for multi-angle zones
In areas where two angles overlap, use micro-peeks: show the smallest amount of model to clear the first, then reposition and clear the second. It may feel slow, but it’s faster than dying and losing the round.
7) Off-Angles: How to Create “Unfair” Fights
Off-angles are positions that break the opponent’s pre-aim. They force the attacker to adjust further than normal, which means slower first shot and more missed bullets.
7.1 What makes an off-angle “good”
- It’s not the first spot people clear with default pre-aim.
- It still gives you cover or an escape path after the first kill attempt.
- It isolates a lane (you’re not exposed to three angles).
- It’s timed: you don’t hold it forever; you use it to surprise, then move.
7.2 Off-angle categories
Think of off-angles as a menu:
- Depth off-angle: holding deeper or shallower than default.
- Height off-angle: standing on a small elevation or crouching behind unusual cover.
- Line break off-angle: standing a step away from the “obvious” head line so pre-aim misses by a few inches.
- Timing off-angle: briefly taking a weird spot only when the enemy is likely to swing.
7.3 The “one-and-done” principle
Off-angles lose power fast. Use them to get a first kill attempt or a tag, then reposition. If you stay in the same off-angle every round, opponents will prefire it—and now you’re just in a worse position.
7.4 Off-angles as CT: control, then rotate
A strong CT off-angle often has one job: delay. You might: get a kill, force utility, or create uncertainty—then you fall back to a safer crossfire. If you die without trade, the off-angle wasn’t worth it.
7.5 Off-angles as T: anti-aggression and post-plant
Off-angles also matter as T:
- Anti-push holds while teammates take space
- Post-plant off-angles that punish common retake clears
- Lurk off-angles that catch rotators on “autopilot”
8) Holding Angles: Micro-Movements, Crosshair Discipline, Repositioning
Great peeking includes great holding. If you only learn to swing, you’ll still lose rounds to smarter defenders. Holding is about discipline: choosing the right angle, not overexposing, and knowing when to move.
8.1 Tight hold vs wide hold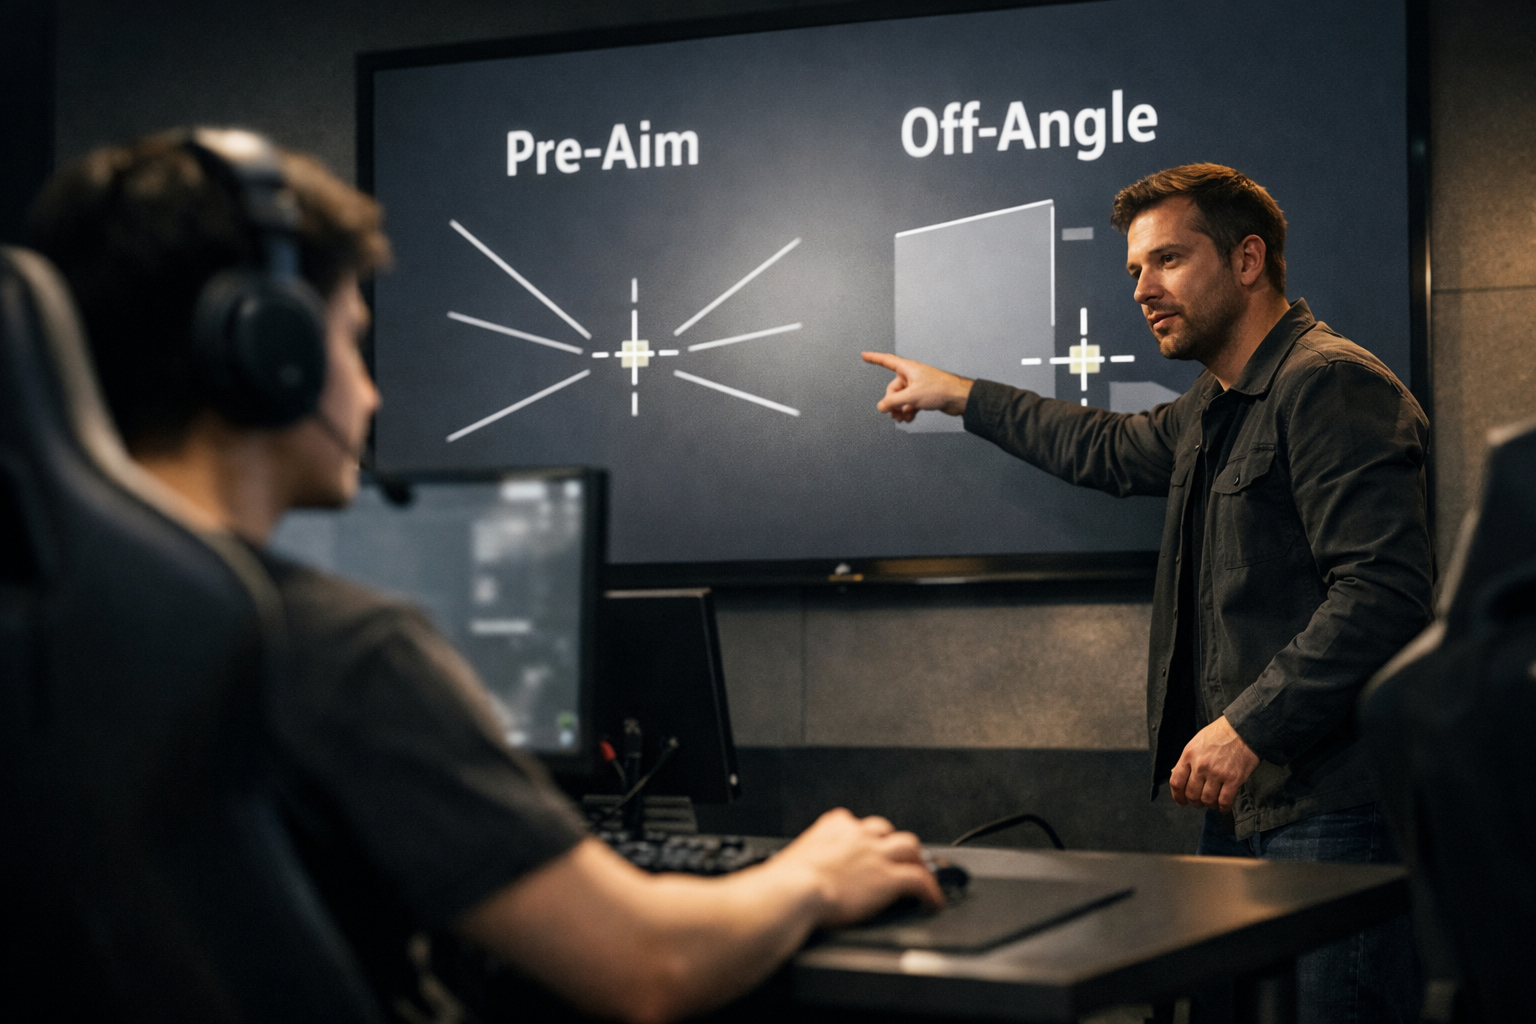
- Tight hold: crosshair close to the corner. Best when you expect a slow contact peek.
- Wide hold: crosshair further from the corner. Best when you expect a fast wide swing.
Most players always hold tight—then complain about “ferrari peeks.” Learn to adjust based on opponent behavior.
8.2 The “micro-strafe hold”
Standing completely still is predictable. A micro-strafe hold (tiny left-right movement in cover) can:
- Reduce prefire accuracy from opponents
- Keep you mentally active and ready
- Let you re-peek with different timing
Don’t overdo it—micro-movement should never break your crosshair placement.
8.3 Repositioning: the invisible skill
After a kill, a shot, or contact, you should ask: “Am I now predictable?” Repositioning wins more rounds than perfect aim. Examples:
- After you shoot once, fall back or change height.
- After a kill, move to a new line so the trade is harder.
- If you’re flashed, don’t stubbornly hold—reset to cover.
8.4 Crosshair patience
Many defenders die because they “help” their crosshair: they flick early before the enemy appears. Instead, trust your placement. Let the opponent walk into your crosshair when possible.
9) Utility + Peeking: Making Every Swing Safer
Utility isn’t separate from peeking—it’s how you convert a risky duel into a favorable one. Even basic utility use will outperform pure aim duels across many rounds.
9.1 Flash + peek fundamentals
- Flash first, peek on pop: time your swing so you appear as the flash detonates.
- Don’t “double hesitate”: if you throw a flash and wait too long, defenders recover.
- Use teammate flashes: call for a flash, then focus on clean pre-aim and wide swing.
9.2 Smokes: block angles, isolate fights
Smokes are not only for executes. They’re for isolation. If a wide area has multiple angles, smoke one to remove it, then clear the remaining angle safely.
9.3 Molotovs: force movement, force timing
Molotovs make defenders move. Movement breaks crosshair placement and creates predictable exits. If you know a defender must run out of a molly, your pre-aim becomes simple.
9.4 “Utility tax” and how to avoid it
Some players waste utility to feel safe. Instead, follow a rule: Use utility when it creates an advantage, not when it replaces decision-making. A flash that enables a trade or entry is value. A flash that blinds nobody and delays your timing is a tax.
10) Entry & Trading: Team Peeks That Actually Work in Solo Queue
In perfect teams, entries are structured. In most matches, they’re chaotic. You can still create consistency with simple rules.
10.1 The entry’s job
- Take space and force defenders to reveal positions
- Create a tradeable fight
- Enable the second player to get the “clean” kill
If you are entry, success can mean dying while your team trades and wins the site. If you entry and no one trades, that’s not always your fault—but you can increase your odds with spacing and communication.
10.2 Trading spacing (the easy fix)
Ideal spacing is close enough to trade instantly, far enough not to block each other—often a few steps behind. If you’re the second player, your crosshair should be set for the angle the first player is about to expose. You are not “following.” You are aiming for the trade.
10.3 Two-man peek patterns
- Staggered swing: first swings, second swings a beat later to punish the first shot.
- Double wide: both swing together to overwhelm a single defender (riskier vs multi-angle).
- Flash + follow: first throws, second swings on pop, first follows to trade.
10.4 Post-plant peeks (don’t donate)
After plant, many players peek unnecessarily. Instead:
- Hold crossfires and trade lines
- Use sound cues and time pressure
- Peek only when it’s necessary to stop a defuse or isolate a retaker
11) Common Mistakes (and the Fix for Each)
Mistake 1: Hugging the wall on peeks
Fix: Back up before peeking. Give yourself distance so you reveal less and can slice angles.
Mistake 2: Diagonal movement into angles
Fix: Strafe laterally. Set your body line so exposure is controlled and crosshair stays stable.
Mistake 3: Clearing with eyes, not crosshair
Fix: Your crosshair must “touch” each head spot you clear. If it doesn’t, you didn’t clear it.
Mistake 4: Re-peeking instantly after missing
Fix: Reset your rhythm. Either fall back, change height, or use utility. Don’t offer the same duel again.
Mistake 5: Wide swinging into two angles
Fix: Isolate with slicing, smokes, or teammate pressure. Wide peeks only work when the duel is isolated.
Mistake 6: Holding tight vs fast opponents
Fix: Hold wider if they wide swing. Match the expected peek speed with your crosshair distance.
Mistake 7: Overusing off-angles
Fix: Use off-angles as “one-and-done,” then reposition. Surprise is the value.
Mistake 8: Peeking without a trade option
Fix: Either create a trade (play near teammate) or convert your peek into info/utility instead of a full commit.
12) Drills: 15–25 Minutes a Day to Level Up Peeking
You don’t need hours. You need focused reps. Here are drills designed around the skills in this guide: pre-aim routes, micro-corrections, timing, and off-angle awareness.
12.1 Drill A: Pre-aim route rehearsal (8 minutes)
- Pick one common route you take often (any map you play most).
- Walk it slowly and stop at each “angle checkpoint.”
- Place crosshair exactly where a head would appear.
- Repeat faster while maintaining head-height and angle order.
Goal: Make your crosshair “snap” to logical head spots without conscious effort.
12.2 Drill B: Slice-the-pie clearing (6 minutes)
- Choose a doorway or corner that opens into multiple angles.
- Practice revealing only one angle at a time with controlled strafes.
- Keep the crosshair locked at head spots as each angle becomes visible.
Goal: Stop dying to the second angle and improve isolation.
12.3 Drill C: Peek timing reps (5 minutes)
- Simulate a sequence: “flash pop” → swing, or “sound cue” → swing.
- Practice swinging immediately on your trigger cue.
- Alternate between info peek (jiggle) and commit peek (wide) deliberately.
Goal: Train a consistent relationship between cue and action, instead of hesitation.
12.4 Drill D: Off-angle library (6 minutes)
- Pick 3 areas you often defend or hold post-plant.
- Find 2 off-angles per area: one depth change, one height/line break.
- For each off-angle, identify: escape route, trade possibility, and what angle you isolate.
Goal: Build a small set of reliable off-angles you rotate through, not random “weird spots.”
12.5 The weekly structure (simple and effective)
- Days 1–2: Pre-aim + slicing drills (focus on crosshair discipline)
- Days 3–4: Timing + peek-type reps (focus on commitment and rhythm)
- Days 5–6: Off-angles + holding discipline (focus on repositioning)
- Day 7: Review your demos: 3 deaths from peeks, 3 wins from good peeks
If you want a broader aim routine that pairs well with peeking practice, you can also explore neutral aim-training concepts on trusted sources like NVIDIA Reflex (for latency awareness) and VOD examples on HLTV.
13) Duel Mindset: Risk, Information, and “Worth It” Peeks
Peeking isn’t only mechanical. It’s decision-making under risk. A peek can be correct even if you lose the duel, and it can be incorrect even if you win. The question is: Was the peek worth the risk given the round state?
13.1 The three-value model
Before you peek, decide which value you want:
- Information (confirm positions, bait a shot, identify a setup)
- Space (take control of an area)
- A kill (commit duel)
Problems happen when you try to get all three at once. An info peek that turns into a kill attempt becomes a donation. A space-taking peek without trade support becomes a gamble.
13.2 The “escape plan” question
Ask: Where do I go if this is bad? If the answer is “nowhere,” you’re likely taking a low-percentage peek. Good peeks have a fallback: a smoke to retreat, cover to tuck, or a teammate to trade.
13.3 Your job changes with numbers
- 5v5 / 4v4: avoid hero peeks; prioritize information and trades
- Up a player: force opponents to act; hold angles and trade
- Down a player: look for isolated fights, timing plays, or aggressive info
- Clutch: peeks must be purposeful—create 1v1s, avoid multi-angle exposure
14) Quick Checklist & Round Templates
14.1 The 10-second peek checklist
- Am I too close to the wall?
- Can I isolate this fight to one angle?
- Is my crosshair already set at head level for the likely position?
- Am I doing an info peek or a commit peek?
- What’s my escape plan if the duel is bad?
- Do I have trade support or utility support?
- Is my timing predictable (have I done this before)?
14.2 Simple CT template (early round)
- Take a safe info peek (jiggle/shoulder) to confirm early pressure.
- If pressure is heavy, fall back and play crossfire/trade lines.
- If pressure is light, consider a one-time off-angle to punish a late clear, then reposition.
14.3 Simple T template (site take)
- Use utility to isolate at least one defender angle.
- Entry swings with purpose (either commit or bait for trade).
- Second player is ready to trade immediately.
- After plant, stop donating—hold crossfires and only peek for defuse pressure.
15) FAQ
Is wide peeking always better in CS2?
No. Wide peeking is powerful against a tight hold, but it’s weak when multiple angles can see you. Use it when you can isolate the duel or when utility/teammates reduce risk.
How do I stop dying instantly when I peek?
The most common fixes are: back up from the wall, pre-aim the correct head spot, and stop diagonal drifting. Also, don’t repeat the same peek timing—use jiggles, shoulder baits, and utility to change the rhythm.
How do I know which angle to clear first?
Clear the angle that can kill you first—usually the closest “high-threat” corner. If you’re loud, expect deeper holds. If you’re silent, respect close ambush spots. Over time, build a consistent clear order for each area you play.
What’s the best way to improve pre-aim?
Practice routes with deliberate checkpoints. Your crosshair should move from head spot to head spot. Watching VODs helps most when you focus on crosshair placement before enemies appear, not highlight clips.
How do off-angles help if opponents are good?
Good opponents clear more efficiently, but they still rely on default pre-aim patterns. A well-chosen off-angle forces extra correction and buys you first-shot time. The key is one-and-done: surprise, then reposition before they adapt.
Conclusion
Peeking isn’t a mystery skill—it’s a set of repeatable rules: control your distance from the wall, isolate angles, pre-aim head spots, choose the right peek type, time your swings, and use off-angles as surprise tools—not permanent homes.
If you apply the drills for even 15–25 minutes a day, your duels will feel slower (in a good way), because your crosshair will already be close and your peeks will be intentional. That’s how you win more rounds without needing perfect aim.
Want structured help for climbing or performance goals? You can review Boosteria’s CS2 options here: https://boosteria.org/cs2-boosting/prices.