LoL Rotations & Map Movements Guide (2026): Macro, Lane Swaps, Objectives, and Winning Maps
LoL ROTATIONS & MAP MOVEMENTS GUIDE (Updated for 2026)
Quick disclaimer: This macro guide is written for players who already understand basic laning, last-hitting, and common matchups. If you’re still learning core fundamentals, focus first on consistent CS, safe trading patterns, and champion mastery. Rotations become truly powerful once you can reliably “earn” time windows by pushing waves and recalling correctly.
What you’ll learn: how to rotate with purpose (not panic), how to trade objectives without bleeding gold, and how to move as a team using wave states, vision, and tempo—so your macro decisions stay effective in 2026 and beyond.
Table of Contents
- Introduction
- What Are Rotations and Map Movements?
- When Do Rotations Become Relevant?
- Macro Foundations: Tempo, Priority, and Wave States
- Vision That Enables Rotations
- Objective Value: Dragons, Herald/Grubs, Baron, Towers
- What To Do After First Tower Falls
- Why Mid Tower Is So Important
- Top Lane Rotations
- Jungle Rotations
- Mid Lane Rotations
- Bot Lane & Support Rotations
- Early Game Rotation Playbook
- Mid Game Rotation Playbook
- Late Game Rotation Playbook
- Most Common Rotation Mistakes (and Fixes)
- Solo Queue Shotcalling & Ping Language
- How To Practice Rotations (Fast)
- Legacy Notes (Older Concepts & Outdated Rank Terms)
- Conclusion
INTRODUCTION
Map movements and rotations are standard and key if one wants to improve as a player. In this guide, you’ll learn rotations for top, mid, jungle, and bot lane, plus the logic behind them—so you can adapt to any patch. Towers, Baron, Dragons, and other major objectives are the main reasons rotations happen, but the real secret is how you create a time window to move (priority + tempo + wave state).
This guide is designed to be timeless, but it includes a small “updated for 2026” touch so search engines know it’s current—without locking the strategy to one exact patch. If Riot tweaks timers or systems, the decision-making framework here stays valid.
Recommended external references (high-trust):
Official League site •
Riot Support (game systems & FAQs) •
LoL Esports (watch macro in pro games)
Boosteria links (as requested):
If you’re exploring services or pricing pages, here are the links you asked to include organically:
boosteria.org and
BO6 Boosting Prices.
What Are Rotations and Map Movements?
Rotations are coordinated movements from one area of the map to another to gain a measurable advantage: an objective, a tower, a vision line, a crash-and-dive, a numbers advantage, or a tempo recall that denies resources.
A rotation is not “wandering.” It has a reason and a payment plan. The “payment” is usually minions (gold/XP) you’re choosing to delay or sacrifice. A good rotation earns more than it costs. A bad rotation feels busy but leaves you down a level, down plates, and late to every fight.
Map movement is the broader skill: how you position to support rotations, how you path between lanes, how you take safe routes through vision, and how you time your move with waves and recalls.
When Do Rotations Become Relevant in the Game?
Rotations become relevant the moment one lane can create priority and use it to influence something else. Many games begin with bot lane pressure because early dragons and early turret gold often sit on that side of the map. But “bot rotates first” is not a rule—it’s a common pattern.
In modern League/LoL, rotation triggers usually look like this:
- Wave crash window: you hard-push a wave into enemy tower and can move first.
- Recall window: you reset, buy items, return with tempo, and are first on the next play.
- Objective spawn window: you set vision and lane states 45–90 seconds before a big objective.
- HP/Mana advantage: enemy can’t contest because they’re too low or without key cooldowns.
- Jungle information: you see the jungler top, so you can safely pressure bot—or vice versa.
Macro Foundations: Tempo, Priority, and Wave States
Before we talk about “where to rotate,” we need the three concepts that explain why rotations work.
1) Tempo (who gets to move first)
Tempo is the right to act first. You gain tempo by:
- crashing a wave
- forcing the enemy to last-hit under tower
- forcing a recall (poke them out)
- killing them (obviously)
- resetting at the correct time so you come back stronger
When you have tempo, you can:
- arrive first to river
- place vision first
- start objectives safely
- set up dives with a numbers advantage
- deny the enemy choices (they must respond)
2) Lane Priority (priority is not just “winning lane”)
Priority means you can move without losing too much. A lane can be “even” in kills but still have priority if the wave is pushing and the enemy is stuck catching it.
Macro rule: Don’t rotate from a wave that’s about to crash into your tower unless the play is guaranteed and massive (like Baron/ending). If you leave at the wrong time, you donate gold and XP, and the “rotation” becomes a slow loss.
3) Wave States (the hidden timer of every rotation)
Wave states decide if you can rotate safely:
- Slow push: you stack waves, then crash a big wave to buy time for a roam/objective/dive.
- Fast push: you clear quickly to move first, often to river or mid.
- Freeze: you hold the wave near your tower to deny farm (but freezing reduces your ability to rotate).
- Reset: you crash and recall so the wave bounces back and you return with tempo.
Most players lose macro games because they rotate on the wrong wave state. The best habit you can build is asking one question before every move:
“What happens to the next two waves if I leave?”
Vision That Enables Rotations
Rotations without vision are coinflips. Vision doesn’t just “prevent ganks”—it tells you which rotations are safe and which are bait.
Core vision principles
- Vision lines: don’t place random wards; build a line that protects your route.
- Ward with a wave: place deep vision when your wave is pushed (you’re safer).
- Control wards have jobs: (1) protect an objective setup, (2) protect a splitpusher, or (3) deny a key choke point.
- Sweep before you commit: if you’re starting a major objective, clearing vision matters more than hitting it instantly.
Simple warding pattern for most games
If you’re playing for the next dragon: ward river entrances, pixel brush, and one deep ward behind the pit if you can. If you’re playing for Baron: ward top-side river, tri-brush routes, and the enemy’s jungle entrance near top/mid.
When vision is correct, rotations become obvious: you see enemies late, you see their path, and you punish them for showing.
Which Objective is More Important?
All objectives matter, but they matter in different ways. Some objectives increase your teamfight power. Some increase siege power. Some increase map control and choke the enemy’s options.
It’s almost impossible to assign a single permanent “value” to each objective because objective value depends on:
- team compositions (teamfight vs poke vs splitpush)
- current gold/level state (ahead vs behind)
- summoner spells and ultimates available
- wave positions and tower health
- vision control (who owns fog)
Example: Baron vs Elder is not “always Elder.” Baron enhances siege and map pressure; Elder is a fight-ending buff that can instantly close games if your comp can force fights. Sometimes you take Baron to avoid fighting; sometimes you take Elder to guarantee fighting.
Objective value cheat sheet (timeless)
- Towers: gold + map access. More space to ward, invade, and rotate.
- Dragons: scaling power and win-condition pressure over time.
- Herald/Grubs (top-side early objectives): snowball gold, crack towers, and accelerate tempo.
- Baron: end games through lane pressure, siege, and forced responses.
- Inhibitors: create permanent map pressure and force defensive rotations.
The best teams rotate because they understand the next 2–3 minutes of the game: “If we take this, we unlock that.”
What Do You Do After First Tower is Down?
It depends on where the tower falls, how the next objective lines up, and which champions can safely play shorter lanes or side lanes.
Key idea: After first tower, the map “opens.” Rotations become stronger, but so do punish windows. If you rotate at the wrong time, you can lose two waves and give shutdowns.
If top tower falls first
Commonly, top lane becomes a longer lane and more dangerous to farm without vision. If your top laner can split safely, they may keep pressure top or swap depending on the next objective and teleport status.
- If next objective is bot-side: your top laner often holds top and uses TP to join fights, while bot stays bot or rotates mid depending on wave states.
- If your top is a strong duelist: keep them in a side lane to draw pressure and create a numbers advantage elsewhere.
- If your top is weak without tower: you may rotate them to mid (safer lane) and shift resources to stabilize.
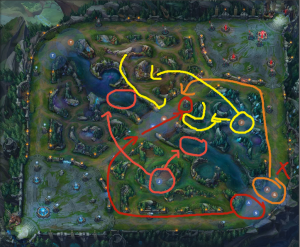
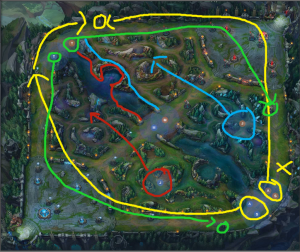
If bot tower falls first
If bot tower falls first then there are three textbook scenarios that can happen. The best one depends on your comp and the next major objective.
- Bot stays bot if an important dragon needs to be contested and the wave state supports staying.
- Bot rotates mid if your duo can pressure mid tower, unlock vision, and your mid can safely side lane.
- Bot rotates top to pressure top tower while your jungler hovers to protect them—especially if top-side objectives or tower trades matter more right now.
Situation 2
Situation 3
The “why” behind these scenarios
- Mid lane tower is the gateway: taking it unlocks rotations into both jungles.
- Side lanes are risky without towers: bot moving to mid often protects your ADC from long-lane deaths.
- Top swap creates pressure: if the enemy answers late, you get plates/tower and can pivot into top-side vision.
How Important is Mid Tower?
Mid tower is the most important outer tower because it protects the widest set of pathways: both rivers, both jungle entrances, and the safest rotation routes between lanes. Losing mid opens your map like a broken zipper—everything spills out, and you can no longer move safely.
When mid tower is alive: you can defend by clearing mid waves, and you have a central “anchor” to regroup from. When it’s gone, you must spend extra time warding and escorting waves, which slows your whole team and makes you late to objectives.
Mid tower and objective setups
- Dragon setup: mid priority lets you enter river first, ward first, and fight on your terms.
- Baron setup: mid priority lets you control top-side entrances and collapse faster.
- Invades: without mid tower, invades become safer for the enemy because your rotations take longer.
If mid tower falls post-early game, teams often reorganize lane assignments so the champion with best waveclear can hold mid safely while others pressure sides. If your team has a strong waveclear mage, rotations become more flexible because they can “stall” mid while your side lanes apply pressure.
If mid tower falls early, the team that lost it must play with discipline: deeper defensive wards, safer wave clears, and fewer random river contests. Your goal becomes trading smartly and waiting for a clean window—not forcing fights in fog.

Do Rotations Help Win Games?
Drastically. Rotations are a core engine of winning LoL games. Correct rotations lead to:
- more CS for the team (better wave coverage)
- more vision control (safer map access)
- better objective control (arrive first, set first)
- more picks (catch enemies moving late through fog)
- cleaner tower takes (siege with waves + numbers)
If you consistently execute rotations with correct wave states, you’ll climb because you’re playing the map—not just the lane. It’s also the foundation you build on to reach higher MMR: once macro is stable, micro improvements compound faster.
Top Lane Rotations
Top lane rotations are about one thing: creating pressure without donating your life. Top is often isolated early, but later it becomes the role that either (1) draws multiple enemies or (2) becomes the frontline for objectives.
Top lane rotation goals
- Crash + move: push a wave, then move to river/jungle to help secure vision or an objective.
- Crash + invade: move with your jungler to steal camps or force a fight with numbers.
- Side lane pressure: later, keep pushing until someone answers, then decide: fight or back off.
Teleport and rotations (timeless rule)
Teleport turns top lane into a map lever. If you have TP and the enemy doesn’t, you can play more aggressively in side lanes and still join major fights. If you don’t have TP, your team must respect that you can’t appear instantly—so your rotations should start earlier.
Top lane “safe pressure” checklist
- Is the next wave pushing toward the enemy (so I can leave)?
- Do we know where the enemy jungler is?
- Do I have wards behind me or a safe retreat path?
- Can I win 1v1 if someone answers?
- If two enemies come, can my team take something elsewhere?
A top laner who pressures correctly doesn’t need 10 kills. They win by forcing the enemy to respond and making them late to objectives.
Jungle Rotations
Jungle is the role most defined by rotations because your entire job is movement: pathing, covering lanes, contesting vision, and turning priority into objectives.
The jungler’s macro loop
- Farm route → create pressure → convert pressure into vision → convert vision into objective or invade
Key jungle rotation skills
- Hovering: being near a lane that’s about to be pressured, so you can countergank or dive.
- Cross-map trading: if you see the enemy jungle top, you can pressure bot-side camps/dragon (if lanes allow).
- Objective setup: the best junglers don’t “start dragon,” they start the setup (vision + waves) first.
- Reset timing: recall so you arrive with items before an objective spawns.
Jungle rotation rule that wins games
Don’t force objectives when your lanes cannot move. If your mid and bot are under tower with no priority, starting dragon is often flipping the game. Secure waves first, then objective.
Mid Lane Rotations
Mid is the highway of LoL. Mid lane rotations decide skirmishes because you’re closest to both rivers and both side lanes. A good mid laner doesn’t just “roam”—they roam on the correct wave and return without losing the game in CS.
Mid rotation priorities
- Wave first: push or stabilize mid before moving.
- Move with information: roam when you know jungle positions or when your support/jungle can escort you.
- Roam with purpose: dive a stacked wave, contest vision for an objective, or collapse on an invade.
3 types of mid roams
- Hard roam: commit fully to a side play (often with ult).
- Soft roam: step into fog to threaten; force enemy to back off; return to lane.
- Objective roam: rotate to river to secure wards and control for dragon/Baron setups.
Soft roams are underrated. Simply disappearing from mid can win bot lane because the enemy must respect a possible collapse.
Bot Lane & Support Rotations
Bot lane rotations decide the pace of the early-mid game because bot is two champions. Two champions moving together create the fastest numbers advantage on the map.
ADC rotation priorities
- Farm safely: your job is reliable gold income.
- Move to the safest lane after tower falls: often mid, because it’s short and protected.
- Show up to objectives on time: but only after wave is handled.
Support rotation priorities
- Enable vision: your movement creates safe routes for your team.
- Roam with wave timing: roam after your ADC can safely farm a wave or recall.
- Pair with jungler: two-man support+jungle movements win vision wars and set picks.
The most important bot rotation concept
Bot lane should not rotate just because “it’s time.” Bot rotates when the wave state and objective timing make it profitable. If you rotate mid while your bot wave is slow pushing to you, you can lose a full wave and plate pressure. Rotate after a crash, not before.
Early Game Rotation Playbook
1) First recall timing
The first recall often decides who controls river. If you recall on a crashed wave, you return with items and tempo. If you recall on a bad wave, you come back weaker and late.
2) Early objective setup
Even in solo queue, the clean way to secure early objectives is:
- push mid and bot/top (whichever side you’re playing for)
- place wards and clear enemy wards
- arrive first and force enemy to facecheck
- start objective only when lanes can move
3) Early roams that actually work
- Support roam mid after bot wave crash to burn flash or secure a kill.
- Mid roam top when top has stacked a wave to dive.
- Jungle invade when mid has priority and support can move.
Mid Game Rotation Playbook
Mid game begins when outer towers fall and the map opens. This is where most players throw games because they stop farming and start “ARAM-ing.”
Mid game win conditions
- Assign lanes: someone catches each wave, and you don’t leak gold.
- Control the next objective: start the setup early, not late.
- Use numbers: rotate as 2–3 players to force picks or tower damage.
Common lane setups (timeless)
- 1-3-1: strong side laners pressure both sides while mid trio holds vision and wave.
- 4-1: one splitpusher draws attention; four play for objective or siege.
- 1-4: when you want to protect a fed splitpusher and threaten dives/picks with the group.
Your setup depends on champions and power spikes. If you have weak side lanes, don’t force 1-3-1—play 4-1 and keep vision tight.
Late Game Rotation Playbook
Late game rotations are about two things: (1) wave positioning and (2) fog-of-war control. If waves are wrong, you can’t start Baron safely. If vision is wrong, you can’t walk into river without dying.
Late game rotation rules
- Waves first, then objective. Always.
- Don’t facecheck as 1. Move as 2–3 into fog.
- Set vision early. If you arrive late, you lose control wards, lose HP, and lose the fight before it starts.
- Side lane pressure creates mistakes. Push sides to force someone to show, then start Baron or take mid control.
Baron “dance” simplified
Baron isn’t always about taking Baron. It’s about threatening Baron to force a response, then punishing the response:
- Enemy checks? Pick them.
- Enemy sends someone to catch side wave? Start Baron or force mid tower.
- Enemy groups five? Push side waves and reset vision, don’t coinflip a 5v5 in fog.
Most Common Rotation Mistakes (and Fixes)
Mistake #1: Rotating without crashing the wave
Fix: Crash first, then move. If you can’t crash safely, consider a soft roam or stay and stabilize.
Mistake #2: Grouping mid for no reason (“ARAF”)
Fix: Someone must catch side waves. If all five mid, you bleed gold and lose tempo.
Mistake #3: Starting objectives with no priority
Fix: Get mid wave control first. If mid can’t move, trade cross-map instead of forcing.
Mistake #4: Over-chasing picks
Fix: If you got a pick, convert it into an objective or tower. Don’t waste the timer chasing into fog.
Mistake #5: Rotating late
Fix: Start setups earlier. The game rewards whoever arrives first with vision and positioning.
Solo Queue Shotcalling & Ping Language
You don’t need voice to coordinate rotations. You need clarity.
- “Push then move” pings: ping the wave, then ping river.
- “Reset” pings: ping recall on teammates when you want to spend gold before objective.
- “Trade” pings: if enemy sends 4 bot, spam ping top objective/tower and back away.
- “Don’t facecheck” pings: spam danger into fog, then group ping on yourself.
If you become the player who consistently calls the right rotation, you’ll win more games—even if your mechanics are average—because macro decisions multiply everyone’s impact.
How To Practice Rotations (Fast)
1) The “two-wave rule” drill
Every time you want to roam, ask: “What happens to the next two waves?” If the answer is “I lose them,” don’t roam unless it’s game-winning.
2) The 60-second objective timer drill
When a major objective is ~60 seconds away, your job is to:
- push mid
- push the closest side lane
- reset if needed
- walk in together to ward/sweep
3) VOD review shortcut
Watch your last 3 losses and only look at:
- the minute before each dragon/baron fight
- your wave state when you moved
- whether you arrived first or late
You’ll usually find the same mistake repeating. Fix one macro mistake and your rank jumps faster than learning ten new combos.
Legacy Notes (Older Concepts & Outdated Rank Terms)
Some older guides refer to ranks like “Diamond 5.” In modern LoL, the exact rank labels and divisions have changed over time, but the spirit of the advice remains: rotations become far more impactful once you’re at a level where players can reliably manage waves, understand recall timing, and punish overextensions.
Also, very specific early-game numbers (like exact minutes for certain tower/plate behaviors) can shift across seasons. This guide intentionally focuses on timeless principles: wave first, vision second, objective third—and the correct lane assignments after towers fall.
Conclusion
Rotations are quintessential for not just winning games in LoL but for understanding LoL itself. With three lanes, a large jungle, and constant objective pressure, small mistakes stack quickly. From start to finish, rotations and how you path your champions matter at all stages of the game. One wrong move can cause a snowball that feels unstoppable.
The good news is: macro mistakes are fixable. Once you can recognize wave states, create tempo, and rotate with vision, you’ll climb to new heights—because you’re not playing “random fights,” you’re playing the map.
You also can be interested in:
Optional note: If you want, you can add a short FAQ section under the conclusion (great for SEO), covering questions like “When should bot rotate mid?”, “How do I stop ARAM?”, “What if my team ignores waves?”, and “How do I set up Baron safely?”


