LoL Wave Management: Freeze, Slow Push & Crash (Drills)
LoL — Wave Management Fundamentals: Freeze, Slow Push, Crash (With Drills)
Wave management is the skill that turns “I’m even in lane” into “I’m up a level, up 20 CS, and their jungler hates visiting my lane.” In LoL, the minion wave is a resource you can shape: you can deny farm, create safe windows to trade, set up ganks, secure clean recalls, and force opponents to choose between losing CS or losing tempo.
This guide is built to stay useful season after season. Instead of relying on patch-specific damage numbers or champion lists, you’ll learn the timeless rules that govern minion waves and how to apply them with simple, repeatable drills.
What Wave Management Really Is
Wave management is the intentional control of where minion waves meet, how quickly they die, and when they reach a tower. If you can control those three things, you can control the lane’s risk level and the lane’s timing.
Newer players often think wave management is only “freezing to deny CS.” That’s a small part. The deeper truth is: the wave is a clock. Every time you change the wave’s position and size, you change the timing of trades, ganks, roams, objectives, and recalls.
Here’s the mindset shift: your lane is not only a fight between champions. It’s a fight between tempo decisions. If you crash a big wave at the right time, your opponent must answer it. While they answer, you get a move first. That “move first” is where most winning plays come from.
The 4 Core Goals: Gold, XP, Safety, Tempo
Every wave decision should serve one (usually two) of these goals:
- Gold: secure CS, deny CS, or force your opponent to miss last-hits under pressure.
- XP: hit level spikes first or keep your opponent from safely soaking XP.
- Safety: reduce gank angles, keep the wave closer to your tower, avoid overextending.
- Tempo: create windows to recall, roam, ward, or start objectives while the opponent is stuck clearing.
The best wave managers ask one question every 10 seconds: “What is the next 30–45 seconds supposed to look like?” Are you preparing a recall? Setting up a gank? Protecting yourself from a jungler? Trying to hit level 6 first? Your wave should reflect that plan.
Wave “Physics” You Must Understand
You don’t need to memorize exact minion stats to manage waves consistently. You do need a few rules that always hold true.
1) More minions = more DPS = the wave pushes
If your side has more minions alive than the enemy side, your wave tends to push over time because your minions deal more total damage. That advantage compounds: the wave with more bodies kills enemy minions faster, creating even more bodies.
2) Position matters: tower zones create “anchors”
Close to a tower, minions die faster and waves reset more often. This makes it easier to “lock” a freeze near your side and easier to crash if you build a large stack.
3) The wave meets where you allow it to meet
If you last-hit only, you usually allow a natural push depending on minion counts and where the wave is. If you thin a wave, you can stop it from crashing. If you hard shove, you can force it to crash. Wave meeting points are the result of your damage choices, not magic.
4) Health matters as much as numbers
A wave with equal minion count can still push if one side’s minions are healthier. When you “trim” a wave, you’re not only removing bodies—you’re changing the health distribution so the wave behaves differently.
5) Big waves protect you
A stacked wave is a shield. It makes it harder for your opponent to trade into you (they take minion damage), and it makes dives riskier for the enemy team. Many lanes are won simply by building a wave that your opponent can’t step into.
For deeper official explanations and patch notes context over time, Riot’s own news/dev posts can be useful: leagueoflegends.com news. For item/ability reference (not wave theory), community wikis can help with quick lookups: LoL Wiki.
The Three States: Freeze, Slow Push, Crash
Think of wave states as three tools. You’ll use all three in almost every lane phase:
Freeze
A freeze keeps the wave in a stable spot (usually near your tower but not under it). This denies farm, forces your opponent to walk up, and creates safe gank setups for your team. Freezes are about control and punishment.
Slow Push
A slow push is when you build a bigger and bigger wave by killing enemy minions slowly (usually by last-hitting only, or by lightly trimming). Slow pushes are about stacking minions to create pressure.
Crash
A crash is when you shove a wave into the enemy tower so the tower kills it. Crashes are about tempo: forcing the opponent to last-hit under tower while you get a free window to recall, ward, roam, or set up an objective.
The secret: wave management isn’t “pick one and do it forever.” It’s cycling these states on purpose. Most consistent lane plans look like: freeze to punish → slow push to build → crash to reset → bounce back → repeat.
How to Freeze (Step-by-Step)
A freeze is easiest when the enemy wave is slightly larger and the wave is on your half of the lane. Your job is to keep the wave from reaching your tower while also preventing it from pushing back out.
When freezing is correct
- You’re stronger in short trades and want the opponent to walk up.
- You’re vulnerable to ganks and want safety.
- Your jungler wants to gank your lane soon.
- The enemy just recalled or died, and you want to deny the wave as they return.
- You’re ahead and want to “starve” the opponent instead of coinflipping fights.
The “4 extra minions” rule (practical and timeless)
A simple starting point: to hold a freeze near your side in a long lane, you usually want the enemy wave to have a small advantage—often around 3–4 extra enemy caster minions worth of damage. You don’t need to count perfectly, but you should feel it: the enemy wave should be slowly winning if you do nothing. Your last-hits and light trimming keep it stable.
Freeze setup: the 3-step method
- Let the enemy wave come to you. Stop auto-attacking the wave. Last-hit only. If the wave is pushing away from you, you cannot freeze yet.
- Thin the wave just enough. If the enemy wave is too big, it will crash into your tower and break the freeze. Kill a few minions (usually casters) so the wave slows down and stops short of tower range.
- Hold the meeting point. Stand near the wave to control it and to threaten trades if the opponent tries to break the freeze. Keep last-hitting at the last possible moment to avoid accidentally pushing.
How to maintain a freeze without accidentally pushing
- Last-hit late: the earlier you hit minions, the more you push.
- Avoid AoE splash: if your kit splashes the wave, be deliberate with ability use.
- Trim only casters when needed: casters deal consistent damage; removing them changes wave behavior quickly.
- Tank minions briefly: if the wave is about to crash into your tower, step in front and hold it for a second or two (only if safe) so your next friendly wave arrives and stabilizes the freeze.
How opponents break your freeze (and how to respond)
There are only a few ways to break a freeze:
- They hard shove: they dump abilities and autos to force the wave into tower.
- They call jungler: they threaten you off the wave so they can crash it freely.
- They bait you into trading in the wave: you AoE the wave accidentally and it starts pushing out.
To protect your freeze:
- Trade when they hit minions: if they step up to shove, that’s the moment they’re not hitting you. Punish their shove attempts with short trades.
- Use “thin + hold” instead of “fight the whole wave”: your goal is wave position, not killing them. Keep the wave stable first.
- Respect jungle timing: freezing invites ganks—for both teams. If you’re freezing with no vision and no jungle info, you’re the one being punished.
Freeze win conditions
Freezing wins lanes by forcing choices: the opponent either walks up and risks dying, or stays back and loses CS/XP. Your job is to make both options bad.
How to Slow Push (Step-by-Step)
A slow push is the foundation of safe pressure. It creates large waves that protect you, enable tower damage, and force the enemy to spend time clearing while you move first.
When slow pushing is correct
- You want to crash a big wave for a recall timer or roam.
- You want priority to help your jungler or contest vision.
- You want to set up a dive (big wave = more safety, more damage, more chaos for the defender).
- You want to reduce risk while trading (enemy takes heavy minion damage if they fight into your stack).
Slow push setup: how to start it
The simplest slow push starts when the wave is on your side and you have slightly more minions. You create that condition by killing the enemy caster minions a little faster than they kill yours, then switching to last-hit only.
- Create a small minion advantage. Take out 1–2 enemy casters (or thin their wave) while keeping your wave healthy.
- Stop pushing hard. After the advantage exists, last-hit only and let your extra minions do the work.
- Protect the stack. Trade when the enemy tries to walk into your wave, and keep your minions alive when possible.
How slow pushes actually win games
A slow push does three powerful things:
- It grows into a “problem” wave. The bigger it gets, the longer it takes the enemy to clear.
- It forces predictable behavior. Most players must show up to clear a big wave, revealing their position.
- It gives you tempo. If your wave crashes, you can recall/roam while the enemy is trapped under tower.
Slow push trading rules
- Fight in your wave, not outside it. If you chase past your minions, you lose the wave’s protection.
- Short trades are king. Hit them when they step up for CS, then back into your minions.
- Don’t “accidentally” thin your own stack. If you AoE your own wave while trading, you can ruin your pressure.
Slow push danger: overextending with no plan
A slow push naturally moves you forward. That means you can become gankable. If you cannot track the enemy jungler, consider:
- slow pushing only when you have vision,
- slow pushing when your jungler is nearby,
- or converting into a crash quickly if you sense danger.
How to Crash (Step-by-Step)
A crash is your “reset button.” Done right, it gives you a free window. Done wrong, it gives the enemy a freeze. Your goal is to shove your wave into the enemy tower at a time that benefits you, then immediately use the time you created.
When crashing is correct
- Before recalling: crash so the enemy must clear under tower while you shop.
- Before roaming: crash so the enemy loses CS if they follow.
- Before taking plates/tower damage: crash with a big wave to maximize damage time.
- To break an enemy freeze: shove hard so the wave reaches their tower and resets.
- To set up a bounce: crash so the wave returns toward you afterward, allowing a future freeze.
Crash mechanics: what “proper crash” means
A proper crash means your wave reaches tower and the tower starts killing your minions before the enemy can thin it outside tower range. If the enemy holds the wave outside tower range, you didn’t really crash—you delivered them a freeze opportunity.
Crash execution: the 4-step method
- Decide early. If you want to crash, commit while your wave still has time to reach tower.
- Clear the enemy casters. Casters slow your wave and keep it from reaching tower quickly.
- Use abilities to accelerate only when necessary. You want the wave to die at tower, not halfway down the lane.
- Leave immediately after the crash. The crash is valuable because it creates time. Use that time: recall, ward, roam.
Crash timing: why “big crash” beats “small crash”
Crashing one small wave gives the opponent an easy clear and minimal tempo. Crashing a stacked wave forces them to spend much longer under tower, often missing last-hits or losing opportunities to contest vision. If you can, build first (slow push), then crash.
Crashing safely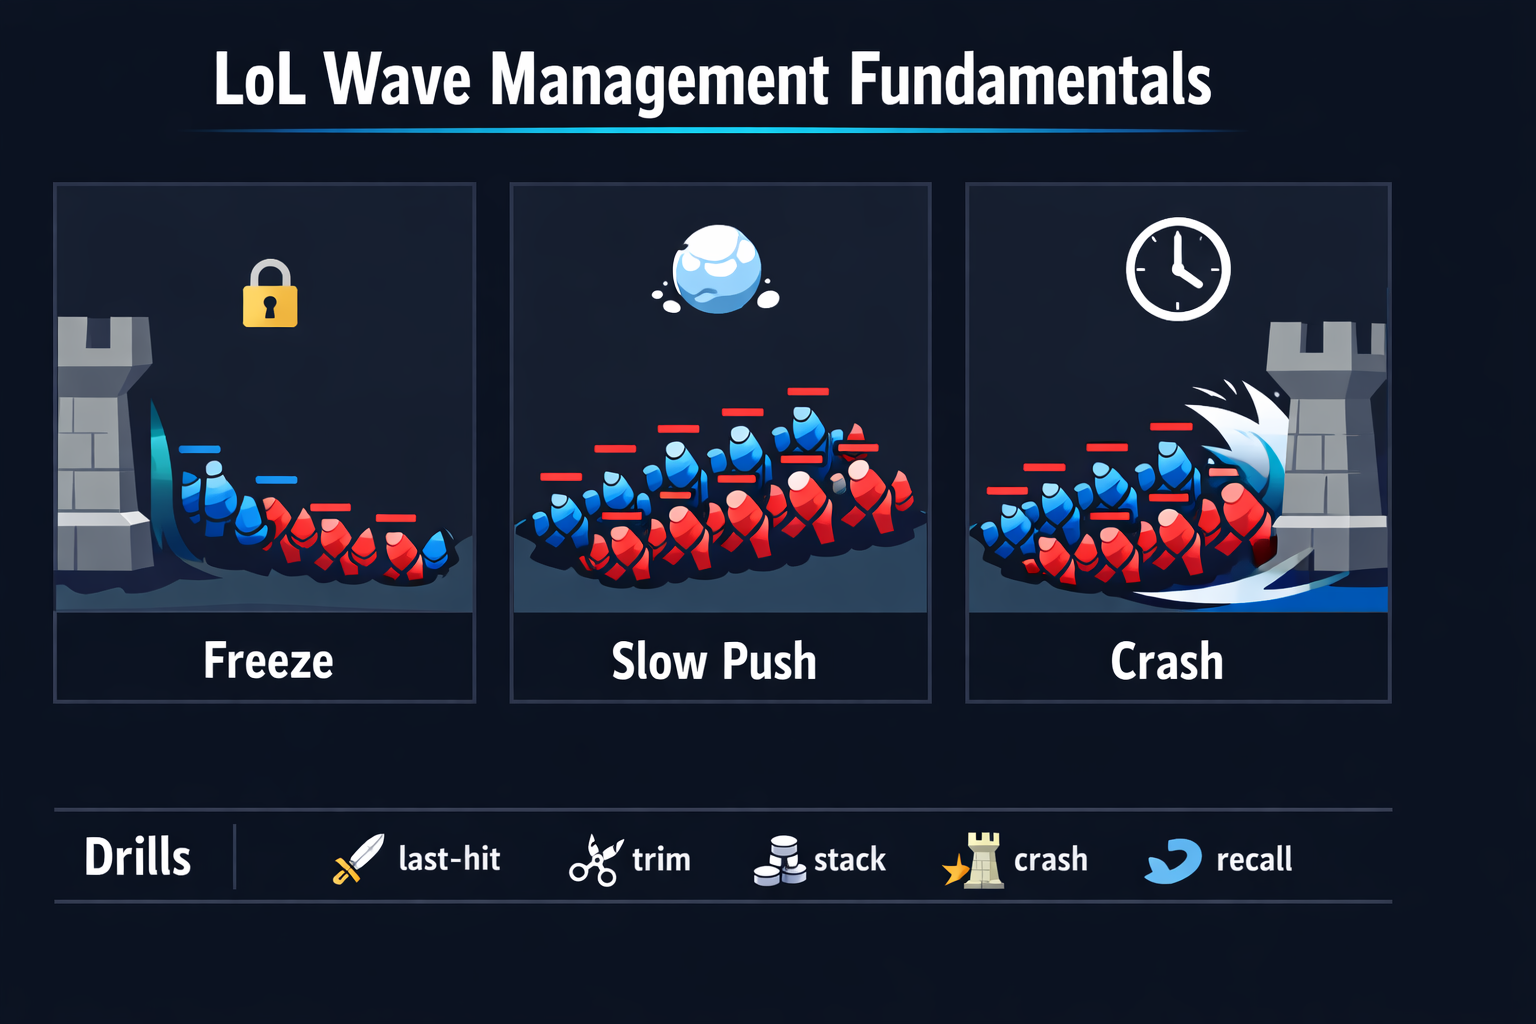
Many players die during a crash because they shove while overextended with no vision. If you need to crash but feel unsafe:
- use wards earlier (not after you’re already deep),
- crash on a wave where your jungler is nearby,
- or crash with a large stacked wave so the enemy is less likely to fight into it.
Transitions: Freeze → Slow Push → Crash
The most reliable lane strategy is not “always freeze” or “always shove.” It’s the ability to transition wave states to match your next goal.
Transition 1: Freeze → Slow Push
You freeze when you want the opponent stuck and vulnerable. But at some point you’ll want a recall, a roam, or a reset. To convert a freeze into a slow push:
- Thin the enemy wave until it’s even. Remove the extra enemy casters that were maintaining the freeze.
- Keep your wave healthier. Last-hit only while letting your wave gain a small advantage.
- Escort the wave forward. Once it starts pushing, protect it and trade in it.
Transition 2: Slow Push → Crash
Once you’ve stacked a wave, crashing is usually easy—but you still must be deliberate. The key is to crash before the enemy can clear the wave in the lane.
- On the last stacked wave, accelerate. Use abilities and autos to ensure it reaches tower.
- Don’t chase trades that slow the crash. If you fight too long, the wave may stall outside tower range.
- Confirm tower contact. Make sure your minions actually enter tower range.
- Instantly use the timer. If you “hang around,” you waste the whole reason you crashed.
Transition 3: Crash → Bounce → Freeze
After a successful crash, the wave often “bounces” back toward you because the enemy tower kills your minions quickly and your next wave arrives later. That bounce is your chance to set up another freeze—especially if you can return to lane in time.
This is why crashes are so powerful: they can create the next freeze for you, which creates the next punish window. Wave control is a loop.
Recall Timing, Bounce, and Practical “Cheater” Concepts
Even without using any special jargon, there’s a simple rule: your best recall is after a crash. If you recall while the wave is in the middle of the lane, you usually lose minions and give the opponent a free reset.
The two best recall patterns
- Big crash recall: slow push 1–2 waves, then crash the stacked wave, then recall immediately. This is the safest, most consistent way to shop without losing much.
- Emergency crash recall: if you’re low HP/mana, sometimes you must crash quickly with abilities just to get out without losing the entire lane.
The bounce window
After you crash and recall, the wave often returns toward you. If you get back on time, you can catch the wave near your tower and choose: freeze it, thin it, or slow push again.
What ruins your recall
- Half-crashing: leaving the wave outside tower range creates an enemy freeze.
- Recalling too late: if you recall after the enemy has already cleared the crash, you lose tempo.
- Recalling on a pushing wave away from you: you return to a bad lane state and often lose more than you gained.
Matchups and Roles: Melee vs Ranged, Weakside vs Strongside
Wave management is universal, but how you apply it changes with matchup, lane length, and jungle attention. Instead of memorizing champion-specific rules, use these timeless matchup lenses.
Melee vs ranged (common patterns)
- Melee goals: keep waves closer to your tower early, reduce poke, punish oversteps with short all-ins. Freezes are often your friend.
- Ranged goals: build slow pushes to harass safely, crash to poke under tower, then reset and repeat. But beware: mindless shove creates gank vulnerability.
Winning vs losing lane
- If you’re winning: prefer freezes and slow pushes. Deny resources, force bad recalls, create dive threats. Don’t coinflip fights when you can starve them.
- If you’re losing: prefer “safe catches” and controlled crashes. Your priority is to survive, collect XP, and avoid getting frozen out. Sometimes the correct play is to thin waves and reset rather than fight.
Weakside vs strongside
“Weakside” means you should not expect help (your jungler is playing elsewhere). “Strongside” means your side of the map has attention or setup for plays.
- Weakside: avoid long slow pushes without vision; prioritize safe wave positions and minimization.
- Strongside: slow push into crash to set up dives, plates, and objective rotations.
Working With (and Against) Junglers
Wave states are signals. They tell junglers what is possible. If you want consistent ganks and fewer deaths, align your wave with jungle reality.
How to set up a gank (the wave way)
- Freeze near your tower: opponent must walk up; jungler has space behind them.
- Keep enough enemy minions to hold the freeze: don’t let it crash into your tower.
- Don’t shove right before your jungler arrives: you remove the gank angle.
How to avoid being ganked
- Don’t slow push blind. If you build a wave while the enemy jungler is missing, you’re walking into danger.
- Crash with purpose. If you must push, crash fast and reset—don’t linger extended.
- Use big waves as protection. Trade and play inside your stacked wave rather than out in the open lane.
Wave + objective timing
A clean crash before objectives is one of the strongest fundamentals in LoL. If your lane wave is crashed, the enemy must choose between answering the wave or arriving late. That decision wins neutral objectives more often than mechanics do.
Using Waves After Lane Phase
Wave management doesn’t end at 14 minutes. It changes form. Instead of freezing in a long lane, you’re now managing side waves to create map pressure and timing for objectives.
Side lane slow push for pressure
A classic midgame plan is to build a slow push in a side lane, then rotate. The wave becomes a “delayed threat” that forces someone to show up later. If they answer, you can fight 5v4 elsewhere or secure vision first.
Crash before you move
The same lane rule stays true: move after a crash. If you leave a side lane wave in the middle, you often lose a full wave and donate gold to the enemy.
Preventing “free waves” for the enemy
Many games are thrown because players group mid while side waves build against them. If enemy waves are stacking and crashing into your towers, you’re losing gold and giving the enemy tempo to start objectives. Managing waves is how you keep the map “clean” and predictable.
Practice Drills (Custom / Practice Tool)
Mechanics improve from repetition. Wave management improves from repeatable scenarios. These drills are designed to be simple and timeless, so you can do them any time you feel rusty.
Drill 1: The 5-minute last-hit baseline
Goal: build clean last-hitting so you can manage waves without accidental pushing.
- Go into Practice Tool (or a custom alone).
- For 5 minutes, last-hit only. No abilities on the wave unless your champion requires it to last-hit.
- Track how often you accidentally push by hitting too early.
- Repeat until your CS feels stable and your wave stays where you expect.
Success metric: you can keep the wave stable near the middle without it racing to either tower.
Drill 2: Freeze setup from a neutral wave
Goal: learn how to “create” a freeze instead of waiting for one.
- Start with a neutral wave (middle of lane).
- Allow the enemy wave to gain a small advantage by last-hitting late and avoiding extra damage.
- As it approaches your side, trim only enough to prevent a tower crash.
- Hold the wave just outside tower range for 60–90 seconds.
Success metric: wave stays on your side without touching tower, and doesn’t slowly drift outward.
Drill 3: Freeze maintenance while trading (no real opponent)
Goal: simulate the pressure of “doing something” while preserving the freeze.
- Set up a freeze as in Drill 2.
- Every time an enemy minion reaches last-hit range, imagine the opponent is trying to break the freeze.
- Move forward for one “trade” action (auto a dummy target if available), then move back.
- Return to last-hitting only without breaking the wave state.
Success metric: you can take small actions without accidentally pushing the wave out.
Drill 4: Slow push build and protection
Goal: build a stacked wave and practice staying inside it.
- Create a small minion advantage (clear 1–2 enemy casters).
- Last-hit only for the next wave so your stack grows.
- Walk with the wave as it moves forward and maintain a safe position within the minions.
- Do not use abilities that kill your own stack unnecessarily.
Success metric: by the time the wave reaches enemy tower area, it is noticeably larger and would be hard to fight into.
Drill 5: The “big crash recall” timer
Goal: crash a stacked wave and recall instantly—no hesitation.
- Slow push for 1–2 waves.
- On the final wave, accelerate and ensure minions reach tower range.
- The moment the tower starts killing your minions, start recall immediately.
- Return and observe whether the wave bounced back toward you.
Success metric: you return to lane with minimal loss and a wave coming toward you (or a stable lane you can manage).
Drill 6: Breaking an enemy freeze (solo simulation)
Goal: learn what “enough shove” feels like.
- Let the wave settle near the enemy side (simulate that they froze).
- Practice hard shoving with autos + abilities to force the wave into tower.
- Focus on clearing casters first so the wave actually reaches tower range.
- Repeat until you can consistently make the wave touch tower without dying to “imaginary” ganks (keep it clean and quick).
Success metric: you can reliably reset the wave instead of feeding the enemy a permanent freeze.
How often to drill
If wave control is a weak point, do 10–15 minutes of Drills 2, 4, and 5 before ranked sessions. If you already understand the concepts but struggle in games, focus on Drill 5 (crash → instant recall) and Drill 2 (freeze setup).
Common Mistakes and Fixes
Mistake 1: “I froze… but it crashed into my tower.”
Cause: enemy wave was too large, or you didn’t tank/trim in time.
Fix: trim casters earlier; if needed, briefly tank the wave outside tower range until your next wave arrives.
Mistake 2: “I crashed… and now the enemy froze on me.”
Cause: you didn’t actually crash into tower range, or you left too early while the wave was held outside tower.
Fix: confirm tower contact. If the enemy is trying to hold the wave, you may need to walk up and finish the crash.
Mistake 3: “My slow push got me killed.”
Cause: slow pushing without vision/jungle tracking.
Fix: slow push only when you have a plan: vision set, jungler nearby, or a quick crash timer. Otherwise, keep it smaller.
Mistake 4: “I always shove because I’m bored.”
Cause: autopilot damage on the wave.
Fix: force yourself to name the next goal: “freeze to deny,” “slow push to crash,” or “crash to recall.” No goal, no shove.
Mistake 5: “I trade a lot, but I’m always down CS.”
Cause: trading at bad times (missing last-hits) and pushing the wave unintentionally.
Fix: trade when the opponent goes for CS. If you miss your own CS to trade, it must lead to a bigger outcome (kill/recall/denial).
Quick Checklist for Every Wave
Use this as your in-game mental script:
- Where is the enemy jungler likely to be? If unknown, avoid long extensions.
- What is my next goal in 30–45 seconds? Recall? Gank setup? Level spike? Roam?
- Which wave state matches that goal? Freeze (control/deny), slow push (build pressure), crash (tempo/reset).
- Do I need to trim? If freezing, trim to prevent tower crash. If slow pushing, avoid thinning your stack.
- After the crash, what will I do? Recall immediately, ward, roam, or hit tower—don’t waste the timer.
FAQ
How do I know if I should freeze or slow push when I’m ahead?
If you can reliably threaten the opponent when they walk up, freezing is usually the most punishing. If you want plates, a recall timer, a roam, or a dive setup, slow push into crash is usually better. In practice: freeze to starve, slow push to convert your lead into map impact.
What if my champion has unavoidable waveclear?
Some kits naturally push. You can still manage waves by being more deliberate with ability timing: use abilities to crash when you want tempo, and otherwise last-hit with autos as much as possible. If you can’t hold a perfect freeze, aim for “controlled waves” near your side and prioritize crash → recall consistency.
Is freezing always safe?
It’s safer than overextending, but it can still be punished by coordinated jungle/mid pressure. Freezing creates a predictable lane state, which is good for your jungler—but also for theirs if you have no vision. Freeze when you can track threats or when you can back off quickly.
What’s the simplest reliable lane plan for most players?
Default plan: last-hit early → build a slow push → crash → recall immediately → catch the bounce → freeze if possible → repeat. This plan naturally creates safe recalls and denies opponents who don’t understand wave states.
How does wave management connect to climbing rank?
Wave control creates consistent advantages that don’t rely on outplaying fights. It’s one of the most “repeatable” skills in LoL: you can practice it in isolation and apply it in every matchup. If you want structured improvement quickly, pairing wave fundamentals with coaching or targeted practice is one of the fastest paths.
Next Step: Structured Improvement
If you want a faster, more consistent climb, wave control is one of the easiest fundamentals to sharpen with a structured plan: one champion pool, repeatable lane scripts, and clear review checkpoints. If you’re looking for help accelerating that process, you can check Boosteria’s LoL options here: Boosteria LoL (Elo) Prices.