Overwatch 2 Cooldown Trading: Win Fights with Ability Economy
Overwatch 2 Cooldown Trading: The Hidden Skill That Wins Fights
Cooldown trading is the quiet skill that decides most teamfights in Overwatch 2 long before the kill feed explodes. It’s not aim. It’s not “my tank diff.” It’s the invisible exchange of abilities—who forces what, who answers with what, and who runs out of tools first.
If you’ve ever felt like fights are random—sometimes you melt a team, sometimes you get wiped instantly—this guide will make those moments predictable. You’ll learn how to track key abilities, bait defensive cooldowns, punish timing windows, and turn small advantages into clean wins. The best part: these principles stay relevant even when heroes get tuned, maps change, and the meta shifts.
This is a timeless, fundamentals-first guide. We’ll use a few common ability examples to illustrate ideas, but the goal is to teach a system you can apply to any comp, any rank, any season.
Table of Contents
- What Cooldown Trading Means (and Why It Wins Fights)
- Ability Economy: The Real Currency of Teamfights
- The Trade Loop: Probe → Force → Punish → Reset
- Cooldown Tiers: Which Abilities Matter Most
- How to Track Cooldowns Without Overthinking
- The 10 Most Common Cooldown Trading Mistakes
- Tank Play: Forcing Space with Smart Trades
- DPS Play: Baiting Escapes and Converting Windows
- Support Play: Saving the Right Tools for the Right Threat
- Layering vs Stacking: How Teams Throw Their Advantage
- Punish Windows: Timing, Distance, and Commit Signals
- Cooldown Trading + Ult Economy (How They Connect)
- Trading by Fight Phase: Neutral, Engage, Brawl, Cleanup
- Simple Communication Templates That Actually Work
- Practice Plan: Drills, VOD Review, and a 7-Day Upgrade
- Solo Queue Cooldown Trading: Carry Without Perfect Teammates
- FAQ
1) What Cooldown Trading Means (and Why It Wins Fights)
Cooldown trading is the skill of forcing an enemy to spend an ability and answering with the cheapest effective response, so your team finishes the fight with more tools than they do.
Think of a fight as a series of questions:
- Can you get to me safely?
- Can you stop my engage?
- Can you survive my burst?
- Can you escape if things go bad?
Each cooldown is an “answer” to one of those questions. When an enemy spends an answer, they temporarily can’t respond to that threat again. Cooldown trading is about creating the moment where the enemy has no correct answer left—and then pushing hard into that weakness.
At lower ranks, teams often win “by accident” because someone hits a big shot. At higher ranks, teams win because they deliberately engineer an opening: force a defensive, force a mobility, force a save—then collapse into the gap.
If you want a single sentence definition: Cooldown trading is creating and exploiting a resource advantage in abilities.
Why it’s the hidden skill
You can’t see cooldown trading in the scoreboard. You can’t measure it with damage numbers. But you can feel it: fights become calmer, cleaner, and more repeatable. Instead of “go in and pray,” you start thinking “we go when they’re missing X.”
What makes it timeless
Balance patches change numbers. New heroes add new tools. But the structure of fights doesn’t change: threat → response → window → punishment → reset. If you master this, you stay strong even when the meta shifts.
2) Ability Economy: The Real Currency of Teamfights
Most players understand ult economy. Fewer players understand that ult economy is just a visible layer of a larger system: ability economy.
Ability economy is about:
- How many tools each team has available right now
- Which tools matter for the next 3–8 seconds
- How expensive each response is
- How quickly each side can regain tools (cooldown timers)
If one team has a key defensive or escape tool missing, they’re not “weaker forever.” They’re weaker for a window. The team that recognizes that window and commits during it wins far more fights.
A simple model: “Tools in the next 6 seconds”
In most Overwatch 2 fights, the critical moment happens in a short burst—often 3 to 6 seconds after someone commits. During that burst, the only thing that matters is which saves, stops, and escapes are available.
Ask yourself constantly:
- What can stop our engage right now?
- What can save their target right now?
- What escape does their backline still have?
This lens instantly improves decision-making. It also reduces tilt: you stop blaming teammates for “not killing” and start noticing the real issue—your team committed into full enemy tools.
Why “cheap responses” matter
Not every trade is equal. If you can force a powerful defensive with a minor threat, you win the exchange. If you answer a small poke with a huge save, you lose the exchange.
Overwatch is full of “overreactions” that look good (big effects) but are strategically losing. The goal is not to press buttons. The goal is to press the right button at the right time for the right threat level.
3) The Trade Loop: Probe → Force → Punish → Reset
Most fights follow a repeatable loop. If you learn the loop, you can control the fight even in solo queue.
Step 1: Probe (Create a question)
A probe is a low-to-medium commitment action that asks the enemy to respond. Examples include:
- Applying pressure to a support angle
- Threatening a quick burst on a squishy
- Taking a strong off-angle that demands attention
- Walking forward with tank presence to test the line
The key: a probe should be reversible. You want to threaten without fully committing your life. Probes are how you bait out answers.
Step 2: Force (Make them spend an answer)
When the enemy believes danger is real, they respond with an ability. This is where trades start. Your goal is to force something that:
- Is important for the upcoming engage (a save, stop, or escape)
- Has a meaningful cooldown (creates a punish window)
- Cannot be instantly replaced by another tool
Forcing “minor” cooldowns can still be good, but forcing a key defensive or escape is the jackpot because it changes what’s possible for the next several seconds.
Step 3: Punish (Hit the window)
This is where most players fail—not because they don’t know a cooldown was used, but because they don’t convert immediately.
A punish window is not infinite. It’s a short period where the enemy lacks an answer. Punish windows close because:
- The cooldown comes back
- The enemy repositions behind cover
- The enemy rotates to a safer line
- The enemy uses a different tool (ult, displacement, counter-engage)
The conversion rule is simple: if you forced a key tool, push within the next few seconds while the enemy is still exposed to the threat that tool was meant to stop.
Step 4: Reset (Don’t donate back value)
After you punish—or if you fail to punish—you must reset. Reset means you stop feeding value into the enemy’s cooldowns. You back up, break line of sight, heal, and set up the next probe.
Many fights are lost because a team “wins the trade” and then throws it by:
- Chasing too deep into fresh enemy cooldowns
- Staying exposed while their own tools are down
- Staggering one-by-one instead of regrouping
Cooldown trading isn’t only about aggression. It’s also about discipline: knowing when your advantage is over and leaving before the enemy stabilizes.
4) Cooldown Tiers: Which Abilities Matter Most
You can’t track everything. The skill is choosing what matters. Use tiers.
Tier A: Fight-Winning “Stops” and “Saves”
These are abilities that can completely deny a kill, deny an engage, or swing momentum instantly. Examples (not exhaustive):
- Hard crowd control / interruption that stops a commit (stuns, sleeps, big knockbacks, pulls)
- Immunity / cleanse / invulnerability effects that erase burst timing
- Death-prevention tools that negate a pick
When a Tier A tool is down, your team often has a real “go time.” This is the core of cooldown trading.
Tier B: Mobility and Escape
Escapes define what targets are punishable. If a backliner has no escape, they become vulnerable to:
- Dives
- Off-angle bursts
- Forced duels
When an escape is down, the punish window is often shorter but extremely lethal if you’re ready.
Tier C: Pressure Tools
These create damage or space but don’t guarantee a swing. They matter because pressure is how you force Tier A and Tier B responses. Pressure tools include:
- Damage cooldowns
- Area denial
- Short shields or temporary mitigation
Tier C is important, but it’s rarely the thing you “track” first. It’s the engine that produces forces.
Tier D: Information and Setup
Scouting, marking, and vision-like tools matter more than people think. They don’t always win the fight instantly, but they prevent you from walking into traps and help you pick the right target at the right time.
Timeless rule: Track Tier A first, then Tier B, then everything else. If you can only track one thing per fight, track the enemy’s best save or stop.
5) How to Track Cooldowns Without Overthinking
Cooldown tracking doesn’t require perfect memory. It requires a simple system and consistent attention.
The “Big 3” tracking method
In most ranked fights, you only need to track three enemy tools:
- Their main save (the thing that prevents a kill)
- Their main stop (the thing that stops your engage)
- Their main escape (the thing that makes a target unkillable)
Once one of those is used, say it (even to yourself): “No save.” “No stop.” “No escape.” That single sentence changes how you play the next seconds.
Don’t track seconds—track states
Trying to count exact cooldown seconds in your head can overload you. Instead, track states:
- Up (they have it)
- Down (they used it recently)
- Back soon (the window is closing)
Most of the time, “down” is all you need. You only care about exact timing when you’re coordinating a high-precision engage. In most ladder games, the window is either open or it isn’t.
Use triggers to remember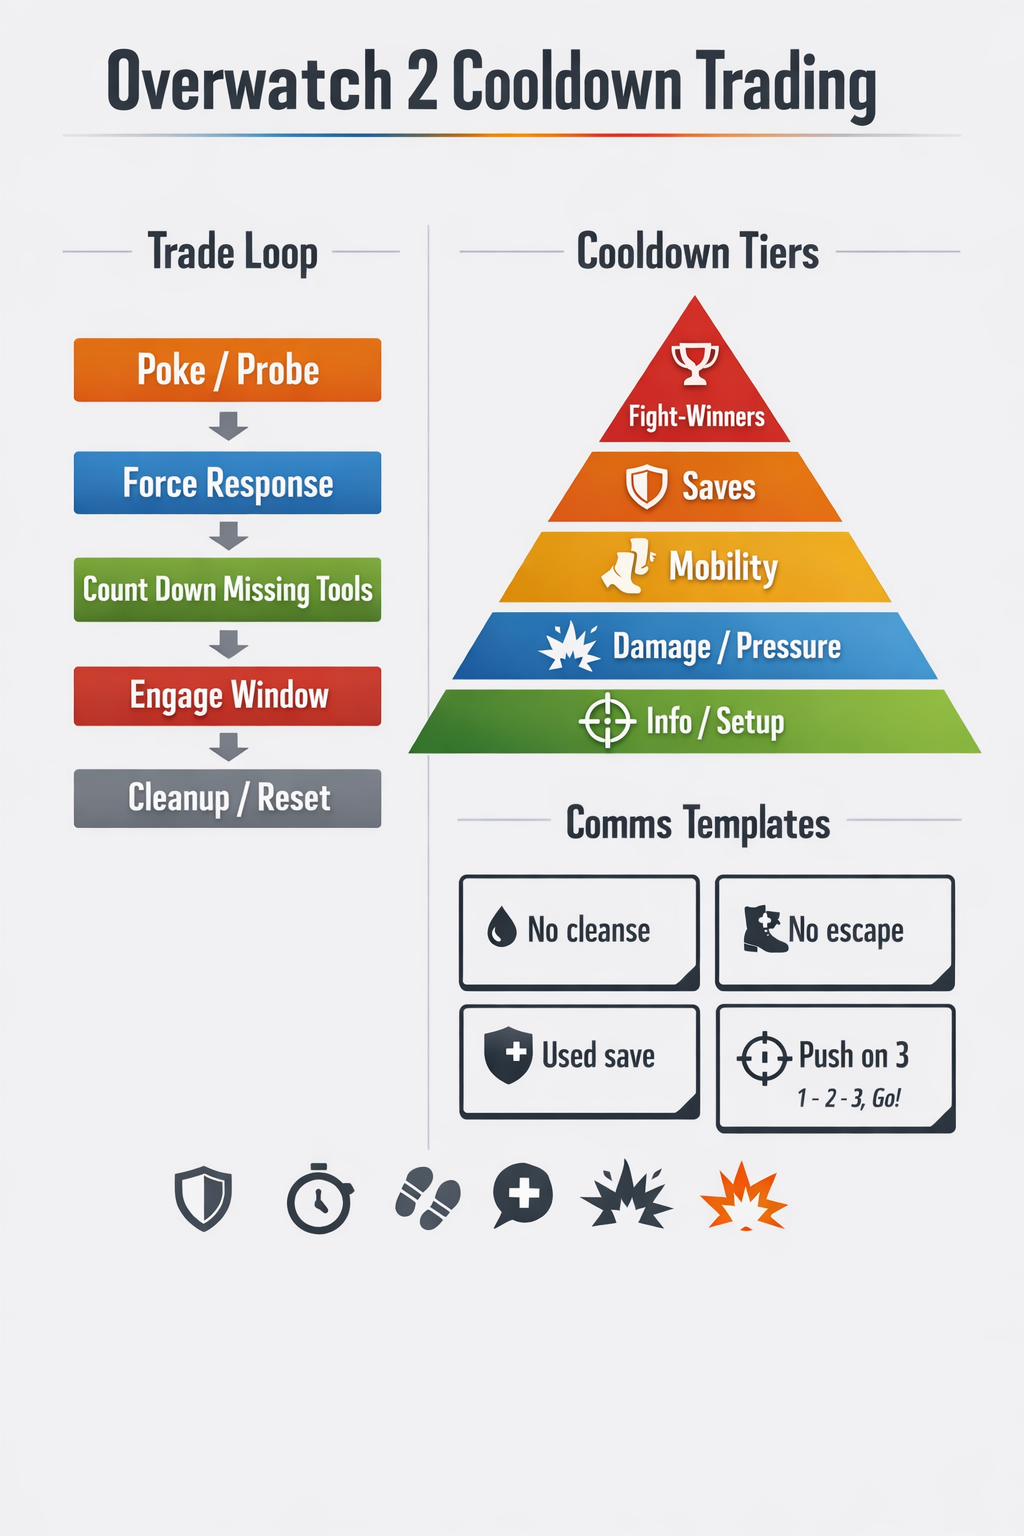
Your brain remembers best when you tie memory to a trigger:
- When you hear/see the animation, you label it: “Used.”
- When you see the enemy reposition defensively, you label it: “Window.”
- When you reload/heal/rotate, you ask: “What’s missing?”
This creates a loop: observe → label → act. You stop playing on autopilot.
How pros do it (in plain terms)
High-level players don’t track everything. They track the one or two abilities that decide the next interaction. Then they plan their next move around that information. It’s less “genius memory” and more “good priorities.”
6) The 10 Most Common Cooldown Trading Mistakes
1) Trading expensive for cheap
Using a major defensive to answer minor poke is a losing trade. The enemy will notice, then hard engage while you’re missing your best tool.
2) Stacking defensives when one was enough
If two supports both “save” the same target, you might survive—but you also remove your ability to answer the next threat. Layering is smart; stacking is panic.
3) Forcing a key cooldown and then waiting
This is the biggest conversion error. If you bait a major defensive and then hesitate, you gift the enemy time to reset and regain tools.
4) Engaging when your own key tool is down
Cooldown trading is not only “track them.” It’s “track us.” If your team’s main save is down, you’re the ones vulnerable. Slow down and probe instead of committing.
5) Pushing the wrong target
Cooldown windows are target-specific. If you forced an escape from one hero, but then you dive someone else who still has full tools, you wasted the trade.
6) Confusing “pressure” with “commit”
Pressure is reversible. Commit is not. Many players commit too early, before the enemy spends their answers.
7) Taking fights at the wrong distance
Some cooldowns are stronger at close range; others dominate at long range. If your punish window requires closing distance, you must already be positioned to do it quickly.
8) Not respecting counter-engage tools
When you push into a window, the enemy may counter-engage with displacement, burst, or an ultimate. Good trading includes planning for their “last resort.”
9) Chasing cleanup into fresh cooldowns
You win the first part of the fight, then donate deaths by chasing too deep. Cleanup is about safe confirmations, not ego duels.
10) Not resetting after losing the trade
If you’ve spent more tools than the enemy, the correct play is often to back up, heal, and wait. Continuing to brawl when you’re missing your answers is how fights turn into wipes.
7) Tank Play: Forcing Space with Smart Trades
Tanks are often the first mover in cooldown trading, not because they must always engage, but because their positioning and presence forces reactions. A tank walking forward at the right moment can compel an enemy to spend key tools early.
Your job is not “go in.” Your job is “make them answer.”
When you step forward, you’re asking the enemy: “Can you stop me?” If they spend a stop, your team can punish. If they don’t, you may take space and create angles that force a save on the backline.
Tank trading checklist
- Before you commit: Do we have our main save available?
- As you probe: Which enemy tool are we trying to force?
- When they respond: Did they spend a stop or a save?
- On window: Can we close distance before they reset?
- After engage: Do we stay and brawl, or reset?
How to create “cheap pressure”
Good tanks threaten without donating. That often looks like:
- Using cover to reduce incoming damage while you advance
- Taking an angle that forces enemy backline reposition
- Feinting an engage to bait a defensive
- Holding your strongest commitment tool until the enemy has spent theirs
In other words: you show the enemy a problem, but you don’t fully solve it until they waste their best solution.
Common tank trap: “I must trade my life for space”
Sometimes sacrifice is correct, but most ranked games are lost by tanks who commit into full enemy answers. A better rule is: commit when the enemy is missing a key answer, or when your team is clearly positioned to follow.
8) DPS Play: Baiting Escapes and Converting Windows
DPS players often decide cooldown trading because DPS are best at creating targeted threats: off-angles, burst, and duels. Your goal is to either:
- Force an enemy escape (mobility/immune), then punish while it’s down
- Force an enemy save on someone else, then punish a second target
The off-angle principle
Cooldown trading becomes easier when the enemy cannot answer everything from one direction. Off-angles force split attention. Split attention forces panic cooldowns. Panic cooldowns create windows.
Even if you don’t get a kill, your off-angle can win the fight if it forces a key defensive early.
The “escape tax”
Many heroes rely on one escape to survive. Your job is to make them pay that escape for something that isn’t a kill. If you force the escape and you stay alive, you have created a timer where that target must play safer.
That timer is your invitation to:
- Call the window
- Re-angle to cut off their retreat
- Coordinate with your tank to collapse
Don’t tunnel on damage—tunnel on tools
A common DPS error is thinking the only measure of value is damage. In cooldown trading, value is: what did they spend because of you?
If you force the enemy’s best save with a medium threat, you’ve created a future kill for your team. That’s winning DPS play even if your damage number isn’t flashy.
9) Support Play: Saving the Right Tools for the Right Threat
Supports are the guardians of ability economy. Many teamfights are decided by a single support decision: Did you use your key save at the correct time?
Support trading is about threat identification
You can’t “save everything.” If you try, you’ll burn your best cooldowns too early. The skill is recognizing the difference between:
- Pressure (they are testing you)
- Commit (they are trying to kill right now)
A good support uses cheaper tools during pressure and reserves the big save for true commit.
Three support rules that win games
- Don’t overlap saves. If one save is active, the next save should usually be held unless the threat escalates.
- Position for line of sight. You can’t trade cooldowns if you can’t see your teammate at the moment of danger.
- Call what’s missing. “No cleanse,” “no save,” “no escape” are fight-winning comms even in messy solo queue.
Support positioning as a cooldown tool
Your positioning is a “cooldown” in the sense that it creates or removes options. If you stand in a place where you can safely see your team and break line of sight when needed, you reduce how often you must spend major defensives.
Timeless mindset: positioning lets you trade less. Trading less means you have more tools for the real engage.
10) Layering vs Stacking: How Teams Throw Their Advantage
This section alone can add ranks if you apply it consistently.
Stacking (bad)
Stacking is when multiple major cooldowns get used for the same moment, even though one would have been enough. Stacking usually happens because:
- Players panic and press their “oh no” button
- Players don’t know what their teammates already used
- Players don’t agree on the threat level
Stacking feels safe, but it creates a future problem: the next enemy push arrives and you have no answers left.
Layering (good)
Layering is when you use one tool, then hold the next tool as insurance, only spending it if the threat escalates. Layering looks like:
- Use a small defensive first
- Hold the big save for the burst moment
- If burst doesn’t come, you keep the save
Layering is the heart of cooldown trading because it keeps your ability economy healthy.
The “one big cooldown per problem” rule
In most fights, try to solve each major threat with one major cooldown. If you must use two, it should be because the enemy truly invested two threats (for example: they layered multiple bursts or combined engage tools).
If your team adopts this rule, you stop losing fights that “should have been won.”
11) Punish Windows: Timing, Distance, and Commit Signals
Winning the trade is only step one. Winning the fight requires conversion.
Window length depends on three factors
- Cooldown duration: longer cooldowns create longer windows
- Distance: if you’re far away, your window is shorter because it takes time to reach the target
- Exposure: if the target can instantly hide behind cover, the window may be “practically” short
That’s why positioning matters before the window opens. Good teams position so that when the key tool is used, the punish is immediate.
Commit signals (the moment you go from pressure to kill)
Commit signals are cues that it’s time to fully engage. Common commit signals include:
- The enemy spent a major save and the target is still in danger
- The enemy backline used escape and is still within reach
- The enemy used a stop and your team has an alternate engage path
- The enemy’s formation breaks (someone isolated or forced to rotate)
When you see a commit signal, you must act decisively. Hesitation is how windows close.
The “3-second rule”
As a practical ladder rule: after a key enemy defensive is forced, try to make your next decisive move within roughly 3 seconds. This doesn’t always mean full dive; it can mean taking the space that makes the kill inevitable.
The point is urgency. If you consistently convert quickly, you’ll feel fights become easier.
12) Cooldown Trading + Ult Economy (How They Connect)
Cooldown trading and ult economy are not separate. Cooldowns decide whether ultimates get value. Ultimates also act like “super cooldowns” that can replace missing tools.
Use cooldown trading to protect ult value
Many ultimates fail because the enemy still has the correct answers available. A timeless approach is:
- First, force the enemy’s best answer with cooldown pressure
- Then, use the ultimate when the answer is missing
This is why teams that “ult first” without trading often get countered and feel unlucky. It’s not luck. It’s economy.
Use ultimates to patch your missing tools
If your team is missing a key defensive or stop, an ultimate can temporarily replace that weakness—either by creating massive threat (so the enemy must back up) or by adding survivability and tempo.
Timeless principle: ults can rescue bad ability economy, but good ability economy makes ults unstoppable.
Don’t over-invest when you already won the trade
One of the biggest ult economy leaks is using ultimates after your team already forced multiple enemy cooldowns and gained control. If the enemy is already missing answers, you can often win with basic abilities and clean focus, saving ultimates for the next fight.
This is how strong teams “snowball” without ever looking flashy: they win fights cheaply.
13) Trading by Fight Phase: Neutral, Engage, Brawl, Cleanup
Phase 1: Neutral (the poke and setup)
In neutral, your goal is to create the first advantage without risking a wipe. You trade low-cost pressure abilities, take angles, and look for:
- Forcing an escape
- Forcing a major save
- Forcing reposition that loses space
Neutral is where discipline matters. If you commit too early, you skip the forcing step and walk into full enemy tools.
Phase 2: Engage (the first real commit)
Engage is where cooldown trading becomes visible. Both teams start spending major tools. The best teams spend theirs in the correct order:
- Pressure first
- Then stops/saves as needed
- Then cleanup tools to confirm kills
The worst teams spend everything at once and pray.
Phase 3: Brawl (the chaotic middle)
In the brawl, your goal is to answer threats efficiently and keep one last defensive for emergencies. This is where layering vs stacking matters most.
Ask: “What’s the next biggest threat?” If you solve the current threat but have nothing left for the next, you lose the brawl even if you started well.
Phase 4: Cleanup (confirm, don’t donate)
Cleanup is where you either end the fight cleanly or throw. The goal is:
- Confirm kills that are safe to confirm
- Avoid chasing deep into respawn and fresh cooldowns
- Prevent staggers on your side
- Set up the next fight with good positions
Timeless rule: after you win, your next job is not to die.
14) Simple Communication Templates That Actually Work
You don’t need long speeches. You need short, actionable information.
Call categories
- Missing tool calls: “No save.” “No cleanse.” “No escape.” “No stop.”
- Target calls: “Focus (hero) now.” “(Hero) is stuck.”
- Timing calls: “Push on 3.” “Go when they peek.” “Wait—reset.”
- Danger calls: “We have no save.” “Back—tools down.”
Examples you can copy
- “Main save used—push.”
- “Escape down—collapse left.”
- “We used both defensives—slow, reset.”
- “Hold—bait the stop first.”
- “Window open—commit now.”
If you only adopt one comm habit, make it this: say what’s missing. It tells your team exactly why you’re pushing or backing up.
15) Practice Plan: Drills, VOD Review, and a 7-Day Upgrade
Cooldown trading improves fastest with targeted review. Aim training won’t teach you this. Repetition of the correct mental loop will.
Drill 1: “Big 3” tracking in live games
For your next 10 games, pick three enemy tools to track each map:
- Their main save
- Their main stop
- Their main escape
Every time one is used, say it out loud. Your goal is not perfect accuracy—it’s building the habit.
Drill 2: The 20-second VOD check
After a lost fight, clip or mentally replay 20 seconds before the wipe and answer:
- Which key cooldown did we use first?
- Which key cooldown did they use first?
- Did we commit into full enemy answers?
- Did we fail to punish when an answer was missing?
This trains your pattern recognition. Within a week, you’ll start seeing fights slow down in your head.
Drill 3: “Layer, don’t stack” support rule
If you play support, adopt a strict rule for a week: never use your biggest save unless you see a true commit. If you’re unsure, use a cheaper tool first or reposition. You’ll quickly learn the difference between pressure and kill threat.
7-Day improvement plan
- Day 1: Learn the trade loop. Focus on Probe → Force → Punish.
- Day 2: Track the enemy’s main save every fight.
- Day 3: Add tracking for the main escape of the enemy backline.
- Day 4: Practice “3-second conversion” after forcing a key tool.
- Day 5: Review one close loss and write down the first bad trade.
- Day 6: Practice resets: back up when your tools are down.
- Day 7: Combine: track Big 3 + call windows + convert quickly.
16) Solo Queue Cooldown Trading: Carry Without Perfect Teammates
Cooldown trading is not only a team concept. You can apply it personally and climb faster even if your teammates don’t coordinate.
Solo queue rule: create your own window
You don’t need five players perfectly syncing. You need one player consistently forcing tools and punishing. That can be you.
In solo queue, prioritize:
- Safe probes that don’t cost your life
- Forcing escapes from enemy squishies
- Calling missing tools so your team accidentally follows the right idea
- Reset discipline so you stop donating staggers
How to “lead” without being toxic
Short calls beat criticism. “No escape, push” is helpful. “Why didn’t you push?” is not. The more your calls are about information, the more likely teammates respond.
When teammates ignore your window
Sometimes your team won’t push. In that case, your best move is to repeat the probe rather than hard-commit alone. Force the tool again. Keep applying pressure until the fight naturally opens.
Patience is part of cooldown trading. You don’t have to win every fight instantly. You have to win more fights than you lose over time.
Trusted Resources (Optional Reading)
If you want official references and general game fundamentals, these are reliable starting points:
- Overwatch 2 Official Site (Blizzard)
- Blizzard Support (Account & Game Help)
- Overwatch 2 Overview (Wikipedia)
Want Faster Progress?
If you want to climb with structured help, you can check Boosteria’s pricing here: Overwatch Boosting Prices. Cooldown trading is one of the core skills strong players use to create consistent wins—coaching and review can accelerate how fast you internalize it.
17) FAQ
Do I need to track every cooldown?
No. Track the “Big 3”: their main save, main stop, and main escape. That alone changes your win rate.
What if I’m not sure what the enemy used?
Start with what you can recognize reliably and build from there. Even imperfect tracking is better than none because it creates intentional decision-making.
How do I stop overlapping defensives with my other support?
Use short comms: “I used save,” or “I have save next.” If comms aren’t happening, default to layering: use smaller tools first and hold the biggest button until the danger is undeniable.
Is cooldown trading more important than aim?
Aim matters, but cooldown trading often decides whether aim even gets a chance to matter. When the enemy has no answers, kills become easy. When they have full tools, even great aim can be denied.
What’s the fastest way to improve?
Track one key cooldown every fight and practice immediate conversion when it’s down. Then add a second cooldown to track. Build habits gradually.
Key takeaway: Overwatch 2 fights aren’t random. They’re exchanges of tools. Force the enemy to spend answers, punish the window, and reset before they recover. Master that loop and you’ll win more fights with less chaos—and climb more consistently.