Valorant Crosshair Placement Guide: Head Level & Angles (2026)
Valorant Crosshair Placement Guide 2026: Head-Level Tips and Angle Holding for Better Aim
Good aim in Valorant is less about “insane flicks” and more about where your crosshair lives before the fight starts. If your crosshair is already at head height and already aimed at the most likely threat, you don’t need to out-react anyone—you just need to click once.
This guide is designed to stay useful over time. Instead of patch-specific tricks, you’ll learn timeless crosshair placement principles: how to keep head level, how to pre-aim common angles, when to hold tight vs wide, and how to build habits with drills that actually transfer into ranked.
If you want faster rank progress with support from experienced players, you can also check Boosteria’s Valorant boosting prices. For official game info and updates, use the trusted sources playvalorant.com and Riot’s Valorant Support.
1) What Crosshair Placement Really Means (And Why It Wins Fights)
Crosshair placement is the skill of keeping your crosshair positioned where an enemy’s head is most likely to appear before you see them. It’s the difference between:
- Reactive aim: You spot an enemy, then you drag your crosshair to them.
- Prepared aim: Your crosshair is already there, so the “aim” part is basically done.
In Valorant, time-to-kill is short, headshots are decisive, and most fights happen around predictable map geometry: doorways, corners, common holds, and chokepoints. That makes crosshair placement disproportionately powerful compared to games where enemies appear in more random ways.
Here’s the practical takeaway: if you improve crosshair placement, you will notice:
- More “free” kills where you barely had to move your mouse.
- More consistent first-bullet accuracy because you’re not panic-adjusting mid-spray.
- Better confidence on defense because you’re holding the right spot at the right distance.
- Cleaner entries on attack because you clear angles in a repeatable way.
Even if your raw aim isn’t amazing, disciplined placement makes you feel “faster” than players with better mechanics but worse positioning.
2) The Head-Level Foundation: The One Habit That Changes Everything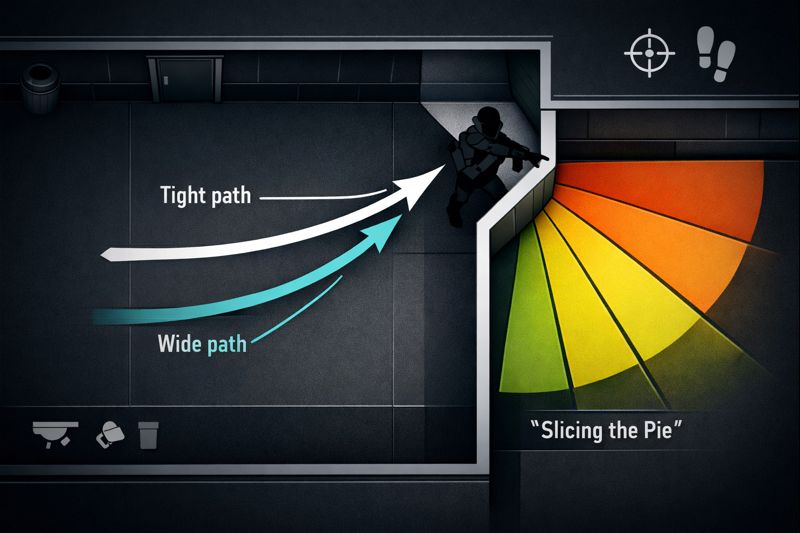
When people say “keep your crosshair at head level,” they usually mean it in a vague way. Let’s make it concrete.
Head level is a moving target
Head height changes based on:
- Elevation: stairs, ramps, boxes, slopes.
- Distance: at longer distance, small vertical errors matter more.
- Enemy posture: standing vs crouching (and how likely crouch is in that situation).
Your goal is not to “aim at a universal height.” Your goal is to keep your crosshair aligned with the expected head height on the path enemies will take.
The “head-height plane” concept
Imagine an invisible horizontal plane cutting across the map at standing head height. Good crosshair placement is simply riding that plane as you move. Most players break this plane in two common ways:
- They aim at the floor while moving, then flick up when contact happens.
- They aim at chest height because it “feels safe,” then lose to one-taps.
A simple rule that fixes 80% of it
Rule: While rotating or repositioning, keep your crosshair at head height on the next corner, not on the ground in front of you.
This sounds obvious, but it’s the core. Most crosshair placement problems are not about aiming poorly in fights; they’re about traveling with your crosshair in the wrong place between fights.
Use map features as head-height references
Every map has consistent visual anchors you can use as “built-in rulers”: edges of boxes, lines on walls, doorframe height, railings, and common props. The exact anchors differ per map, but the method stays the same:
- Pick a common fight area you play a lot (one site hold, one mid lane, one retake route).
- Find 2–3 visual markers that align with standing head height at typical engagement distance.
- Practice moving through that area while keeping your crosshair locked to those markers.
Within a week, “head level” stops being a reminder and becomes your default.
3) Pre-Aiming: Putting Your Crosshair Where Enemies Actually Appear
Head level is the vertical part. Pre-aiming is the horizontal part: which pixel are you aiming at?
Stop aiming at the middle of doorways
A classic beginner mistake is aiming at the center of an opening. But players don’t appear in the middle. They appear at the edge first. This is the simplest pre-aim improvement you can make:
- When holding an angle, aim at the spot where the enemy’s head will first become visible.
- When peeking, aim at the spot where the defender’s head is likely positioned relative to cover.
Think in “first contact pixels”
Every doorway, box, and corner has a “first contact” point: the earliest moment you can see an opponent if they swing or if you swing. When you learn to place your crosshair on first contact points, you create fights where your mouse barely moves.
Use probability, not perfection
Pre-aiming isn’t mind reading. It’s choosing the most likely position based on information:
- Sound: footsteps, utility usage, reloads, drops.
- Map control: what areas your team owns vs doesn’t.
- Timing: how long it takes to rotate or reach a position.
- Habits: common defender spots, repeated attacker routes.
Even in unpredictable rounds, you can still play probability. That’s why disciplined players look “consistent”—they aren’t guessing better, they’re guessing less.
A practical pre-aim ladder
When clearing space, prioritize angles like this:
- Immediate kill angles: places that can see you right now.
- Close corners: positions that punish you if you don’t clear them.
- Off-angles: unusual spots that catch autopilot clears.
- Deep angles: long lines where defenders may hold from far back.
This ordering keeps your crosshair focused on threats that matter first.
4) Angle Theory Made Simple: Advantage, Exposure, and “Fair Fights”
Angle theory sounds complicated, but crosshair placement becomes easier when you understand three ideas: exposure, distance, and commitment.
Exposure: who sees who first?
If you stand in a spot where you can be seen by multiple angles, your crosshair placement becomes impossible—you’d have to aim at three heads at once. Good positioning reduces the number of angles that can see you, making your crosshair placement clean and confident.
Crosshair placement rule: Before you hold an angle, ask: “How many angles can see me?” If it’s more than one, reposition or use utility.
Distance changes the correct hold
At close range, enemies appear quickly and wide swings happen fast. At long range, micro-adjustments matter more and you have more time to react. This affects where you place your crosshair:
- Close range: hold slightly wider if you expect a fast swing.
- Long range: hold tighter to the corner if you expect a jiggle or shoulder bait.
There’s no single “correct” hold. The correct hold is the one that matches the swing you expect.
Commitment: are you fighting or delaying?
If your job is to get one and leave, you can hold a sharper angle and play for a pick. If your job is to stall, you may hold safer, avoid over-committing, and prioritize staying alive.
Crosshair placement improves when your intention is clear. “Maybe I fight, maybe I run” creates hesitation and sloppy aim.
The “comfort angle” trap
Many players hold the same comfortable angle every round because it feels safe. But attackers learn. They pre-aim you. Timeless improvement comes from rotating between:
- Standard angles (reliable, easy crosshair placement)
- Off-angles (punishes pre-aim but requires better discipline)
- Reposition timings (change your hold after contact or utility)
This variety keeps your crosshair placement from becoming predictable.
5) Holding Angles: Tight vs Wide, High vs Low, Passive vs Aggressive
Angle holding is where crosshair placement turns into kills. Let’s make it systematic.
Tight hold vs wide hold
Tight hold means your crosshair is close to the edge of cover. Wide hold means you place it farther away from the edge, anticipating a wide swing.
| Situation | Better hold | Why |
|---|---|---|
| You expect a jiggle peek / info peek | Tight | They show a small slice; your crosshair must be close. |
| You expect a fast wide swing (entry or trade) | Wide | Your crosshair meets the swing path without chasing. |
| You’re holding with an Operator | Often tighter | One shot; you want the first visible target. |
| You’re holding with a rifle and plan to spray | Often slightly wider | Rifles punish wide swings if you’re already placed. |
High vs low: when to break head level (rarely)
Head level is default, but there are exceptions that good players use intentionally:
- Anti-crouch reads: if a player always crouch-peeks, you can lower your hold slightly.
- Jump spot punish: if an enemy often jumps to spot, you can place higher to catch the head on the arc.
- Elevation holds: if the enemy will appear above/below you (ramps, ledges), adjust the plane.
The key is intention. Don’t “accidentally” aim low—only do it when you have a reason and you’re confident in the read.
Passive vs aggressive holds
A passive hold prioritizes survival. An aggressive hold prioritizes first contact. Your crosshair placement should match:
- Passive: hold an angle that allows you to fall back after a shot; avoid multiple exposures.
- Aggressive: hold closer to the likely swing and be ready to commit to a duel.
Micro-adjustments: the “two-breath” rule
When you hold an angle for more than a second, small drift happens. A simple habit:
Two-breath rule: every two calm breaths, re-center your crosshair to first-contact head height and relax your grip. This resets your placement and reduces tension.
6) Peeking Mechanics for Better Crosshair Placement
Crosshair placement and peeking are inseparable. Your crosshair can be perfect, but if your peek is messy, you still lose.
Stop moving before you shoot (with intention)
Valorant rewards accurate first bullets. That means you need clean “stop-shoot” timing:
- Strafe out to reveal the angle.
- Stop (counter-strafe or release movement) to regain accuracy.
- Click when your crosshair is already at head level.
If your crosshair placement is good, your stopping moment becomes predictable—you’re not stopping and then searching. You’re stopping exactly when the angle is cleared.
Wide swing vs tight swing
These are not “good” or “bad.” They are tools.
- Tight swing (small step): good for information, baiting shots, and clearing close corners carefully.
- Wide swing (commit): good for breaking crosshair placement of defenders holding tight, and for isolating duels when you expect a single player.
Crosshair placement becomes consistent when you decide your swing type before you move. “I’ll just peek and see” leads to half-swings and panicked flicks.
Jiggle peeks and shoulder baits (and what to aim at)
When you jiggle, your goal is information, not a kill. Crosshair placement for jiggles should prioritize:
- Keeping head level while moving
- Pre-aiming the “return peek” headshot line
- Not over-adjusting mid-jiggle
Many players ruin their placement by snapping their crosshair wildly during a jiggle. Instead, keep it calm, gather info, then re-peek with a planned crosshair position.
7) Slicing the Pie: Clearing Corners Without Guessing
“Slicing the pie” means clearing an angle gradually so that you expose yourself to one small portion of the space at a time. It reduces surprise and makes crosshair placement almost automatic.
Why it works
If you swing a corner too fast, you expose yourself to multiple possible positions at once. Your crosshair placement can only cover one. When you slice, you convert a chaotic angle into a sequence of simple angles.
How to slice with correct crosshair placement
- Start at head level on the closest possible threat.
- Move in small steps, dragging your crosshair along the edge where heads would appear.
- As new space opens, your crosshair “arrives” at each new first-contact point.
- If you clear one angle, shift to the next angle in a planned order (don’t flick randomly).
Slice order: close, then deep
A timeless clearing pattern is:
- Close corners first (they can kill you instantly).
- Common holds next (most probable).
- Deep off-angles last (less probable but still possible).
When you follow an order, your crosshair placement becomes stable because your brain knows what angle is next.
8) Movement + Crosshair: Stop Fighting Your Own Mechanics
Many players think they have “bad aim,” but they actually have bad movement during aim. Crosshair placement thrives when movement is clean.
Don’t let your crosshair bounce
Your crosshair should feel like it’s on rails. If your wrist is tense or you’re constantly micro-correcting, you’ll drift off head level.
Try this habit: as you move through a corridor, keep your crosshair locked to a single head-height marker on the wall while you strafe. If it jitters, slow down and relax. Smoothness is a skill.
Separate “travel aim” from “fight aim”
- Travel aim: calm, stable, head level on next threat point.
- Fight aim: stop, confirm, click (then micro-correct if needed).
Players who mix these modes end up aiming at the floor while traveling and then trying to “activate aim” only when shots happen. Build the opposite: always be ready.
Crosshair placement and recoil discipline
Even though this guide focuses on placement, recoil still matters because poor recoil habits force bad placement decisions. A timeless approach:
- Prioritize first-bullet accuracy and short bursts.
- Use sprays when you commit to close-range fights or multiple targets.
- Reset to head level after a burst. Don’t let your crosshair sink to the torso permanently.
9) Drills That Transfer: Range, Deathmatch, and Custom Practice
Training only helps if it changes your crosshair placement in real rounds. The best drills are simple, repeatable, and focused.
Range Drill 1: Head-Level Tracking on Stationary Targets
- Stand at medium distance in the practice range.
- Pick a head-height reference line (edge of a panel, seam, or prop).
- Move left/right while keeping your crosshair on that head-height line.
- Stop and take a single shot on a target’s head.
Goal: teach your hand that head level is default, even while moving.
Range Drill 2: First-Contact Flick (Small Flicks Only)
Most “flick training” is too dramatic. Valorant’s best flicks are tiny corrections from good placement.
- Place your crosshair where an enemy head would appear (edge of a doorway line in the range).
- Spawn targets.
- Only allow yourself small flicks. If you need a huge flick, reset—your placement was wrong.
Goal: bias your training toward micro-adjustment, not panic swipes.
Deathmatch Rule Set: Placement-First DM
Deathmatch can ruin your habits if you only chase kills. Use it to train placement:
- Rule 1: No sprinting around corners with crosshair low.
- Rule 2: Clear angles with slicing, even if it costs you tempo.
- Rule 3: After every kill or death, ask: “Was my crosshair at head level before contact?”
- Rule 4: Prefer taps/bursts over full sprays unless the range demands it.
Goal: make correct placement feel normal under pressure.
Custom Game Drill: Map Walkthrough (The Fastest Improvement Tool)
This drill is boring—and it works.
- Load a map alone.
- Pick one route (defense hold to fallback, or attack entry to plant).
- Walk it slowly and place your crosshair on the exact head-level first-contact point for each angle.
- Repeat the route faster while keeping placement stable.
Do this for 10 minutes a day and your “default crosshair placement” becomes sharper than most players who only grind matches.
Bonus: Aim trainers (optional)
Aim trainers can help, but they don’t replace in-game angle knowledge. If you use them, prioritize tasks that build:
- Smooth micro-corrections
- Reaction on small targets
- Click timing (not endless tracking)
Then bring that skill back into Valorant through map walkthroughs and disciplined Deathmatch.
10) Role-Based Notes: Duelist, Initiator, Controller, Sentinel
Your role changes which fights you take—and therefore how you use crosshair placement.
Duelists: placement while moving fast
- Your biggest enemy is crosshair drop during movement abilities or fast entries.
- Train the habit: crosshair stays head level even when you’re “creating chaos.”
- On entry, prioritize clearing the closest kill angles first, then snap to common trade angles.
Initiators: placement + utility timing
- Initiators often swing off their own utility. Your crosshair should already be placed where the blinded/cleared enemy will appear.
- Don’t stare at utility impacts. Place your crosshair, then let the utility confirm.
- After using utility, reset to first-contact head height immediately—don’t wander with your crosshair.
Controllers: surviving while holding space
- Controllers win by staying alive and enabling team fights. Avoid multi-exposure holds.
- Hold angles where your crosshair placement is simple: one choke, one head line, one escape route.
- When you smoke, expect enemies to appear at smoke edges—place your crosshair on first contact at the edge, not the center.
Sentinels: crosshair placement is your superpower
- Sentinels often anchor and take “first contact” fights. That’s where placement shines.
- Rotate between standard and off-angles so attackers can’t pre-aim you every round.
- Use setups to force enemies into predictable paths, then place your crosshair on the forced first-contact point.
11) Common Mistakes (And Quick Fixes)
Mistake 1: Crosshair on the floor while rotating
Fix: Pick a head-height marker on the next wall and “ride” it until contact or angle change.
Mistake 2: Aiming at the center of doorways
Fix: Aim at the edge where the head appears first. Train this in customs: stand still and move your crosshair only between first-contact points.
Mistake 3: Clearing too many angles at once
Fix: Slice the pie. If you can be shot from two places, reposition or use utility—don’t “hope.”
Mistake 4: Over-flicking
Fix: Your best kills should require tiny corrections. If you’re doing huge flicks often, your placement is late. Slow down and pre-aim earlier.
Mistake 5: Holding the wrong distance
Fix: Tight for jiggles, wider for wide swings. Make a decision based on what the enemy is likely to do in that round state.
Mistake 6: Spraying from bad placement
Fix: Force yourself to tap/burst in Deathmatch until your first-bullet placement improves. Spraying is a tool, not a rescue plan.
12) VOD Review Checklist: How to Self-Coach Placement
You don’t need long reviews. You need a consistent checklist. After any session, review 3–5 rounds where you died first or lost a duel and ask:
- Was my crosshair at head level before contact?
- Was my crosshair aimed at first contact or the middle of space?
- Was I exposed to multiple angles?
- Did I choose tight vs wide hold intentionally?
- Did I stop before shooting?
- Did I over-flick instead of micro-correct?
- Did my crosshair drop during movement or utility usage?
Write down the most common failure. Fix only that for the next session. Crosshair placement improves fastest when you focus on one leak at a time.
13) Settings That Support Crosshair Discipline (Without Overthinking)
Settings won’t replace fundamentals, but the right setup can make it easier to maintain stable placement.
Sensitivity: prioritize control over speed
Crosshair placement is a “small correction” skill. If your sensitivity makes micro-adjustments shaky, you’ll constantly miss heads even with good placement. Choose a sensitivity where:
- You can track head level smoothly while strafing.
- You can stop on a head without wobbling.
- You can do 180 turns comfortably (with arm movement if needed).
If you frequently over-flick past heads, your sensitivity may be too high—or your grip too tense.
Crosshair visuals: clarity > style
A good crosshair for placement is one you can keep perfectly aligned with head height markers. Look for:
- Clear center reference
- Not too thick (covers heads at range)
- Not too tiny (hard to track under stress)
Whatever you pick, don’t change it daily. Consistency builds muscle memory.
Video settings: stable visibility beats pretty effects
If your game feels visually noisy, it’s harder to keep head-level references. Use settings that keep targets and edges readable, then forget about it and focus on habits.
14) Mini-Routines: 10, 20, and 40 Minute Training Plans
10-minute routine (busy day)
- 2 minutes: range head-level movement drill
- 3 minutes: first-contact micro-flick drill
- 5 minutes: disciplined Deathmatch (placement-first rules)
20-minute routine (most effective for steady improvement)
- 5 minutes: custom map walkthrough on one route (head level + first contact)
- 5 minutes: range micro-flick + burst control
- 10 minutes: Deathmatch with placement goals (no rushing corners)
40-minute routine (serious climb session)
- 10 minutes: custom map walkthrough (two routes)
- 10 minutes: range drills (head level + small corrections)
- 15 minutes: two Deathmatches, placement-first
- 5 minutes: quick VOD check of one lost duel (why was placement late?)
Pick one routine and stick to it for at least two weeks. Consistency beats intensity.
15) FAQ
Should I always aim for the head?
As a default, yes—head-level placement is the biggest long-term win. Exceptions exist (anti-crouch reads, jump spots, elevation), but they should be deliberate, not accidental.
Why do I lose even when my crosshair is at head level?
Usually one of three reasons: you were exposed to multiple angles, your hold distance didn’t match the enemy swing, or you shot while moving. Fix those and head-level placement becomes lethal.
Is holding angles “bad” because of peeker’s advantage?
Holding can still be strong if you choose smart holds (single exposure), match your hold distance to the expected swing, and mix positions so you aren’t predictable. Also, utility exists for a reason—combine holds with information tools.
How long does it take to improve crosshair placement?
You can feel improvement in days if you stop aiming at the floor while moving. Deep consistency takes weeks because it’s a habit, not a trick. The fastest path is daily map walkthroughs + disciplined Deathmatch.
Do I need an aim trainer?
No. Aim trainers can help smoothness and click timing, but Valorant-specific improvement comes from learning first-contact points, head-height references, and clearing patterns on real maps.
16) Final Checklist: “Head Level, Next Threat, One Click”
Before you queue, memorize this simple loop. It’s the whole guide in one mental model:
- Head level: ride the head-height plane while moving.
- Next threat: aim at first contact, not empty space.
- One click: stop, confirm, click—then reset.
- One angle at a time: slice the pie; don’t expose to multiple threats.
- Intentional holds: tight vs wide based on expected peek.
If you apply those five lines consistently, your aim will feel faster, cleaner, and more confident—without needing highlight-reel mechanics.
Want to accelerate your climb with experienced guidance? See Boosteria’s Valorant boosting prices and pick the option that fits your goals.