Apex Legends Rotations & Positioning: Stop Free Deaths
Apex Legends — Rotations & Positioning: How to Stop Dying “For Free”
Apex Legends is full of players who can aim well, move well, and still lose far too many games because they walk into bad space at the wrong time. They die crossing open ground. They get trapped by the Ring. They hold positions that look safe but have no escape route. They start fights they cannot finish before the third party arrives. They stand shoulder to shoulder, give away their angle, and let one grenade or one coordinated swing ruin the entire squad. Then they say the same thing: “We died for free.”
This guide is about stopping that pattern.
If your mechanics are decent but your results are inconsistent, rotations and positioning are usually the missing layer. Good positioning does not mean hiding forever, and good rotations do not mean sprinting early every time. It means understanding where the next safe, playable, and defensible space is likely to be, then moving there in a way that preserves your resources, protects your squad, and gives you the option to fight on your terms.
A lot of Apex improvement content focuses on aim drills, movement tech, or legend tier lists. Those matter, but they do not solve the deeper problem: many squads lose before the real fight even starts. By the time bullets are exchanged, they are already in the worse spot, on the worse timing, with the worse line of retreat. At that point, mechanics can save you only occasionally.
The goal of this guide is to give you timeless decision-making rules that stay useful across metas, maps, and legend balance changes. Specific legends, item values, and map rotations can change. Core truths do not. Cover is still cover. Height is still powerful. Narrow choke points are still dangerous. Third parties still punish long fights. The Ring still forces the lobby into predictable pressure. Teams that move with a plan still beat teams that simply react late.
You will learn how to think about safe space, when to rotate early versus late, how to cross exposed areas without donating free knockdowns, how to anchor a position, how to read whether a fight is good or bad based on nearby terrain, and how to avoid the most common positioning mistakes in both solo queue and coordinated squad play.
If you want more official Apex basics, it is worth checking EA’s beginner guide and terms guide. If you enjoy studying high-level macro decisions, watching competitive Apex through the ALGS is one of the best ways to see why rotation timing and position value matter so much. And if you want a faster path through ranked while you work on your macro game, Boosteria’s Apex Legends boosting prices page is the most relevant service link for this topic.
Table of Contents
- 1. Why “free deaths” happen in Apex Legends
- 2. The core idea behind strong rotations
- 3. What makes a position actually valuable
- 4. How to read Ring pressure without overcomplicating it
- 5. Rotations in early, mid, and late game
- 6. Squad spacing: close enough to help, far enough to live
- 7. How to cross open space without throwing
- 8. When to fight during a rotation and when to skip
- 9. How to hold space once you get there
- 10. Preventing third parties and collapses
- 11. Solo queue positioning rules
- 12. Common positioning mistakes that cause free deaths
- 13. A simple in-match rotation checklist
- 14. Practice habits to build better macro instincts
- 15. Final thoughts
- 16. SEO title, description, schema, image prompts, and tags
1. Why “free deaths” happen in Apex Legends
A free death is not literally free. It is usually bought with several hidden mistakes stacked together.
Maybe your squad looted too long and rotated late. Maybe you chose the shortest path instead of the safest one. Maybe you focused on the team in front of you and ignored the hill that could see your entire cross. Maybe you took a roof with no fallback, got cracked, and had nowhere to reset. Maybe one teammate swung too wide and turned a stable hold into a 2v3. Maybe your team won a fight but stayed to loot in a lane every nearby squad could hear.
These deaths feel random because the final blow often comes suddenly. In reality, the real losing moment happened earlier. It happened when your squad gave up control over timing, terrain, or escape routes.
That is why players who only review their final gunfight often improve slowly. They ask, “Should I have hit more shots?” when the better question is, “Why were we ever standing there?” Apex rewards fast reactions, but it punishes preventable exposure even more. The better your lobby becomes, the harsher that punishment gets.
Most free deaths come from one of five root causes:
- Late movement. You stay too long in low-value space and are forced to run through danger instead of choosing your route.
- Bad terrain selection. You move into areas with weak cover, no height, poor sightlines, or no exit.
- Weak squad spacing. Your team is either too stacked or too split, so you cannot trade efficiently.
- Tunnel vision. You look at the fight in front of you and forget the fight that can appear behind, above, or to the side.
- Poor discipline after contact. You overchase, overloot, or overpeek after gaining a small advantage.
Fixing these is not glamorous, but it is one of the fastest ways to climb. In Apex, a squad that avoids bad deaths consistently reaches better endgame positions, gets cleaner fights, and preserves more healing, ammo, cooldowns, and armor value for moments that actually matter.
2. The core idea behind strong rotations
A strong rotation is not simply moving from point A to point B. It is moving from your current position to the next playable position while minimizing how many teams can punish you on the way.
That word playable matters. A location can be “inside zone” and still be terrible. It can be technically safe from Ring damage but impossible to defend, impossible to leave, or vulnerable to every surrounding angle. A good rotation therefore has three layers:
- Destination: where are you trying to end up?
- Path: what route gets you there with the least risk?
- Timing: when should you move relative to Ring pressure and nearby squads?
Most players think only about the first layer. Better players think about all three.
Imagine two squads rotating into next zone. One runs the direct line, crossing a wide lane because it is faster. The other moves along cover, briefly gives up speed, clears a nearby angle, and enters through terrain that allows an immediate reset if pressured. The first squad may arrive earlier by a few seconds, but if it loses armor, burns healing, or gives up a knock, that “faster” rotation was actually slower in every meaningful sense.
The best rotations preserve optionality. They leave you with choices. You can stop and fight if the opportunity is excellent. You can continue if the area is crowded. You can disengage if a stronger team appears. Bad rotations remove choices. You end up committed to a dangerous path, forced into panic decisions, and punished by teams already set up around you.
Whenever you rotate, ask yourself one simple question: Are we moving to a position, or are we just moving away from our current one? Good teams move with intent. Weak teams move because the Ring scared them or gunshots distracted them. Intent wins more often than panic.
3. What makes a position actually valuable
Not all “good spots” are equal. Players often overvalue height, buildings, or Ring edge without asking whether those things are strong in context. Position value in Apex comes from a combination of factors, not one magic trait.
Cover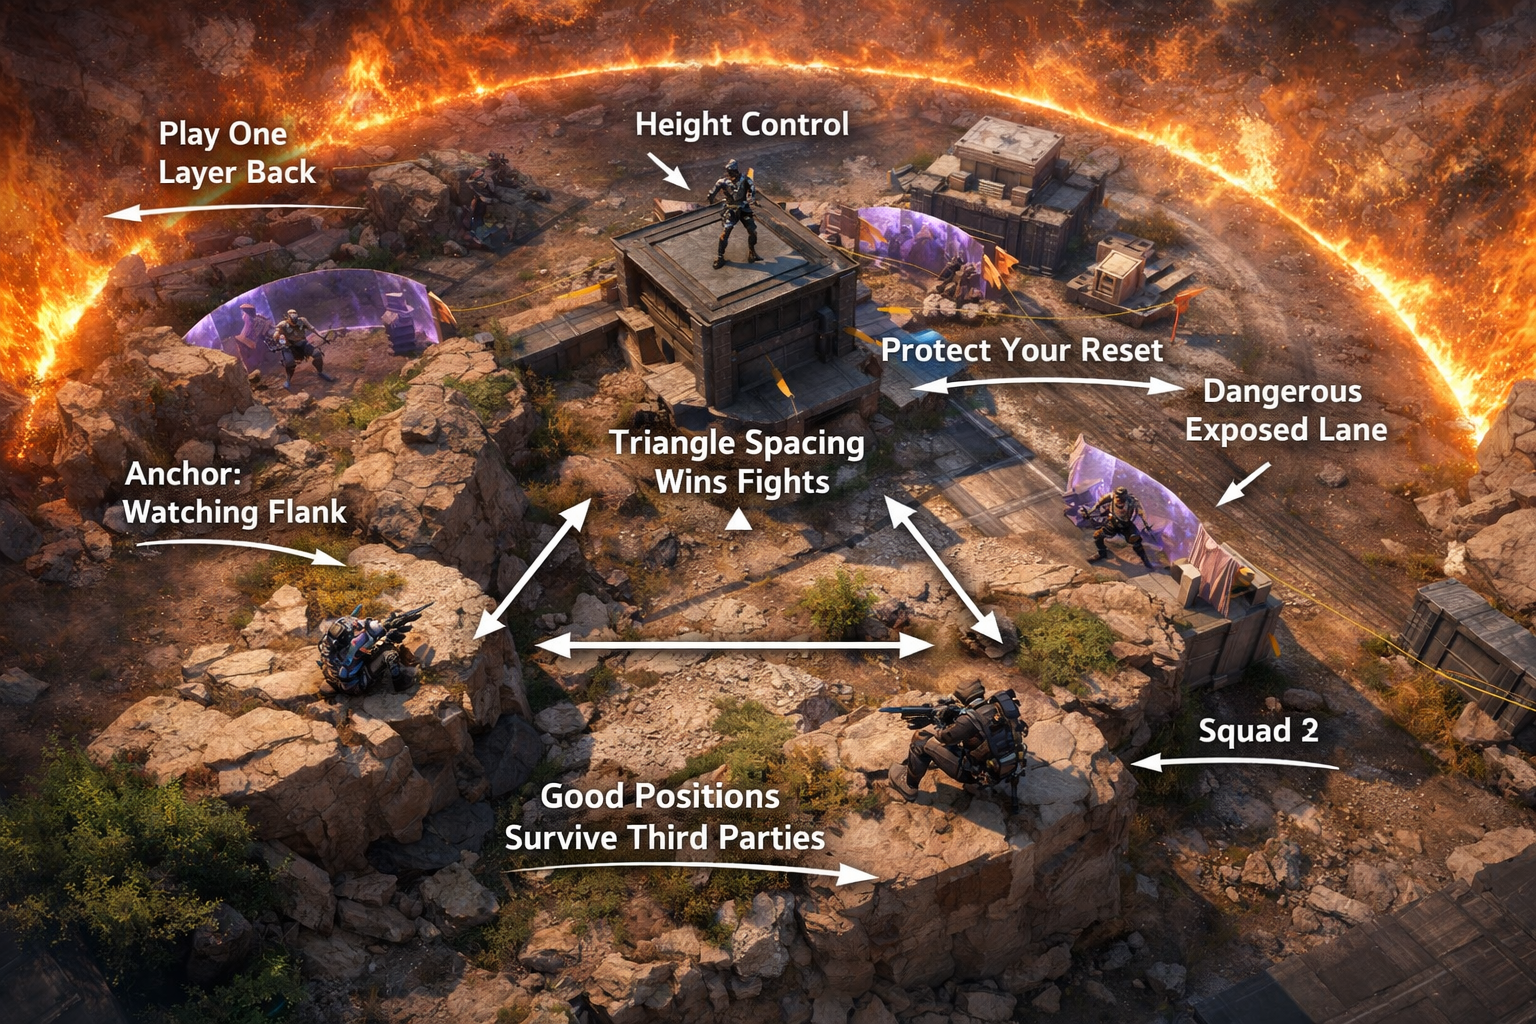
The first question is simple: what protects you when bullets arrive? Hard cover is still the foundation of Apex positioning. Rocks, walls, strong corners, head glitches, doors, and sturdy objects create room to reset. Soft terrain can help, but if it does not let you break line of sight quickly, it is often fake safety. One of the easiest ways to die for free is mistaking concealment for protection.
Height
Height is powerful because it improves information, angle quality, and pressure. It can force enemies to use movement resources just to challenge you, and it often lets you peek more safely than they can. But height is not automatically best. A high spot with no real cover, no lateral movement options, or no way down except a predictable drop can become a trap. The right question is not “Do we have height?” It is “Is this height holdable if two teams look at us?”
Lines of sight
A good position sees important approaches without exposing itself to every irrelevant angle. If your team can watch the main route enemies must use while staying hidden from distant teams, that is excellent. If your team can shoot one squad but is visible to four others, your position is inflated in theory and weak in practice.
Escape routes
Many squads die because they choose positions with no exit plan. Strong spots usually have at least one fallback: another piece of cover, a lower layer, a secondary building, a slope, or a path that lets you leave without sprinting through open ground. A position you cannot abandon safely is often only strong until the first coordinated focus fire hits you.
Access to space
Good positions control nearby usable space. They let you fan out, hold multiple angles, or move a few meters without losing your entire setup. Cramped spots can be playable for short periods, but they are easy to grenade, easy to flood, and hard to share between three players without overlap. In Apex, your position should not only protect you; it should let your squad function as a unit.
Future value
The best positions are not just good now. They stay useful when the lobby changes. A building on edge may be fine in the moment, but if the next zone pulls away and the only exit is a death funnel, it becomes low future value. By contrast, a moderate spot near several transitions may become stronger over time because it keeps options open.
Whenever you evaluate a spot, think in layers: cover, height, sightlines, exits, spacing, and future value. The more of these you have, the better the position. The more of them you are missing, the more likely you are to die “for free” once pressure builds.
4. How to read Ring pressure without overcomplicating it
You do not need to predict every final zone perfectly to rotate well. What you need is a practical relationship with Ring pressure.
Many players make Ring decisions emotionally. They either rotate far too early and give up strong loot, safe crafting, or favorable edge fights, or they rotate too late and arrive with no space left. The answer is not “always early” or “always edge.” The answer is understanding what Ring pressure does to the map and to the lobby.
The Ring creates traffic. As safe space shrinks, more teams are funneled through fewer playable routes. That means late rotations become more dangerous not only because of the Ring itself, but because the number of squads watching key lanes increases. Even if nobody wants to full-send your team, they can still chip you, hold you, and force you into worse terrain.
A practical way to read Ring is to ask four questions:
- How far do we need to go? Distance changes everything. Short moves can often be delayed. Long moves usually need to start before panic begins.
- How many natural choke points are between us and next space? Bridges, tunnels, zip approaches, narrow valleys, exposed ridges, and forced climb areas all increase rotation risk.
- How many squads are likely to be near our route? If your path goes through common traffic, assume contact is possible even if you hear nothing.
- How playable is our current position if we wait? A strong edge hold can justify a later move. A weak, low-ground, open area usually cannot.
Notice what is missing here: perfect certainty. Good macro is about playing the percentages, not reading the future exactly. If your current space is weak, your route options are shrinking, and the next safe terrain contains stronger cover, you probably should not linger just because the Ring timer has not become scary yet.
At the same time, rotating blindly into center can be just as bad. A mediocre central position held too early can leave your team pinched from all sides. Strong players understand that “early” only matters if the destination is actually worth taking and holding.
The evergreen rule is this: move before your route becomes obvious and crowded, but not so early that you volunteer to become every nearby team’s first target.
5. Rotations in early, mid, and late game
Rotation priorities change as the match evolves. A lot of bad decisions happen because players use the same logic in every phase.
Early game: stabilize, don’t drift
Early game is about leaving your drop area with a workable loadout, enough healing, and a clear idea of your first meaningful move. Many squads throw here by wandering. They finish looting one point of interest, then casually drift to another because nobody has defined the next objective. That drifting delays the first real rotation and creates the classic midgame problem of being caught in low-value terrain.
Your early goal is not perfect loot. It is stable loot plus information. Once your squad can fight reasonably well, stop behaving as if one extra attachment matters more than timing. If your next route contains contested space, move while you still choose the pace.
Early fights should also be judged through position. A nearby fight can be attractive, but if engaging it forces you into a valley, a no-cover road, or a double-pinch angle, you are risking your entire macro for a small possible gain.
Mid game: claim the next useful layer of space
Mid game is where most free deaths happen. Loot is mostly solved. Squads are rotating. Teams begin holding power spots, and every noisy or slow decision becomes more expensive.
Your priority in mid game is to move from merely safe space to useful space. Useful space is any area that either:
- gives you leverage over expected traffic,
- protects you from multiple approach angles,
- creates a strong staging area for the next zone pull, or
- lets your team take or refuse fights with control.
This is the phase where map awareness separates average squads from consistent ones. You should not be asking only, “Are we in?” You should be asking, “If the next pull shifts away from us, do we have a clean next move? If we get pressured here, where do we reset? If another team appears behind us, are we dead?”
Late game: every meter matters
In late game, tiny positioning errors become fatal. Angles overlap, utility matters more, and there is less empty space to hide poor pathing. The best late-game teams understand that they are no longer rotating across the map; they are rotating across micro-terrain. A single rock, crate, wall segment, or staircase can be the difference between a reset and a wipe.
Late game rotations should be short, efficient, and synchronized. One player moving early alone often dies. Three players moving late together often get focused in transit. The ideal is a controlled shift using cover and coordinated pressure so that no one is exposed without support.
Also remember that in endgames, survival time and angle quality often matter more than forcing damage instantly. Teams that burn resources to take a flashy but unstable spot often collapse the moment they are counter-swung.
6. Squad spacing: close enough to help, far enough to live
One of the least appreciated aspects of positioning is spacing. Bad squads are usually either too tight or too loose.
When your team stacks too tightly, you create a single problem for the enemy to solve. One grenade, one heavy angle, one ultimate, or one coordinated push hits all three players. You also reduce your own pressure because everyone shares nearly the same line of sight. The enemy only needs to hide from one angle, not several.
When your team is too split, the opposite happens. You create multiple problems for yourselves. One player gets swung and cannot be traded. One player has to cross open ground to rejoin. One player thinks the team can help, but the geometry says otherwise.
The ideal spacing depends on terrain, but the principle is stable: your squad should occupy different pieces of usable cover that allow immediate support, overlapping fire, and simple retreat paths.
In practical terms, that means:
- Do not share one rock if there are three workable cover pieces in the area.
- Do not take an off-angle that requires five seconds of sprinting for your team to help you.
- Do not hold so wide that a crack on one teammate becomes a free isolated push.
- Do not peek the same window, roof edge, or doorway with all three players unless you are ending a fight immediately.
Think of spacing as a triangle, not a line. Triangles create trade opportunities and pressure from multiple directions. Lines are easier to collapse. A squad that can cover each other from slightly different elevations, corners, or objects is far harder to punish than a squad that simply stands together because it “feels safe.”
There is also a hidden benefit: better spacing improves information. If all three players see the same thing, your team’s awareness is narrow. If each player responsibly watches a different approach, your awareness expands without needing to overpeek.
7. How to cross open space without throwing
Crossing open space is where countless ranked games die. The mistake is rarely the open space itself. The mistake is crossing it carelessly.
Sometimes open ground is unavoidable. The skill is reducing how punishable your cross becomes.
Use these rules:
Cross from cover to cover
Never mentally frame an open cross as one long run. Break it into pieces. What is your first stop? What is the second? If shots come in, where do you reset? The fewer unplanned meters you travel, the fewer free deaths you donate.
Clear likely angles before moving
Before you commit, identify the positions most likely to punish your cross. High ground, rooflines, ridge edges, windows, and power rocks matter more than random emptiness. If your team cannot clear or at least threaten those angles, the cross is lower percentage.
Move together, not chaotically
All three players do not always need to move at the exact same frame, but the team should cross as one decision, not three separate impulses. One player starting early while another loots and the third stares at a distant fight creates staggered vulnerability. Crosses fail most often when the squad is mentally split before it is physically split.
Use pressure before movement
If an enemy team can see your path, sometimes the answer is not to run faster. It is to make them uncomfortable first. Hold their heads down. Crack one. Force them behind cover. Even two seconds of reduced pressure can turn a losing cross into a safe one.
Do not loot in the lane
Death boxes in open space are bait. They magnetize impatient players. If the lane is dangerous, finish the cross, secure the space, then return only if it is truly safe. Many “free deaths” are just greed in disguise.
Accept small detours
The shortest route is often the worst route. If a longer path gives you rocks, walls, cliffs, or buildings that break enemy sightlines, that detour is not wasted time. It is preserved health, armor, and revive probability.
The mature Apex mindset is simple: open space is a tax. Pay as little of it as possible.
8. When to fight during a rotation and when to skip
One of the biggest macro upgrades in Apex is learning that not every visible squad deserves your attention. Some fights are strategically profitable. Others are just distractions that ruin your pathing.
A good rotation fight usually has at least three of the following traits:
- You already control the better terrain.
- The enemy is crossing or entering a choke point.
- Your squad can focus one target quickly.
- You have a clear way to armor swap, reset, or leave if needed.
- Nearby third-party routes are limited or slow.
- Winning the fight improves your route or gives you a stronger next position.
A bad rotation fight usually looks like this:
- You are shooting uphill at cover.
- You are fighting from Ring pressure.
- You must leave your path and enter worse terrain to continue.
- You do not know where neighboring squads are.
- The enemy is entrenched and your only entry is obvious.
- The fight solves no macro problem even if you win.
There is a major difference between taking a fight and accepting an opportunity. High-level macro players prefer the second. If a team gives you a free crossfire, a crack in the open, or a clean isolated swing, take it. But if you must invent a complicated engagement during your rotation just because you saw movement, that is usually ego, not strategy.
Ask one blunt question before committing: If we wipe this team, are we more likely to survive the next two minutes? If the honest answer is no, the fight is probably low value.
9. How to hold space once you get there
Reaching a good position is only half the job. Many squads arrive in strong space and still lose it because they do not know how to hold it.
Holding space in Apex means denying clean entry, preserving resources, and making the enemy pay for every step they take toward your team. It does not mean peeking constantly. In fact, overpeeking is one of the main reasons strong positions collapse.
To hold space well:
Assign attention, not just bodies
Each player should be responsible for a likely approach angle or fallback layer. If all three players stare at the same team because they are noisy, another squad can walk into your weak side for free.
Preserve health for the push, not for the highlight
Damage matters, but survival matters more. Do not throw away shields for low-conversion poke. A team with more armor and healing at the moment of collapse often wins even if it dealt less farm damage earlier.
Play one layer back from the obvious edge
Players love roof edges, top ledges, and aggressive windows because they feel dominant. But the most exposed visible edge is often the worst long-term hold. The better habit is to use the edge for information and timing, then retreat slightly to a spot that still controls the approach without donating a free knock.
Know your fallback before pressure arrives
When your front layer breaks, where does each player go? If you only begin solving that question after someone gets cracked, you are late. Good squads pre-plan their retreat line.
Punish overextension immediately
Strong holds are not passive. If one enemy over-swings, climbs alone, or enters a doorway ahead of support, coordinated focus can turn defense into a winning numbers advantage. The key is discipline: punish the isolated player without turning your own team into the next overextension.
Space is easiest to hold when your team acts as if the position belongs to you. Not emotionally, but structurally. You know the angles. You know the exits. You know which peeks matter and which do not. That calm ownership is a huge part of macro consistency.
10. Preventing third parties and collapses
Apex is famous for third parties, but many squads talk about them as if they are random acts of fate. They are not fully random. You cannot prevent all of them, but you can reduce how vulnerable you are.
Third parties punish three things especially hard: noise, duration, and immobility.
Noise
The longer and louder your fight, the more interest it attracts. That does not mean never shoot. It means understanding that every prolonged engagement is an invitation to nearby teams. If you commit to a fight, try to convert quickly or disengage before the lobby gathers.
Duration
The worst fights are long, indecisive poking wars in medium-value terrain. You burn ammo, cells, and attention while accomplishing nothing. Then the third team arrives fresh. If a fight is not advancing toward a wipe, route denial, or major positional gain, consider cutting it short.
Immobility
Teams that cannot leave are third-party food. If your fight location has poor exit routes, low cover, and multiple approach lanes, every second spent there increases danger. This is why many experienced players would rather give up a maybe-kill than remain trapped in a bad lane.
To reduce third-party risk:
- Finish downs fast if safe, so the enemy cannot stall forever behind revives.
- Armor swap and reset quickly after a knock or wipe.
- Loot with purpose, not greed.
- Move off the exact fight location once your immediate needs are solved.
- Expect another team before you hear one.
One of the strongest habits in Apex is learning to ask, “What does the map sound like right now?” If your fight happened near common traffic or late in a rotation window, assume nearby squads heard it. That assumption alone will save you many ranked points over time.
11. Solo queue positioning rules
Solo queue changes the details but not the principles. In fact, good positioning matters even more when communication is inconsistent.
You cannot control whether random teammates make perfect macro decisions, but you can position in ways that keep bad decisions from instantly killing you too.
Here are the most important solo queue rules:
Follow the team’s macro unless it is clearly suicidal
Being right alone is often still losing. If two teammates commit to a route, splitting completely from them usually creates two bad groups instead of one recoverable one. You want to influence randoms with pings and movement, not create unwinnable separation.
Be the stabilizer
Random teammates often overpeek, overloot, or hesitate. You can increase win rate simply by becoming the player who takes a supportable angle, watches the flank, and moves on time. Stable players save chaotic squads surprisingly often.
Do not mirror every bad peek
If a teammate swings too far, your job is not always to swing just as badly. Sometimes your job is to hold the better angle that lets you trade or cover retreat. Joining a mistake does not transform it into teamwork.
Prioritize rejoinable positions
In solo queue, your teammates may not understand your off-angle. So choose positions you can rejoin from quickly. Fancy wide macro plays have lower value when teammates do not read them.
Ping early, not after the danger starts
Late pings are mostly emotional. Early pings guide movement. If you think a route is bad, ping the safer path before teammates commit. If you see a team likely to gatekeep, ping before your squad enters the lane.
Know when to cut losses
Sometimes a teammate dies in space nobody could reasonably save. Do not convert one mistake into three deaths. Apex rewards recoverable discipline more than heroic self-destruction.
Solo queue is often framed as a mechanical test, but a huge part of winning with randoms is simply preventing the lobby from cashing in on avoidable positioning errors.
12. Common positioning mistakes that cause free deaths
Let’s make this concrete. These are some of the most common ways players die for free in Apex Legends, even after they “know” the theory.
Overvaluing loot over timing
One more bin. One more attachment. One more side room. Then suddenly the clean route is gone and you are rotating through bullets. Looting feels productive, so players excuse it. But once you are combat-capable, timing often matters more than perfection.
Taking the obvious path every time
Default roads, straight lines, exposed bridges, and central lanes attract lazy rotations. They are easy to imagine and easy for enemies to watch. Slightly less obvious paths often buy huge survival value.
Standing on the strongest-looking pixel
Many players seek the most dominant visible edge of a position and stand there constantly. Yes, it has the best view. It also has the worst exposure. Often the correct play is a half-step back from the flashy angle.
Ignoring vertical danger
Players frequently track horizontal threats and forget rooflines, cliffs, ledges, and elevated wraps. In Apex, vertical geometry multiplies punish windows. Every time you move, ask who can see you from above.
Looting before securing
Winning a fight does not mean the area is safe. If you do not first control nearby angles, confirm no instant third party, and position one player to watch while others swap or loot, you are inviting disaster.
Holding low ground because it feels hidden
Low ground sometimes conceals you, but it often steals information and escape routes. If everyone above can collapse on you and you have limited sightlines, your hidden spot is just delayed death.
Refusing to leave bad space
Some players get emotionally attached to a position because they invested time in reaching it. But if the Ring shifts, another team takes superior height, or your exits disappear, you must be willing to abandon the spot before it becomes a coffin.
Using movement abilities as excuses for bad routes
Mobility is strongest when it enhances a good plan, not when it rescues a terrible one. If your only justification for a route is “we can probably ability through it,” you may already be gambling too hard.
Not asking what happens after the first knock
Players are often too focused on opening damage. But every fight should include a second thought: once someone is knocked, what changes? Can you close? Can you hold? Can you be third-partied? Planning only the opening is incomplete macro.
13. A simple in-match rotation checklist
If you want a practical tool you can use immediately, use this checklist before major rotations. It is simple enough to remember and strong enough to prevent many pointless deaths.
- Where are we trying to play next?
Name a real destination, not just “in zone.” - Is our current space still valuable?
If not, move before pressure decides for you. - What route gives us the best cover?
Favor routes with layered stops and broken sightlines. - What angles can punish us during the move?
Clear or suppress them before crossing. - Can all three of us help each other from this path?
Do not begin a rotation while mentally desynced. - If we get pressured, where do we reset?
Every route needs a fallback. - Does this fight improve our macro?
If not, it may be bait. - Once we arrive, who watches what?
Assign attention before chaos begins.
This checklist is intentionally boring. That is why it works. Strong macro is often repetitive. The players who stop dying for free are usually the ones who build habits, not the ones who rely on inspiration.
14. Practice habits to build better macro instincts
You do not build rotation skill by reading one guide and hoping it appears under stress. You build it by reviewing specific patterns and turning them into habits.
Review deaths backward
When you die, do not start your review at the knock. Go back 20 to 40 seconds. Ask where the macro error happened. Was the route late? Was the team split? Was the hold too exposed? Over time you will notice repeated causes.
Call your next position out loud
Even if you are solo queueing, verbally naming your intended next spot sharpens intent. “We play that building.” “We move to those rocks.” “We hold this height until next close.” Clear language improves clear decisions.
Study one map layer at a time
Do not try to memorize every possible endgame pattern instantly. Instead, learn recurring terrain ideas: good ridge holds, dangerous valleys, common choke points, areas with strong fallback cover, and places where third parties arrive fast. Map mastery grows through chunks.
Watch competitive play for macro, not just mechanics
If you watch high-level Apex, focus on the questions good teams answer before shooting starts. Why did they leave that spot? Why did they refuse that chase? Why are two players forward and one anchoring? Why did they stop peeking after the crack? Those are macro lessons disguised as calm gameplay. The official ALGS site is a strong starting point for following the competitive scene.
Practice disciplined disengages
Not every drill needs to be aggressive. One of the best self-training habits is recognizing bad fights early and leaving without turning around for unnecessary extra shots. Players who can disengage on time preserve more games than players who believe every fight must be finished.
Track your “avoidable damage” moments
Damage taken is not always a positioning error. But many cracks are avoidable. If you repeatedly lose armor while crossing, peeking obvious headshot angles, or looting in exposed lanes, that is actionable data.
Macro improvement can feel slower than aim improvement because it is less flashy. But it compounds. Better movement between fights means better resources during fights. Better resources during fights mean better odds in late game. Better late-game positioning means more placements, more wins, and more consistent ranked progress.
15. Final thoughts
Stopping free deaths in Apex Legends is not about becoming passive. It is about becoming intentional.
The strongest players are not necessarily the ones who seek the most fights. They are the ones who understand when and where a fight should happen. They know that the map itself is part of every gunfight. Cover, height, timing, route quality, spacing, and fallback layers all shape what your mechanics are allowed to do.
If you remember only a few things from this guide, remember these:
- Rotate toward playable space, not just safe space.
- Choose routes based on cover and future value, not just distance.
- Space your squad so you can trade without stacking.
- Do not overcommit to bad fights that solve no macro problem.
- Hold positions with discipline, not ego peeks.
- Assume third parties before they happen.
- Review the decision before the death, not just the death itself.
Apex punishes lazy movement harder than many players realize. But that is also good news. It means some of the biggest improvements available to you are not random and not mechanical-lottery dependent. They are learnable. They are repeatable. And they work across seasons.
Once your team starts arriving to stronger space earlier, crossing fewer dangerous lanes, taking cleaner fights, and preserving better spacing under pressure, the game changes. You feel slower in the best way. More in control. Less surprised. Less likely to say, “How did we die there?”
That is the real value of rotations and positioning in Apex Legends. They do not just help you survive longer. They help you spend your resources, your cooldowns, and your mechanics in places where winning is actually possible.