Fortnite Fight Selection Guide: W-Key or Disengage?
Fortnite — Fight Selection: When to W-Key and When to Disengage
Fortnite is not just a game of mechanics. It is a game of decisions. Plenty of players can build, edit, aim, and pressure a box. Far fewer know when a fight is actually worth taking. T:contentReference[oaicite:0]{index=0}tween players who feel “stuck” and players who consistently climb, survive deeper into matches, and convert strong positions into wins.
If you have ever wondered why one day aggressive play feels unstoppable and the next day every push gets you third-partied, the answer is usually not “bad luck.” More often, it is poor fight selection. The best Fortnite players do not simply W-key because they are faster. They W-key because the fight is favorable, efficient, and low-risk relative to the reward. And when a fight becomes ugly, slow, expensive, or exposed, they disengage early instead of donating their game to the lobby.
This guide breaks that decision-making process down into timeless principles. It does not depend on one season’s loot pool, one map gimmick, or one temporary meta trend. Instead, it focuses on fundamentals that stay valuable in Battle Royale over time: timing, positioning, health economy, material management, storm awareness, information advantage, and the hidden cost of every engagement.
By the end, you should be able to answer the most important question in Fortnite more consistently: should I commit, or should I leave?
Table of Contents
- Why Fight Selection Matters More Than Raw Aggression
- What W-Keying Really Means
- The Core Fight Decision Framework
- When You Should W-Key
- When You Should Disengage
- The Hidden Cost of Every Fight
- Storm, Zone Timing, and Fight Windows
- Positioning Before and During Fights
- Builds, Edits, and Pressure: Smart Aggression vs Bad Aggression
- Third-Party Awareness and Lobby Context
- Health, Materials, and Loadout Checks
- Solo, Duo, and Squad Fight Selection Differences
- The Most Common Fight Selection Mistakes
- How to Practice Better Fight Selection
- A Simple In-Game Fight Checklist
- Final Thoughts
Why Fight Selection Matters More Than Raw Aggression
Many players misunderstand aggression. They think aggressive play means taking every fight, chasing every tag, diving every crack, and forcing every box battle. In reality, strong aggression is selective. It is controlled pressure applied at the right moment, from the right position, with the right resources.
A reckless player thinks in terms of excitement: “I can probably kill this guy.” A strong player thinks in terms of expected value: “If I take this fight, what are the odds I win quickly, preserve resources, avoid third parties, and improve my position?”
This matters because Fortnite is not scored only by eliminations in most real climbing environments. Survival, placement, consistency, and game flow matter too. Even in formats that reward eliminations, bad fights destroy consistency. A risky early fight may gain one elimination, but if it causes you to burn half your materials, lose key healing, rotate late, and die in a worse spot later, it was not actually profitable.
Fight selection helps with all of the following:
- improving survival rate
- reducing unnecessary resource loss
- avoiding storm panic
- minimizing third-party deaths
- converting advantages more reliably
- playing deeper into endgame
- making ranked progress more stable
That is why high-level players often look “disciplined” rather than “wild.” They are not passive. They are efficient.
What W-Keying Really Means
In Fortnite language, “W-keying” usually means pushing forward aggressively, actively forcing fights, and refusing to sit back. But the term can be misleading. Good W-keying is not just moving at enemies. It is using tempo to create a fight on your terms.
That means several things:
- you start the engagement with information
- you choose the angle or timing
- you are healthy enough to trade
- you can finish before outside pressure arrives
- you are not gambling your entire match on a low-percentage swing
So a proper W-key is not simply “I saw someone.” It is “I see someone who is weak, isolated, poorly positioned, rotating late, or otherwise vulnerable, and I can pressure them without making my own situation worse.”
That is the mindset shift many players need. Aggression is not just about confidence. It is about context.
The Core Fight Decision Framework
Before every major engagement, run a quick internal checklist. The best part is that this becomes instinctive over time. You do not need to stop and analyze for ten seconds. You just need to train your brain to notice the key variables.
Ask yourself:
- Do I have an advantage?
Is the enemy weak, exposed, out of position, split from teammates, low on builds, or rotating badly? - Can I finish fast?
Fast fights are safer. Long fights attract danger. - What does the storm say?
Can I afford time here, or am I creating a late rotate? - What is the third-party risk?
Am I near a hot path, central zone area, POI edge, or obvious sound magnet? - What happens if this goes badly?
Will I still have mats, health, position, and time to recover?
If multiple answers are bad, disengage. If multiple answers are good, pressure confidently.
This framework is timeless because it is based on battle royale logic, not patch notes.
When You Should W-Key
Let’s talk about the situations where aggressive play is not only fine, but correct.
1. You have a clear damage lead
If you land strong opening damage and the opponent is forced into immediate defense, you have earned initiative. That is one of the best times to W-key. A cracked or heavily tagged player has fewer options. They must heal, turtle, reposition, or hope you misplay. If you stay organized and deny their recovery, the fight is often favorable.
But there is a condition: your push needs structure. The damage lead only matters if you convert it intelligently. Do not turn a clean opening tag into a desperate coin flip by overpeeking or jumping into an unknown box without a plan.
W-key when you have damage lead and at least one of the following is also true:
- the enemy lacks height
- they are trapped near bad terrain
- you have spare builds and mobility
- storm pressure limits their healing time
2. The enemy is isolated
Isolated players are prime targets. In solos, this means someone with no cover, no immediate escape path, or poor rotation timing. In team modes, it means one player has drifted too far from support, is looting separately, or is caught crossing open space.
Isolation reduces the complexity of the fight. Fewer variables usually means higher conversion odds. If you can burst an isolated target before their support arrives, you can turn a messy fight into a simple numbers advantage.
3. The opponent is in a weak position
Position beats mechanics more often than people think. A mechanically solid player in a bad position is still vulnerable. Some examples:
- they are below you on weak low ground
- they are rotating from storm without clean cover
- they are stuck near a cliff, waterline, or awkward terrain
- they are boxed in a spot with limited exits
- they must move before you do
These are strong green lights because the opponent is already constrained. W-keying works best when the other player has fewer good choices than usual.
4. You need refresh and the fight is actually efficient
Sometimes you must fight because you need materials, mobility, healing, or safer space. That does not automatically mean any fight is justified. But if you identify a refresh opportunity that is quick and controlled, aggression becomes practical rather than emotional.
For example, if you are low on mats and see a weak player nearby boxed in a poor area while zone is still manageable, that may be a correct fight. If you wait too long, your situation worsens anyway. The key is that you are choosing a fight that can solve a problem, not create two more.
5. You have superior tempo
Tempo is one of the least discussed but most valuable ideas in Fortnite. If you are dictating pace while the opponent reacts, you are often favored. Tempo comes from early tags, better angles, stronger piece control pressure, better elevation, cleaner timing, or just forcing the other player into repeated defensive decisions.
When you feel the opponent losing control of the sequence, that is a strong time to W-key. They are no longer shaping the fight. You are.
6. You can end the fight before it becomes public
Every noisy fight in Fortnite has a clock on it. The longer it continues, the more likely other players arrive. Therefore, if you can realistically finish in a short window, aggression becomes more attractive.
This is especially true when:
- the area is otherwise quiet
- you have immediate pressure tools
- the opponent is weak and boxed
- you have line-of-sight control over exits
Quick, decisive engagements are usually the healthiest aggressive fights in Fortnite.
7. You are pressuring a player with a worse rotate than yours
If two players are on similar resources but one has a significantly harder path into zone, the player with the worse rotate is under hidden pressure. They must spend attention and materials simply to stay alive. That makes them more fragile in combat.
W-keying a player who is already late, pinched, storm-pressured, or terrain-locked can be smart because their options are limited by the map and timer, not just by your mechanics.
When You Should Disengage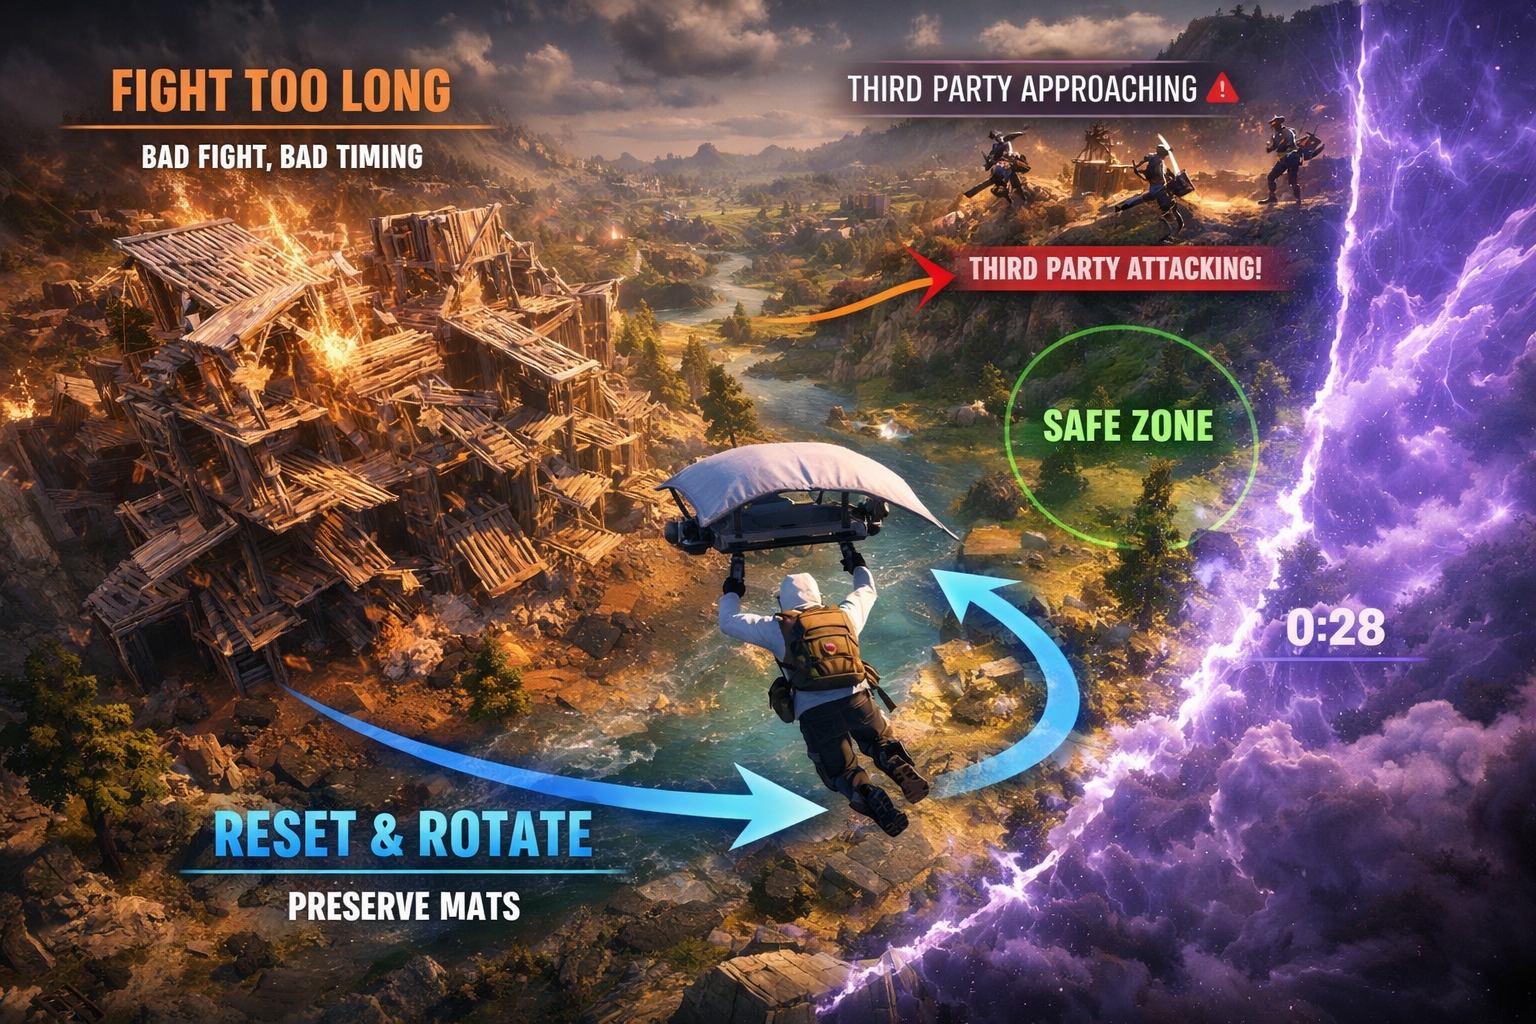
Knowing when to back out is a superpower. Many players think disengaging means fear. In reality, it often means discipline. The strongest players protect their match quality. They do not keep fighting just because a fight started.
1. The fight is taking too long
This is one of the clearest disengage signals in Fortnite. If a fight drags without real progress, its value falls fast. Both players are spending materials, attention, and time. Nearby players hear everything. Storm continues moving. Rotations get worse.
A long fight is often a bad fight unless:
- it is unavoidable
- you are locked in endgame
- the elimination is strategically necessary
If the fight has gone from clean opportunity to messy stalemate, leave. You do not win bonus points for stubbornness.
2. You lose the information edge
If you no longer know where the opponent is, whether they healed, whether their teammates are arriving, or whether another team is nearby, your confidence should drop immediately. Many bad deaths come from clinging to a fight after the information picture collapses.
Disengage when the fight stops being readable.
3. Storm is about to punish both of you
Storm pressure ruins good intentions. A fight that might have been profitable 20 seconds earlier becomes a disaster if it forces a late rotate, burns your heals, or sends you into zone from a terrible path. Battle Royale rewards players who treat time as a resource.
If storm timing is bad and your opponent is not already one shot or trapped, disengage early instead of late. Early disengages preserve choice. Late disengages feel like escapes because the window was already missed.
4. Third-party risk becomes obvious
You hear extra shots nearby. You see movement on an off-angle. Another team has line of sight over your builds. A fresh opponent starts pressuring from medium range. That is your warning. You are no longer in a clean 1v1 or isolated skirmish. You are becoming the center of a multi-team problem.
Many players make the mistake of doubling down here, thinking they are “too deep” to leave. Usually that is exactly when they should leave.
5. Your resources are dropping below comfort level
There is no universal number that works for every situation, but the principle is simple: if the fight is costing more than the likely reward, stop. A single elimination is not worth arriving to midgame or endgame with broken economy.
If you are bleeding:
- materials
- key ammo types
- healing items
- mobility options
then the fight may already be unprofitable, even if you eventually win it.
6. The opponent is stronger than the position suggests
Sometimes you start a fight thinking the enemy is free, then quickly realize they are calm, mechanically sharp, resource-rich, and comfortable in the engagement. That does not mean panic. It means update your evaluation. If your original read was wrong, your decision should change too.
Good players do not cling to the first plan just because it was the first plan.
7. Your next game stage matters more than this elimination
There are moments when staying healthy and arriving well-positioned matters far more than forcing an extra elimination. This is especially true if you already hold a good path, have strong terrain, or are entering a zone phase where survival value increases.
Do not risk a winning position to chase a medium-value elimination.
The Hidden Cost of Every Fight
One of the biggest reasons players misjudge fights is that they only think about the result in terms of “win” or “lose.” But many fights that you technically win still damage your overall game.
Every engagement has hidden costs:
- materials spent: defensive layers, retakes, pressure builds, exit routes
- heals spent: topping off after chip damage or storm damage
- ammo spent: especially if you over-pressure without conversion
- time spent: slower rotates, worse route options, delayed looting
- attention spent: while focused on one fight, you stop scanning the lobby
- position spent: you may give up safe ground or priority pathing
This is why smart players evaluate not just “Can I win?” but also “What will it cost?”
A perfect example is the low-value chase. You see a player escaping with poor loot. You spend 90 seconds chasing, burn materials, take storm damage, reveal your location, and finally get the elimination. It feels satisfying. But strategically, you may have lost more than you gained.
The best eliminations in Fortnite are efficient eliminations. Quick, cheap, controlled, and positionally useful. That should be your standard.
Storm, Zone Timing, and Fight Windows
The storm is one of Fortnite’s biggest decision filters. It tells you when aggression is smart, when urgency matters, and when greed becomes punishment.
Fight early in the window, not late in the panic
If you are going to pressure a nearby player before rotating, do it while you still have time to finish, loot, heal, and move. Players often make the mistake of fighting only after they have already delayed too long. Then every trade feels terrible because the storm is acting as a second enemy.
Early-window fights are cleaner because they preserve follow-up options.
Edge fights are different from center fights
Players rotating from the edge often have predictable paths and greater storm pressure. That can make them good targets if your own route is secure. But if you are also edge-trapped and under the same timing stress, the fight can become mutually bad.
Center-side fights are usually less storm-driven but often carry more third-party risk because more players are nearby and sightlines are wider.
Always ask: who does zone favor here?
Zone can be your ally or your trap
Sometimes the best reason to pressure is that the zone already forces the enemy’s movement. Other times the zone is the reason to disengage because it will punish you both equally and turn the fight random.
A useful rule: if storm pressure improves your ability to predict and control the opponent, aggression may be good. If storm pressure reduces your ability to finish safely, disengagement is better.
Positioning Before and During Fights
Most “bad fights” are actually bad positions disguised as fights.
Positioning determines:
- who sees first
- who trades upward or downward
- who controls exits
- who gets punished by terrain
- who is exposed to third parties
Fight from strength, not from frustration
A common mistake is taking a fight simply because you feel annoyed, challenged, or impatient. That emotional push often starts from bad footing. Maybe you are low ground with weak cover. Maybe you are in an open lane. Maybe you are moving uphill into a defender. These are not good fight starts.
Before committing, try to shape the engagement:
- gain cleaner right-hand angles
- take superior elevation when possible
- reduce exposed sides
- avoid building in spots visible from half the map
- keep a disengage route available
The best fights often feel easy not because the opponent is weak, but because your position made their options bad from the beginning.
Control space, not just damage
Players obsessed with raw damage often miss the bigger point. Space control matters just as much. If you can take the piece of terrain, building layer, or line that forces the opponent into predictable moves, you gain real control over the fight.
That is why good players often look patient. They are not waiting because they are indecisive. They are waiting because they are shaping the board.
Always preserve an exit
One hallmark of smart aggression is that it includes a disengage plan. Even when pushing hard, leave yourself a route to reset if the fight changes. That might mean:
- not overcommitting all your materials upward
- not dropping blindly into closed spaces
- maintaining awareness of natural cover
- keeping mobility or movement utility available
A fight is much safer when you know you can leave.
Builds, Edits, and Pressure: Smart Aggression vs Bad Aggression
Mechanical players often lose track of purpose. They build fast, edit fast, pressure fast, but do not ask why. Smart mechanics serve a decision. Bad mechanics create chaos without improving odds.
Smart aggression
- pressure after meaningful damage
- edit with information
- take controlled peaks
- use builds to limit enemy choices
- maintain cover against outside angles
- convert, then stabilize
Bad aggression
- spamming builds without pathing
- jumping into unscouted boxes
- taking repeated 50-50s because of impatience
- forgetting storm while tunneling on pressure
- burning all materials to force a marginal fight
W-keying should not mean “brain off.” It should mean “intent on.” Every aggressive movement should answer a question: what advantage is this creating?
Pressure with purpose
Pressure should usually try to do one of four things:
- deny healing
- force a predictable exit
- claim better space
- create a finishing shot window
If your pressure is not doing one of those things, it may just be noise.
Third-Party Awareness and Lobby Context
Fortnite is never just you and your target. The lobby is always part of the equation. Some fights are fine in isolation but terrible in context.
What raises third-party risk?
- fighting near central zones
- fighting near major landmarks or traffic routes
- high, visible build battles
- long shotgun-SMG exchanges
- repeat tagging from the same location
- late rotates where many players funnel together
The louder and longer the fight, the more it invites new problems.
How to account for lobby context
Ask yourself:
- How many players are likely nearby?
- Does this area usually attract rotations?
- Will my builds become a signal visible from distance?
- If someone appears on a side angle, can I survive it?
Skilled players are often not just reading the target. They are reading the map around the target.
The best players leave before the punish arrives
This is an underrated habit. Many strong players disengage not because the third party has already fully committed, but because the signs are there. They see the danger one step early. That is usually enough.
Health, Materials, and Loadout Checks
Fight selection is impossible without honest resource awareness. If your health is low, your materials are thin, or your loadout is awkward for the engagement type, you must adjust your threshold for aggression.
Health advantage matters more than confidence
Some players push simply because they “feel hot” mechanically. But confidence does not replace HP. If the opponent can survive one extra trade and you cannot, the fight is worse than it looks.
All else equal, healthy players can pressure better because:
- they can absorb small mistakes
- they can take space with less fear
- they can outlast awkward trades
- they can continue fighting if a third party appears
Materials are not just defense, they are freedom
Low materials reduce your options. You cannot safely retake, extend, layer, box up, or disengage with confidence. That means a fight you could take at 800+ materials may be completely wrong at low materials.
Always think of materials as decision freedom. When mats are low, your fight selection must become stricter.
Loadout fit matters
Even in a timeless guide, this principle stays true: not every loadout wants the same fight. Some setups reward close pressure, others reward range control, others reward safe damage into rotation denial.
Do not force a fight style your current inventory does not support well. Adapt to what you actually have, not what your ideal loot would be.
Solo, Duo, and Squad Fight Selection Differences
Fight selection changes by mode. The core principles remain, but the details shift.
Solos
In solos, every fight is highly personal. Information and conversion speed matter a lot because there is no revive structure, no teammate cover, and no second body to stabilize mistakes.
Good solo fight selection emphasizes:
- opening damage advantage
- position before commitment
- fast finish windows
- careful third-party avoidance
In solos, long fights are especially dangerous because there is nobody to hold a side angle for you while you reset.
Duos
Duos introduces a much bigger punishment for isolation and a much bigger reward for clean focus. Two players can instantly convert small openings if synchronized well.
In duos, W-key when:
- you have both players present
- the enemy pair is split
- you can double pressure one layer or angle
- your communication is stable
Disengage when your spacing breaks. A duo that is not actually together is often just two solo targets.
Squads
In squads, commitment quality matters even more. One bad overextension can collapse a whole fight. But a coordinated push onto a weak team can end things quickly.
Squad fight selection revolves around:
- team presence
- focus fire
- angle layering
- knock conversion
- not overchasing into chaos
Disengaging in squads is often the right call when the structure breaks and the fight turns into disconnected individual duels.
The Most Common Fight Selection Mistakes
If you want fast improvement, fix these first.
1. Confusing tags with commitments
Just because you hit someone does not mean you must full-send. Some damage creates pressure. Not all damage creates a winning push.
2. Chasing too long
A fleeing target often pulls you into bad terrain, bad timing, or bad lobby visibility. Chasing is one of the easiest ways to turn advantage into overextension.
3. Fighting because you are bored
This is more common than players admit. Unstructured aggression often comes from impatience, not strategy.
4. Ignoring storm until it is too late
Storm should shape your decisions early, not force them late.
5. Overvaluing one elimination
Players often sacrifice an entire strong game state for a medium-value elimination. That is poor trade logic.
6. Refusing to reset after a bad trade
Many fights become losable only because a player insists on “forcing it back.” Resetting is often stronger than instantly re-peeking.
7. Not updating the read
If new information appears, your decision must change. A good player adapts faster than their ego reacts.
How to Practice Better Fight Selection
Fight selection improves fastest when you review decisions, not just outcomes.
Ask after each death:
- Was this fight necessary?
- Was my timing good or late?
- Did I have a real advantage?
- Could I have disengaged earlier?
- Did the fight cost more than it was worth?
Do not just say, “I lost because I missed a shot.” Sometimes that is true. But many deaths happen because the fight itself was low quality before the mechanics even mattered.
Review wins too
This is critical. Some players only review losses and miss the fact that many of their wins were strategically bad but mechanically salvaged. If a “won” fight regularly leaves you broke, late, weak, and exposed, it still needs fixing.
Create categories in your notes
Track patterns like:
- storm-greedy pushes
- overchases
- long box fights in bad areas
- third-party blindness
- late disengages
When you see the same category repeatedly, you know where real progress will come from.
Practice calm aggression
In creative or scrim-like environments, deliberately practice pushing only after one of your green-light conditions is present. This teaches you to connect aggression with reason rather than impulse.
Epic’s current Fortnite Competitive hub and rules library are useful reference points for understanding the game’s live competitive structure, while Fortnite’s broader documentation reinforces the Battle Royale basics around shrinking storm space and player survival pressure that make fight timing so important.
For official references and ecosystem context, you can review: Fortnite Competitive, Fortnite Rules Library, and Fortnite Documentation and Glossary.
If your goal is climbing more efficiently across competitive games, you can also explore Boosteria’s Fortnite boosting prices page for additional service information.
A Simple In-Game Fight Checklist
Here is a practical mini-checklist you can internalize:
- Did I start with an advantage?
- Can I finish this quickly?
- Is zone giving me enough time?
- What is the third-party risk here?
- Do I have enough health, mats, and ammo to survive if this gets messy?
- If I win, will I actually be in a better game state?
If the answers are mostly yes, W-key with confidence.
If the answers are mixed, pressure lightly and stay flexible.
If the answers are mostly no, leave.
That sounds simple, but it is powerful because it keeps your decisions tied to reality instead of emotion.
Final Thoughts
The biggest breakthrough in Fortnite often does not come from learning one flashier retake or one faster edit. It comes from taking better fights. Strong fight selection makes your mechanics matter more because you stop spending them in low-quality situations. It makes your rotations cleaner because you stop wasting time in stubborn midgame battles. It makes your placements better because you arrive to later zones with more health, more materials, and more control over your path.
So when should you W-key? When the fight is favorable, efficient, and likely to improve your position. When should you disengage? When the fight is slow, expensive, storm-bad, third-party-prone, or no longer worth the risk.
That is the real skill: not simply fighting hard, but fighting smart.
If you build that habit, your matches become less random, your losses become more understandable, and your progression becomes much more consistent.