Avoid Duel Mistakes in VALORANT 2026: Peeks, Reloads, Positioning
Avoiding Common Duel Mistakes in Valorant (2026 and Beyond): Dry Peeks, Reload Errors, and Positioning Fixes
Most Valorant rounds are decided by a small number of “high-leverage” fights: the first contact on a lane, the swing to trade, the retake entry, the post-plant peek, the last two players in a clutch. If you consistently lose those fights, it rarely comes down to aim alone. It’s usually a repeatable mistake in how you take duels.
This guide focuses on three categories that quietly bleed rounds at every rank:
- Dry peeks (taking a 50/50 without advantage, info, utility, or a trade plan)
- Reloading errors (reloading at the wrong time, in the wrong place, or for the wrong reason)
- Positioning mistakes (standing where you can be shot by multiple angles, can’t escape, or can’t be traded)
The goal is simple: make your fights higher percentage. You’ll learn rules and templates that stay relevant over time, regardless of meta shifts, agent releases, or map rotations. You’ll also get drills and checklists you can apply immediately in ranked.
If you want faster progress with structured feedback, Boosteria coaching and rank help can accelerate the process—especially when you’re stuck repeating the same duel habits under pressure. You can review options here: Boosteria Valorant Boosting Prices.
Table of Contents
- How Duels Really Work in Valorant
- Dry Peeks: Why They Fail and What to Do Instead
- Reloading Errors: The Hidden Tax on Your Rounds
- Positioning Fixes: Stop Being Duelable From Everywhere
- Movement & Mechanics That Make Duels Easier
- Information & Utility: Turning 50/50s Into 70/30s
- Role-Based Templates: Duelist, Initiator, Controller, Sentinel
- Checklists: Pre-Fight, Mid-Fight, Post-Fight
- A Timeless Practice Plan (7 Days + Repeat)
- FAQ: Common Duel Questions
1) How Duels Really Work in Valorant
In ranked, people often describe duels as “I swung and my aim wasn’t there” or “they were just better.” That story is comforting because it makes the outcome feel uncontrollable. In reality, most duels are shaped before the first bullet is fired.
1.1 Duels are about conditions, not confidence
A duel is easier when you control one or more of these conditions:
- Angle advantage: you’re exposed to one threat while the enemy is exposed to you and a teammate
- Timing advantage: you peek during their reposition, reload, ability animation, or after a sound cue
- Information advantage: you know where they are (or where they aren’t)
- Trade advantage: if you lose, your teammate instantly trades the kill
- Utility advantage: flash, smoke isolation, recon/dog/drone pressure, stun, or molly forcing movement
- Exit advantage: you can fall back after contact while they can’t safely chase
The “common duel mistakes” in this guide are simply the moments you fight without advantage—especially when you didn’t need to.
1.2 A practical definition: “Duel quality”
Instead of asking “Did I win?”, ask “Was this a good duel?” A good duel is one you’d be happy to repeat 100 times because the conditions favor you.
Use this quick scoring model after any death:
- +1 I had info (callout, sound, drone/recon, minimap confirmation)
- +1 I had a trade (teammate in range and ready)
- +1 I had utility help (flash/smoke/stun/recon or forced movement)
- +1 I had a clean exit (cover, off-angle, or fall-back line)
- 0 I dry swung into unknown, no trade, no exit
If most of your deaths score 0–1, you’re not “unlucky”—you’re consistently taking low-quality fights.
1.3 Trusted references for fundamentals (optional reading)
If you want official or community reference points on core mechanics and competitive structure, these are useful baselines:
- Official VALORANT site (game basics, updates, agents/maps)
- Riot support for VALORANT (settings, troubleshooting, account/security)
- Liquipedia VALORANT (competitive ecosystem and terminology)
2) Dry Peeks: Why They Fail and What to Do Instead
A “dry peek” isn’t always wrong. The problem is that most players dry peek when they’re not forced to—into an angle that could contain an Operator, crossfire, off-angle, or pre-aimed rifle. When you do that repeatedly, you donate first bloods and create avoidable 4v5s.
2.1 The three most common dry peeks
- Dry peek into unknown: you swing an angle with zero info and no teammate ready to trade.
- Dry re-peek: you miss or tag someone, fall back, then swing the same angle again because “they’re low.”
- Dry ego peek: you feel pressure to “make something happen,” so you fight the first angle you see.
These peeks fail because they ignore how defenders hold angles: pre-aimed crosshair placement, sound cue timing, and layered utility.
2.2 The replacement framework: ISOLATE → PRESSURE → EXIT
Before you peek, run this mental template (it takes one second with practice):
- Isolate: Can I make this a one-angle fight? (smoke, off-angle, angle slicing, reposition)
- Pressure: Can I force a mistake? (flash, drone/dog, shoulder/jiggle bait, prefire)
- Exit: If this goes wrong, can I live? (cover line, dash/TP/utility, teammate trade)
If you can’t answer at least two of these, you are likely gambling.
2.3 How to “peek” without gambling
A) The info peek (jiggle/shoulder) is not a duel
Many players die because they “jiggle” but accidentally commit their body into the angle. A real info peek is a micro exposure designed to trigger a shot, ability, or sound cue—then you reset.
- Goal: bait an Operator shot or get a tracer/sound confirmation
- Rule: if you see them, you’re already exposed too long
- Follow-up: call it, smoke it, flash it, or group swing with trade
B) The “slice the pie” peek: clear one threat at a time
Angle slicing is the highest ROI skill for rifle duels. Instead of swinging wide and seeing three angles at once, you move your crosshair and your body so you reveal only one line of sight at a time.
Common error: your body clears faster than your crosshair. That creates a half-second where you’re visible but not ready.
Fix: crosshair leads, body follows. You “earn” the next angle only after your crosshair is already placed where a head could appear.
C) The supported peek: utility + trade
If you want a repeatable, high-win-rate pattern, it’s this:
- Utility first: flash, drone/dog, recon, stun, smoke isolation
- Spacing: second player close enough to trade instantly
- One call: “Swing on flash,” “swing on contact,” or “hold for my peek”
Even if you lose the duel, the trade converts it into a favorable outcome.
2.4 When a dry peek is actually correct
Yes—sometimes you should swing dry. But make it intentional. Dry peeks are justified when:
- You have timing: you heard them reload, rotate, or drop; you swing during that vulnerability.
- You have isolation: you’re confident it’s a single angle, not a crossfire.
- You have an exit: you can break line of sight instantly after first shots.
- You’re the trade: your teammate is taking first contact and you swing off their fight.
The mistake is not “dry peeking.” The mistake is dry peeking when none of those conditions exist.
2.5 Dry re-peek: the #1 “free kill” habit
After first contact, defenders often hold their crosshair exactly where you will reappear. If you re-peek the same line, you’re walking into a pre-aimed headshot.
Fix with the 3R rule:
- Reset: break line of sight fully; stop giving shoulder/arm info.
- Reposition: change elevation, change distance, or change side of cover.
- Re-engage with help: utility, teammate swing, or off-angle timing.
2.6 Dry peek drills you can do in any patch
Drill 1: Two-beat peeking (safe commit)
- Beat 1 (info): micro jiggle/shoulder to bait a shot or confirm presence.
- Beat 2 (commit): if you gained info, swing with a plan (isolate + pre-aim + exit).
In Deathmatch, you can simulate this by forcing yourself to “see or hear something” before committing to a full swing.
Drill 2: “One angle only” custom routine
Load a custom map alone. Walk common lanes and repeatedly practice clearing a corner while exposing only one angle at a time. Your goal is to make your crosshair placement feel automatic as you move from piece of cover to the next.
Drill 3: No-ego rule set (ranked habit reset)
- No re-peek within 2 seconds of first contact unless you have a flash/trade.
- If you miss the first burst, you must break line of sight and reposition.
- Every first contact must have either info, trade, utility, or exit (two is better).
3) Reloading Errors: The Hidden Tax on Your Rounds
Reloading mistakes are brutal because they don’t feel like “aim errors.” They feel like bad luck: “I got swung while reloading.” In reality, reload discipline is a positioning and timing skill. Good players treat reloads like a decision, not a reflex.
3.1 The five classic reload errors
- Panic reload: you reload immediately after firing, even if you still have enough bullets for the next fight.
- Reload in the open: you reload while exposed to an uncleared angle.
- Reload after one kill: you get a pick and instantly reload instead of expecting a trade attempt.
- Reload without sound discipline: you reload when enemies are close enough to punish the audio cue.
- Weapon tunnel: you reload instead of swapping to a sidearm for the last few bullets of a fight.
3.2 The “ammo threshold” mindset
You don’t need a full magazine to take a duel. You need enough bullets to win the next two seconds.
As a general rule for rifles:
- 10+ bullets: you can still win a clean rifle duel with discipline (bursting, head-level placement).
- 6–9 bullets: you should avoid multi-target commitments unless you have cover and a trade.
- 1–5 bullets: either fall back to reload behind cover or plan a swap if contact is likely.
These aren’t rigid numbers. The point is to break the habit of “reload because it feels nice.”
3.3 The Reload Ladder: Swap → Cover → Reload
When you feel the urge to reload, run this ladder in order:
- Swap: If the next contact is immediate, swapping to your sidearm is often faster and safer than reloading.
- Cover: If you must reload, move to hard cover that breaks line of sight from the most dangerous angle.
- Reload: Only reload when you’ve reduced punish windows (line of sight, timing, sound range, teammate cover).
Most players do the opposite: reload first, then discover they needed cover.
3.4 The “after kill” rule that prevents free trades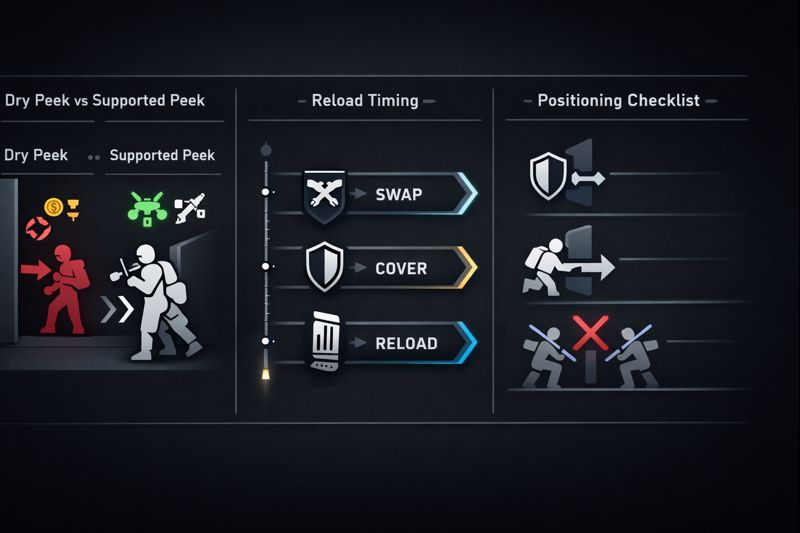
After you get a kill, assume the enemy will either:
- Trade you immediately (swing the angle you just shot from), or
- Utility you (flash/stun/dart), or
- Fall back to reset and re-hit elsewhere.
Reloading instantly after a kill is a gift to the trading player. Instead:
- First: move (reposition) or hold for the trade
- Second: confirm safety (info from team, cleared angle, smoke timing)
- Third: reload behind cover or after you’ve broken line of sight
3.5 Sound discipline: reloads create timing windows
At closer ranges, reloading is not just risky—it’s informational. Good players will punish reload audio the same way they punish spike taps: they swing when you are least ready to shoot.
Fix: If enemies are close, reload only when:
- You are behind hard cover (no wallbang line)
- You have a teammate watching the punish angle
- You are confident the enemy is delayed (smoke, molly, stun, recon pressure)
3.6 Reload drills that build real habits
Drill 1: Deathmatch “no reload after first contact”
For 2–3 Deathmatch sessions per week, apply this rule:
- After any fight, you must move to a new piece of cover before you reload.
This forces you to separate “fight” from “maintenance” and builds safer timing by default.
Drill 2: Sidearm confidence reps
In the range, practice a simple sequence:
- Fire 20 rifle bullets quickly into bots or a wall
- Immediately swap to sidearm and finish the next target
- Only reload after you’ve moved behind cover
The goal is to remove the emotional discomfort of fighting with less-than-full ammo.
4) Positioning Fixes: Stop Being Duelable From Everywhere
Positioning is the multiplier. With good positioning, your aim gets “bigger” because your targets are predictable and your exposure is controlled. With bad positioning, you can have great aim and still lose because you are fighting multiple threats at once.
4.1 The #1 positioning mistake: being exposed to two+ angles
If you can be shot from two different lines of sight, you’re relying on luck. Someone will eventually time the second angle while you’re focused on the first.
Fix: Always anchor your body to cover so your exposure is limited to one primary angle. If you must watch two lanes, do it with:
- a teammate holding the second lane, or
- a smoke that removes one lane, or
- a temporary jiggle to gather info (not a committed hold).
4.2 The “CET” rule: Cover, Escape, Trade
Before you choose a spot to fight from, confirm you have at least two of these three:
- Cover: a hard object that breaks line of sight instantly
- Escape: a route to disengage without crossing open space
- Trade: a teammate who can punish the enemy if you die
Positions without CET are “highlight spots” that look cool but lose rounds over time.
4.3 Distance control: stop taking the enemy’s preferred fight
Different guns (and player habits) thrive at different ranges. Many duel losses are simply range mistakes:
- Taking long-range fights with a weapon or stance you can’t control
- Fighting close into multi-swing angles where you can’t reset recoil
- Standing at “medium” range where both sides can wide swing you cleanly
Fix: Choose distance based on your role and plan:
- Entry roles: create close-range isolation with flashes/smokes and force 1v1s
- Anchor roles: play ranges that allow you to fall back safely after first contact
- Support roles: hold angles that enable immediate trades, not solo hero fights
4.4 One-and-done vs re-peekable positions
Some spots are designed to get one kill then leave (one-and-done). Others are designed to hold, disengage, and re-fight safely. Many players fail by using a one-and-done spot as if it’s re-peekable.
Examples of one-and-done characteristics:
- After shooting, you have no safe cover to reset
- You are predictable once revealed
- You can be cleared by common utility paths
Fix: Decide your intention before contact:
- “I’m taking one shot then falling back.”
- “I’m holding for trade and re-fighting only with utility.”
4.5 Defensive positioning templates
A) The anchor template: delay, not duel
If you are anchoring a site, your job isn’t to “win the site alone.” It’s to:
- Get info early without dying
- Delay with utility (smokes, mollies, slows, stuns)
- Force the attackers into predictable timing windows
- Survive long enough for rotations or trades
Anchor rule: If you are alone, prioritize survival + delay over “fair” duels.
B) The crossfire template: make your teammate’s life easy
A good crossfire is not “two people watching the same angle.” It’s two people positioned so that when one is engaged, the other has a clean shot at the enemy’s side or back.
Crossfire checklist:
- Angles are offset (enemy must expose to one to shoot the other)
- Spacing prevents multi-kills with one spray
- At least one player has an escape route
4.6 Attacking positioning templates
A) Spacing for trades: the ranked skill that wins rounds
Attackers often lose because spacing is wrong: too far to trade, or stacked so tightly that one spray kills two. Ideal trade spacing is close enough to swing instantly, but not so close that you die together.
Simple rule: If your teammate takes first contact, you should be able to swing and shoot within one second.
B) Post-plant positioning: don’t “protect spike,” protect angles
After plant, many players stand in spots that feel safe but are actually duel traps: multiple angles open, no escape, and no teammate trade. Post-plant is a duel quality test: you should only fight on your terms.
Post-plant checklist:
- Can I break line of sight if they swing?
- Can my teammate trade me if I die?
- Am I forcing them to clear me with time pressure?
4.7 A quick reference table: positioning mistakes and fixes
| Mistake | What it causes | Fix |
|---|---|---|
| Holding while exposed to two angles | Untradeable deaths and “random” timings | Anchor to cover; remove one angle with smoke or teammate |
| Standing with no exit route | Forced 50/50s | Fight from positions with a fall-back line |
| Taking the same angle repeatedly | Pre-aimed headshots | Reset, reposition, re-engage with help (3R rule) |
| Post-plant “hero spot” alone | Easy isolation by defenders | Play tradeable positions; hold crossfires, not ego peeks |
5) Movement & Mechanics That Make Duels Easier
This guide is not an aim trainer advertisement, but mechanics matter—because mechanics determine how forgiving your duel choices are. The point isn’t perfection. The point is consistency under pressure.
5.1 Stop shooting while “almost stopped”
A huge share of duel losses come from firing while your movement is still settling. You feel like you stopped. Your bullets disagree.
Fix: Practice “deadzone discipline”:
- Strafe → stop → shoot a short burst
- Repeat until the rhythm feels automatic
- Then apply it while slicing angles in live fights
5.2 Burst timing beats panic spraying
In many rifle duels, a calm two-burst rhythm is stronger than a long spray—especially when you’re peeking into a player who is already pre-aimed.
Simple burst rules:
- At medium range: 2–4 bullets, micro-correct, 2–4 bullets
- After you miss the first burst: break line of sight or strafe reset, don’t “feed” the angle
5.3 Crosshair placement: the duel mistake that hides inside everything else
If your crosshair is consistently at head height and positioned where the next head is likely to appear, you’ll feel like you “have more time.” That’s because you do.
Two timeless rules:
- Head height by default (use map geometry cues: boxes, door handles, edges)
- Pre-aim the next threat before your body exposes it (crosshair leads the peek)
6) Information & Utility: Turning 50/50s Into 70/30s
Valorant is a tactical shooter. If you fight like it’s only aim, you will lose to players who stack small advantages. The good news: you don’t need perfect lineups to stop dry peeking. You need basic patterns.
6.1 The “probe then commit” rule
Before committing to a duel, try to gain info with low risk:
- Sound cues (steps, reloads, ability usage)
- Minimap confirmation (teammate contact, revealed positions)
- Utility probe (recon, drone/dog, smoke pressure, flash timing)
If you commit without probing, you’re relying on the enemy making a mistake first.
6.2 Utility patterns that reduce dry peeks
A) Flash + swing (simple and timeless)
- Call: “Swing on flash.”
- Flash the angle you want to isolate.
- Swing with trade spacing: one enters, one follows for trade.
B) Smoke to isolate (remove the second angle)
Smokes aren’t only for executes. They are duel-shaping tools.
- Smoke off a crossfire angle so your peek becomes a 1v1.
- Use smoke timing to cross or reposition safely instead of dry swinging.
- Hold edges intelligently: avoid standing on the obvious “smoke edge” at head level.
C) Recon/drone/dog to force movement
Information utility isn’t just about spotting. It forces defenders to shoot, reposition, or reveal their presence—creating timing windows for safer peeks.
6.3 Trading: the ranked superpower
If your team trades well, your duels get easier because you stop “needing” to win every 1v1. You can take a fight knowing your death still produces value.
Trade rules:
- If your teammate is fighting, you should be ready to swing immediately.
- Don’t watch them die from too far away.
- Don’t stack so close that one spray kills both.
7) Role-Based Templates: Duelist, Initiator, Controller, Sentinel
One reason players repeat duel mistakes is role confusion. You take the same “solo dry peek” whether you’re a duelist, a sentinel, or a controller—even though the correct duel style changes by role.
7.1 Duelist: create space without donating first blood
Duelists often feel responsible to “go first,” so they dry peek. The better model is: go first with a plan.
- Default pattern: probe (info) → isolate (smoke/angle) → commit (flash/help) → exit (dash/cover)
- Entry rule: if your team can’t trade you, you’re not “creating space,” you’re gambling.
- After first contact: don’t re-peek the same line; reset and re-enter from a new timing.
7.2 Initiator: your utility is your duel advantage
Initiators should rarely be forced into low-info duels. Your job is to create the information that makes duels safe.
- Use recon/drone/dog to confirm positions before your team swings.
- When you must fight, do it off your utility timing (as it lands or forces movement).
- Trade your entry: be close enough to swing, not stuck “watching minimap.”
7.3 Controller: isolate fights and survive
Controllers throw rounds by dying early in dry peeks. Your value compounds over time: smokes for execute, then smokes for post-plant, then smokes for retake denial.
- Rule: if you can avoid the first duel, avoid it. Keep your smokes alive.
- Use smokes to remove crossfires before teammates commit.
- Take duels from escape positions: peek, burst, break line of sight.
7.4 Sentinel: win by making duels unfair
Sentinels don’t need to “prove” aim. They win by stacking advantage: off-angles, crossfires, slows, traps, and time pressure.
- Favor one-and-done positions that let you fall back after first kill.
- Play for delay and trade when alone; don’t dry swing to “check.”
- After contact, reposition and force them to clear you again.
8) Checklists: Pre-Fight, Mid-Fight, Post-Fight
These checklists are designed for ranked speed. The goal is not to think more—it’s to think once, then execute consistently.
8.1 Pre-fight checklist (1 second)
- Info: Do I know where they are (or likely are)?
- Trade: Can I be traded if I die?
- Isolation: Am I exposed to more than one angle?
- Exit: Can I break line of sight after first burst?
If you have none: don’t commit. Probe first.
8.2 Mid-fight checklist (during the first burst)
- Did my first burst connect? If not, reset (strafe/cover) instead of feeding the angle.
- Am I getting swung by a second player? If yes, break line of sight immediately.
- Did I over-swing? If yes, stop and re-anchor to cover.
8.3 Post-fight checklist (after kill or disengage)
- After a kill: expect a trade—reposition or hold the trade before reloading.
- After taking damage: don’t re-peek the same line; reset and change the fight.
- After utility: if you used your “fight tool” (flash/smoke), don’t stay in the open; reposition while it has value.
9) A Timeless Practice Plan (7 Days + Repeat)
Most players “practice aim” and hope duel mistakes disappear. They don’t—because duel mistakes are decision habits. This plan trains decision habits and mechanics together in short sessions you can repeat weekly.
Daily structure (25–35 minutes)
- 5 minutes: Range warm-up (burst rhythm, stop-shoot discipline, head-level placement)
- 10 minutes: Deathmatch with a rule focus (see below)
- 10 minutes: Custom map routine (angle slicing + reposition reps)
- Optional 5–10 minutes: Quick VOD review of 3 deaths (score duel quality)
Day-by-day focus
Day 1: No dry re-peeks
- DM rule: after missing a burst, you must strafe reset or break line of sight.
- Ranked rule: no re-peek within 2 seconds unless you have trade/flash.
Day 2: Angle slicing only
- DM rule: you must clear angles slowly; no wide swings into unknown.
- Custom rule: practice “one angle at a time” on common corners.
Day 3: Reload ladder
- DM rule: move to cover before any reload.
- Ranked rule: after a kill, reposition first; reload only when safe.
Day 4: Trade spacing
- Ranked rule: if teammate fights, be within 1 second of a trade swing.
- Review 3 rounds: did you watch a teammate die untraded?
Day 5: Utility-supported fights
- Ranked rule: no first-contact swing without at least one advantage (info/trade/utility/exit).
- Track: how many “0-score” deaths did you have?
Day 6: Post-plant discipline
- Ranked rule: fight from cover with escape; avoid solo “hero” peeks.
- Goal: stop giving defenders free 1v1 isolates.
Day 7: Review + reset
- Pick your top two recurring mistakes from the week.
- Repeat Days 1–6 with those two as your primary focus next week.
Consistency beats intensity. If you remove just one duel mistake per week, your rank will move—because your rounds stop collapsing from avoidable first deaths and untradeable reload punishments.
10) FAQ: Common Duel Questions
“How do I stop dry peeking when my team won’t use utility?”
Make your own advantages: probe for info (sound/jiggle), isolate with movement and cover, and take fights only when you have an exit or a trade. Even without team utility, you can avoid the worst 0-score duels.
“Should I wide swing or jiggle?”
Jiggle for info and to bait shots. Wide swing when you’ve isolated a single angle, you expect a tight hold, or you’re swinging off teammate timing/utility. The mistake is wide swinging into multiple unknown angles.
“I always die while reloading—what’s the fastest fix?”
Adopt one rule for a week: move to cover before any reload. This alone removes most “reloading deaths” because you stop reloading in punishable windows.
“How do I know if my positioning is bad?”
If you die and your teammate cannot trade, your positioning was likely wrong (or your team spacing was). Start using CET: Cover, Escape, Trade. You want at least two before you commit to holding a spot.
“What matters more: aim or decision-making?”
At most ranks, decision-making creates the conditions that allow your aim to work. Better duels (info/trade/utility/exit) make average aim look good. Bad duels make great aim look inconsistent.
Conclusion: Make Duels Repeatably Favorable
If you take one thing from this guide, let it be this: stop measuring duels only by outcomes. Measure them by quality. When you reduce dry peeks, reload with discipline, and fight from tradeable positions, your “aim” will feel better—because your fights are easier and more predictable.
Start with one change for the next 10 games:
- No dry re-peeks without help
- Move to cover before reloading
- Fight from positions with Cover + Escape or Cover + Trade
Those three rules alone eliminate a huge portion of preventable deaths in ranked.
And if you want a faster correction loop—clear feedback, VOD review, and structured plans—Boosteria can help you tighten these duel habits quickly. Review options here: Boosteria Valorant Boosting Prices.