CoD BO6 Aim & Movement Fundamentals Guide for Better Fights
CoD BO6 — Aim & Movement Fundamentals: Centering, Pre-Aim, Slide Timing
Table of Contents
- Why Aim and Movement Fundamentals Matter in CoD BO6
- What Better Players Actually Do Differently
- Centering: The Skill That Makes Everything Easier
- Pre-Aim: Winning Before the Gunfight Starts
- Slide Timing: When Movement Creates Value
- How Aim and Movement Work Together
- Peeking, Lane Control, and First-Bullet Advantage
- Micro-Positioning Inside Every Fight
- Controller vs Mouse and Keyboard Fundamentals
- Most Common BO6 Aim and Movement Mistakes
- Practice Drills That Actually Transfer to Matches
- A Simple Warm-Up Routine for Ranked and Pubs
- Fight Templates You Can Reuse in Real Matches
- How to Review Your Own Gameplay Efficiently
- How to Build Consistency Instead of Random Pop-Offs
- Advanced Habits That Separate Good From Great
- 7-Day Improvement Plan
- Final Thoughts
- Image Prompts with SEO Alt Text
- Tags
Why Aim and Movement Fundamentals Matter in CoD BO6
Most players who want to improve at CoD BO6 search for “best settings,” “best sensitivity,” “best loadout,” or “best meta weapon.” Those things matter, but they are not the foundation of reliable performance. The foundation is how you move into fights, how ready your aim is before contact, and how efficiently you control your crosshair during the first fractions of a second after you see an opponent.
That is why the three ideas in this guide matter so much: centering, pre-aim, and slide timing. These are not flashy concepts. They do not look dramatic in highlight clips. But they are the difference between feeling like gunfights are random and feeling like you are quietly in control of most engagements.
In CoD BO6, clean mechanics do not mean “move as fast as possible all the time.” They mean moving with purpose, entering lines of sight prepared, keeping your reticle where danger is most likely to appear, and using slides as a timing tool instead of a panic button. The better your fundamentals become, the less you need miracle flicks, panic corrections, or lucky hipfire to survive.
This is also what makes the guide timeless. Weapon balance changes. Attachments get tuned. Maps rotate. Certain high-level tactics evolve. But the core idea remains the same across every Call of Duty title: if your reticle arrives early, if your body enters the fight under control, and if your movement creates a harder shot for the enemy without destroying your own aim, you will win more fights.
If you want outside references while improving, it is worth checking official game and support resources from Call of Duty and Activision Support. And if you are looking at progression help, rank improvement, or a faster climb while still learning fundamentals, Boosteria’s BO6 boosting prices page is the most relevant fit for this topic.
The goal here is not just to “aim better.” The real goal is to make fights simpler. Simpler fights are easier to read, easier to repeat, and easier to win under pressure.
What Better Players Actually Do Differently
When average players watch a strong CoD BO6 player, they often focus on the wrong details. They notice the speed. They notice the confidence. They notice the occasional snap to target. What they miss is the preparation that made those moments look easy.
Good players usually do four things better than everyone else.
First, they keep their reticle in useful places while moving. Their crosshair is not wandering across walls, floors, or empty corners. It lives where a body could realistically appear. This is centering in action.
Second, they enter dangerous angles already expecting contact. They are not surprised by predictable fights. That is pre-aim.
Third, they treat movement as a way to influence timing and spacing, not as a substitute for aim. They do not slide because sliding looks cool. They slide to cross a threat window, break a tracking pattern, or arrive at cover with momentum.
Fourth, they understand that the first bullets matter more than the last bullets. Strong players often win because their first burst is cleaner, earlier, and more controlled. The fight may look close in the killcam, but the advantage was created before the enemy fired back.
This means improvement is not mostly about reaction speed. It is about removing unnecessary corrections. If your reticle is already close to the target when contact happens, your required reaction becomes smaller. If your body is entering the lane correctly, the enemy has less time to punish you. If your slide happens at the right moment, you arrive in a stronger position with your gun ready instead of exposed in the open.
That is good news, because these are trainable habits. They are far easier to improve than raw talent. And once they become automatic, your gameplay starts to feel calmer even when the lobby gets harder.
Centering: The Skill That Makes Everything Easier
Centering is the habit of keeping your reticle naturally aligned with the most likely enemy location as you move around the map. It sounds simple, but it is probably the most valuable mechanical habit in any FPS, and especially in a fast game like BO6 where contacts happen quickly and often at close to medium range.
Imagine two players rounding the same corner. One player has the reticle floating low near the ground. The other has the reticle already hovering at upper torso level where a defender is likely to appear. The second player does not need a real “flick.” They only need a tiny adjustment. That tiny adjustment is faster, more stable, and more repeatable. Over dozens of fights, that turns into a large statistical edge.
Good centering has three layers.
Height. Your reticle should generally sit at the height where the enemy’s torso or upper chest is likely to appear. Many players either aim too low or over-focus on perfect head level in situations where body-level consistency would be more practical. In BO6, consistent center-mass readiness often outperforms over-ambitious micro-head hunting in chaotic fights.
Horizontal placement. Your reticle should favor the side of the screen where danger is more likely. If you are slicing a corner, do not keep your crosshair centered in empty space. Bias it toward the likely peek point.
Pathing. Centering is not only about where your reticle rests. It is also about how smoothly it travels while you move. If your reticle jerks, bounces, or swings too far every time you sprint, mantle, turn, or slide, your visual discipline is leaking.
One of the best ways to improve centering is to stop thinking of your crosshair as decoration. Think of it as a prediction tool. Every second, ask a quiet question: “If someone appeared right now, where would they most likely be?” Put your reticle there before anything happens.
This does not mean your crosshair should glue itself to one exact pixel. It means it should live in relevant space. Relevant space includes door frames, lane entries, likely headglitches, power positions, corners defenders hold, and the edge of cover where a shoulder could swing out.
A simple rule helps here: do not let your reticle drift into useless space during downtime. Many lost fights start three seconds earlier, when a player sprints through the map with their aim pointed at the floor. Then contact happens suddenly, and now they need a huge emergency correction under pressure.
Centering also reduces panic. When your reticle is already near the threat, your brain stays calmer because the task feels smaller. This matters more than many people realize. Calm aim is efficient aim.
To train centering, spend sessions where your only goal is to move through common routes while keeping your reticle connected to likely enemy locations. Do not worry about kill count at first. Worry about readiness. Once readiness becomes natural, speed and confidence will follow.
Pre-Aim: Winning Before the Gunfight Starts
Pre-aim is closely related to centering, but it is more specific. Centering is your general crosshair discipline while moving through the map. Pre-aim is the deliberate act of getting your weapon and reticle prepared for a particular expected angle before the enemy appears.
Think of pre-aim as respectful paranoia. You are acknowledging that a certain angle is dangerous, so you enter it already prepared to shoot. Instead of reacting late, you arrive early.
Bad players often move into hot zones like they are entitled to free space. Good players assume someone could be there and structure their movement around that possibility.
Strong pre-aim has three components.
Expectation. You need a reason to expect an enemy. This might come from map flow, spawn logic, teammate deaths, audio, objective pressure, or simple probability. Pre-aim is strongest when it is informed, not random.
Gun readiness. Your weapon should be prepared at the correct moment. If you know a doorway is dangerous, you should not still be in a lazy sprint posture while fully exposed. Conversely, you do not need to hard-ADS every harmless area. Good players know when to become “combat ready.”
Angle discipline. Pre-aim works best when you isolate one threat source at a time. If you expose yourself to three angles simultaneously, your pre-aim loses value because your prepared line does not cover all possible enemies.
Many people misunderstand pre-aim and become too passive. Pre-aim does not mean slowly crawling through the map with maximum fear. It means compressing uncertainty. You are reducing the number of surprises in the fight.
For example, if you are about to challenge a predictable lane where defenders often sit behind a certain object, your pre-aim should settle on that likely position before your body fully enters the angle. If no one is there, you continue. If someone is there, your first bullets come out immediately. That speed comes from planning, not reaction.
Pre-aim also helps your recoil control. When your starting point is correct, your firing pattern stays cleaner because you are not yanking your reticle across the screen and then trying to stabilize under recoil. It is much easier to hold control when the initial placement is already good.
Here is the practical mindset: every time you approach a doorway, corner, stair exit, headglitch, or objective entrance, ask yourself, “Where would I hold this if I were the enemy?” Then prepare for that location first. Not forever, just first.
If you regularly lose to players who seem “already aimed in,” it is usually because they were. They were not superhuman. They were simply prepared earlier than you were.
Slide Timing: When Movement Creates Value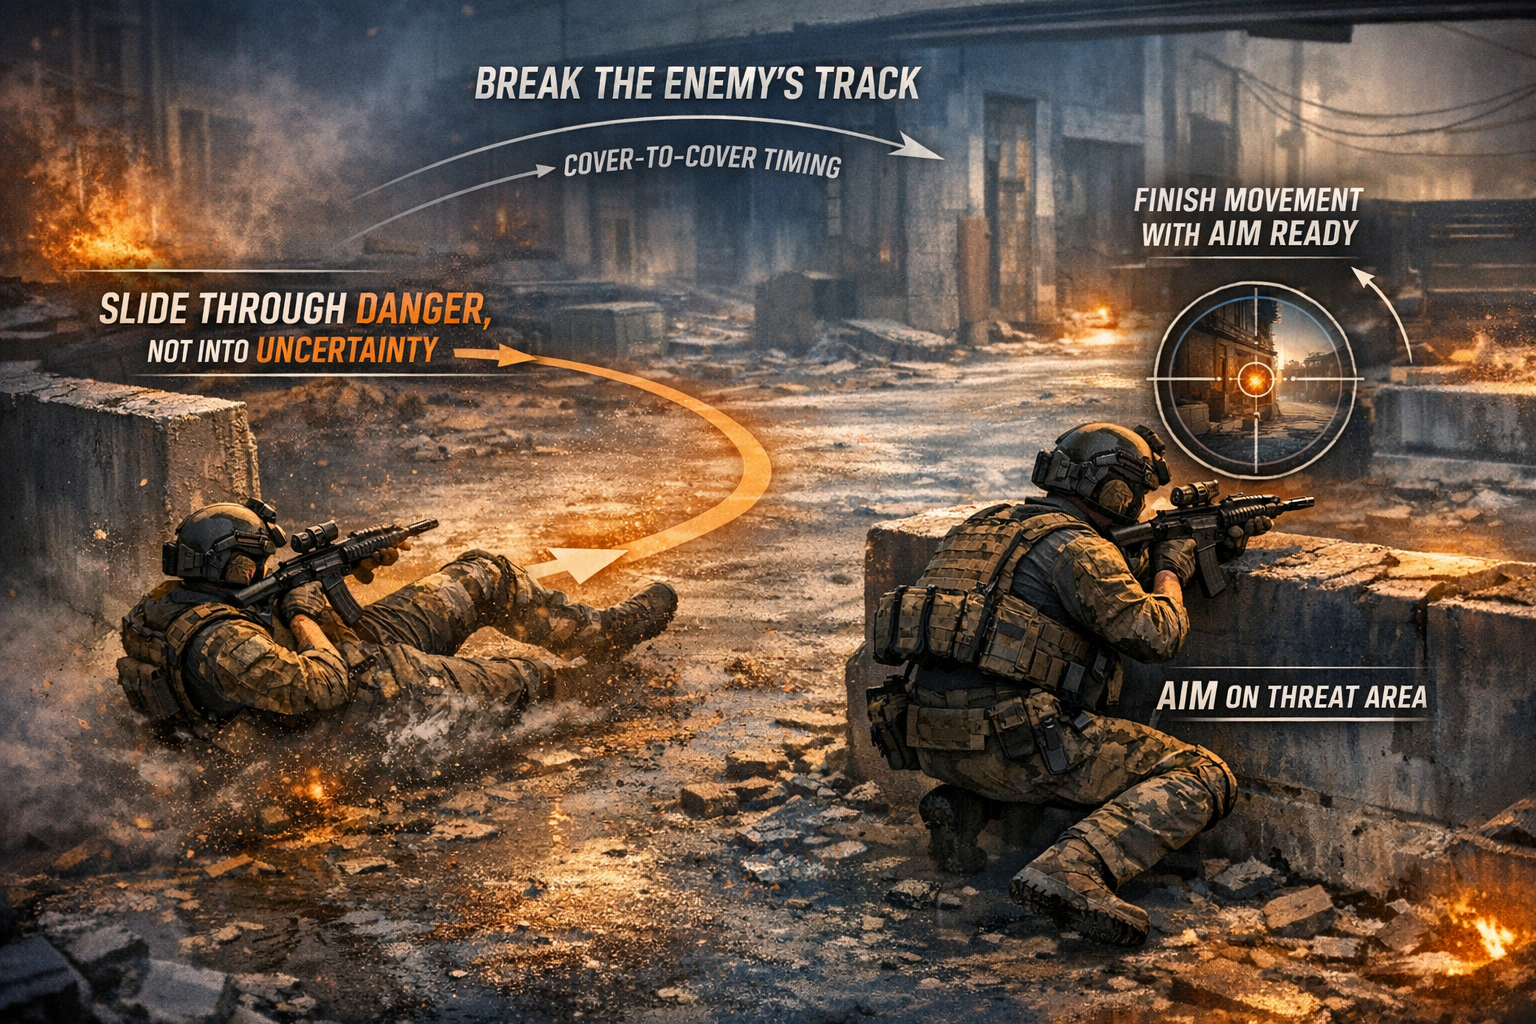
Sliding is one of the most misunderstood movement tools in modern Call of Duty. Many players either overuse it or use it at the wrong moments. They turn every approach into a slide and then wonder why their gunfights feel messy. The answer is simple: slide timing matters more than slide frequency.
A good slide does one of four things. It crosses exposed space quickly. It changes the enemy’s expected tracking line. It helps you arrive into cover with momentum. Or it lets you re-enter a fight on a slightly different timing than the opponent expects.
A bad slide does the opposite. It locks you into a predictable path, throws off your own aim, and delivers you into the enemy’s crosshair like a gift.
The most important principle is this: slide through danger, not into uncertainty. If you slide into an area you have not read properly, you may be faster, but you are also more committed and less adaptable. If you slide across a known threat window toward a planned piece of cover, that is purposeful movement.
Think of slide timing in terms of phases.
Before the slide. You need information. Where is the threat likely located? What cover are you moving toward? What are you trying to gain—distance, timing, or evasiveness?
During the slide. Your job is to stay composed. Many players mentally “give up” on aiming during movement mechanics. Better players stay visually connected to the fight even while repositioning.
After the slide. This is where most gunfights are actually decided. Did you arrive with your reticle somewhere useful? Did you transition into the next action cleanly—shoot, strafe, challenge, or tuck into cover? Or did the slide become a dramatic movement with no stable finish?
That final point is huge. A movement mechanic is only as valuable as the position and readiness it creates at the end. If your slide looks fast but leaves your reticle late and your body overexposed, it was not efficient.
The best slide users are selective. They use it to pass through short danger windows, to reposition between cover pieces, to hit a favorable timing after breaking line of sight, or to avoid becoming an easy standing target during a predictable challenge.
The worst slide users reveal a common habit: they move first and think later. Their slide is a reflex, not a decision. They see pressure, panic, and commit to movement without asking whether that movement produces a winnable next state.
So when should you slide less? Slide less when you are entering a dense angle with several possible defenders, when you are already advantaged and do not need to overcomplicate the fight, and when your current cover-to-cover route is short enough that disciplined strafing is safer.
And when should you slide more? Slide more when you must cross a punished lane, when you want to break the enemy’s initial reticle alignment, when you are escaping after getting tagged, or when you are chaining movement between known cover points.
In other words, do not ask “Should I slide a lot?” Ask “What does this slide solve?” If the answer is unclear, do not slide.
How Aim and Movement Work Together
One of the biggest breakthroughs in FPS improvement happens when players stop treating aim and movement as separate topics. In real fights, they are the same system.
Your movement determines the kind of aim problem you create for yourself. If you swing too wide, jump unnecessarily, or slide into a cluttered angle, your aim task becomes harder. If you take a cleaner path, isolate a smaller portion of the angle, and keep your reticle stable, your aim task becomes simpler.
This is why some players look “naturally accurate” even without wild raw mechanics. Their movement constantly gives their aim easy work.
Here is the key relationship:
- Centering reduces the size of your first correction.
- Pre-aim reduces the need for surprise reactions.
- Slide timing influences how predictable your body is during entry and exit phases.
- Micro-strafing after contact affects your opponent’s tracking while preserving your own control.
If even one of those pieces is poor, the others have to work harder. If all four are coordinated, your fights feel smooth.
For example, a good challenge often looks like this: you approach with disciplined centering, you pre-aim the most likely defender position, you use a movement cue only if it solves a specific exposure problem, you land first bullets quickly, and then you strafe with intention while maintaining recoil control. Nothing in that sequence is random. It is structured.
That is what you should chase: structure. Structured fights are consistent fights.
Peeking, Lane Control, and First-Bullet Advantage
Most BO6 gunfights are shaped by how you enter space. Peeking is not merely exposing yourself and hoping your mechanics carry. It is the art of presenting your body to the enemy at a timing and angle that favors you.
A clean peek has four goals: see early, expose little, isolate one threat, and be ready to fire instantly.
Many players fail because they challenge space too greedily. They swing an entire lane at once, allowing multiple enemies to see them. Or they over-peek past cover before confirming where the opponent actually is. Both errors increase the amount of aim they need and the amount of damage they are likely to take.
Instead, think in slices. Reveal the lane in controlled pieces. Let your reticle lead the body. Clear the most likely holding position first. If the lane is empty, expand your information step by step.
This is also where first-bullet advantage matters. In evenly matched fights, the player whose reticle is more prepared often gets meaningful damage first. Once that happens, the fight becomes easier to finish because the opponent is now reacting under pressure while likely adjusting both movement and recoil at once.
Do not confuse speed with rushing. Clean peeks can be fast. The difference is that fast, clean peeks are prepared. Fast, messy peeks are gambling.
When playing objective modes, lane control becomes even more important. Good players are not constantly sprinting into every fight. They are establishing influence over key sightlines, denying easy routes, and forcing enemies to enter disadvantageous timing windows. Fundamentals make this possible. If your centering and pre-aim are strong, holding and re-taking lanes becomes far more reliable.
Micro-Positioning Inside Every Fight
Movement is not only about getting from one place to another. It is also about small body placements inside the fight itself. This is micro-positioning, and it often decides whether your mechanics feel crisp or desperate.
Good micro-positioning means you are constantly aware of your nearest cover, your escape route, your visible hitbox, and the distance that best suits your weapon and current angle. You do not need to be a strategy genius to use this well. You just need to stop taking every fight from bad terrain.
Ask simple questions:
- Can I fight from the edge of cover instead of in the open?
- Can I expose only enough to shoot?
- Am I standing in a place where a second enemy can easily trade me?
- If I get tagged, where do I disengage?
These questions matter because not all accurate shooting has equal value. Hitting shots while standing badly often still gets you killed. Good position makes your aim worth more.
Micro-positioning also influences confidence. When you know you have cover nearby, you can commit to shots more calmly. When you know you can instantly break line of sight if necessary, you make clearer decisions. This is one reason why some players seem composed under pressure—they have already built safer fight structures around themselves.
Controller vs Mouse and Keyboard Fundamentals
The fundamentals in this guide apply to both controller and mouse and keyboard, but the feel of execution is slightly different.
On controller, centering becomes even more important because large emergency corrections are expensive. The stronger your initial placement, the less strain you put on your stick control. Controller players benefit enormously from clean pre-aim because it reduces the need for dramatic last-second reticle travel. Slide timing is also crucial because over-moving can sabotage the stable stick input needed to finish fights cleanly.
On mouse and keyboard, it is easy to become overconfident in flick ability and underinvest in centering. That is a mistake. Great mouse aim still becomes much stronger when crosshair placement reduces the total correction required. MnK players can sometimes recover worse placement with raw speed, but consistent high-level performance still comes from disciplined preparation, not endless rescue flicks.
For both inputs, the lesson is the same: do not build your game around saving mistakes. Build it around making fewer mistakes in the first place.
Most Common BO6 Aim and Movement Mistakes
Improvement gets faster when you can name your errors clearly. Here are the most common mistakes that hold players back.
1. Sprinting through dangerous space with lazy reticle placement.
This is one of the biggest killers of consistency. If you enter high-risk areas with the crosshair pointing nowhere useful, every encounter becomes reactive.
2. Aiming only after seeing the enemy.
This sounds obvious, but many players still play this way. They do not pre-aim likely positions, so their fight begins late.
3. Sliding as a habit instead of a decision.
Random slides often create self-inflicted chaos. If the slide does not solve an exposure or timing problem, it may only hurt your readiness.
4. Over-challenging after getting first damage.
Sometimes the best follow-up to early damage is not to dive harder. It may be to hold the angle, tighten cover, or force the enemy into your prepared line.
5. Peeking too much at once.
Exposing yourself to multiple angles reduces the value of pre-aim and magnifies all mechanical errors.
6. Letting recoil control become reactive and panicked.
If your first placement is poor, your recoil control often becomes a rescue mission instead of a steady pattern.
7. Confusing unpredictability with effectiveness.
Jumping, sliding, and wide-swinging randomly may feel aggressive, but effective aggression still has structure.
8. Playing every fight at maximum speed.
Top players are not always fast in the same way. They are fast when it matters and calm when that gives more accuracy.
9. Ignoring what caused the fight to happen.
If you only review the last second of the duel, you miss the earlier positioning and crosshair mistakes that created the bad fight.
10. Treating “bad aim” as a mysterious curse.
In reality, many aim problems are movement and preparation problems first.
Practice Drills That Actually Transfer to Matches
Many drills look productive but have weak transfer to real games because they isolate the wrong thing. The best BO6 drills connect visual readiness, decision timing, and controlled movement.
1. Centering Walkthrough Drill
Load into maps or run through familiar routes in a private environment. Move through common lanes and entrances without rushing. Your only goal is to keep the reticle on likely enemy locations at all times. Track door frames, headglitches, and common hold positions. This builds the habit of keeping your aim connected to danger.
2. One-Angle Pre-Aim Drill
Pick a route with several predictable fights. Approach each angle and deliberately settle your reticle on the most likely defender position before exposing your body. Then move on. This teaches your brain to expect contact instead of reacting late.
3. Cover-to-Cover Slide Drill
Practice sliding only between specific cover points, not randomly. The goal is to connect movement to a defined destination. Each slide should end with immediate reticle readiness on the next threat source. This teaches useful slide timing instead of empty speed.
4. Shoot-Move-Shoot Rhythm Drill
Engage a target, break line of sight, reposition slightly, then re-challenge from a cleaner angle. This drill develops the habit of fighting in phases rather than standing still and dumping bullets until someone dies.
5. Slice-the-Pie Drill
Take wide areas and clear them in narrow pieces. Let the reticle lead every slice. This improves lane entry discipline and reduces the habit of exposing yourself to multiple threats at once.
6. First-Bullet Accuracy Drill
Focus on landing the cleanest first burst possible. Do not worry about flashy tracking. Focus on arriving early and stable. In real games, many fights are effectively decided by the quality of the opening burst.
7. Recovery Discipline Drill
Any time your reticle drifts into useless space, deliberately recover it back to a useful line immediately. This sounds small, but it builds the skill of self-correction mid-match.
The golden rule for drills is simple: if a drill does not improve how you enter, start, and control real engagements, it is probably not worth too much of your time.
A Simple Warm-Up Routine for Ranked and Pubs
You do not need a long ritual before every session. You need a repeatable one. A practical warm-up should prepare your eyes, hands, and decision timing without burning mental energy.
5 minutes: visual readiness.
Focus on centering and smooth reticle travel while moving. The goal is not speed. The goal is relevance.
5 minutes: pre-aim rhythm.
Approach common angles and rehearse combat-ready entries. ADS or ready your weapon at the correct timing rather than too early or too late.
5 minutes: controlled movement.
Practice cover-to-cover slides and post-slide readiness. Every movement should lead into a useful next aim point.
5 minutes: light live engagement.
Play a mode or sequence where you focus on first-bullet quality and clean entries rather than pure frag chasing.
This kind of warm-up is enough for most players. The purpose is not to “unlock cracked aim.” It is to remind your body what disciplined BO6 mechanics feel like before matches start getting noisy.
Fight Templates You Can Reuse in Real Matches
Players improve faster when they stop improvising every duel from scratch. Build reusable fight templates.
Template 1: The Expected Defender
You know an enemy is likely holding the next angle. Approach with centering, settle into pre-aim on the most common hold spot, expose in a controlled slice, fire immediately if contact occurs, then either strafe to maintain pressure or tuck back if the trade risk is high.
Template 2: The Lane Cross
You must move through a punished lane. Identify your destination cover first. Slide or burst through only if it meaningfully shortens vulnerability. Arrive with your reticle already pointed toward the most likely follow-up threat.
Template 3: The Damage Reset
You land damage but do not secure the kill. Do not blindly sprint after it. Re-center, predict the opponent’s escape or re-peek path, and take the next angle ready. This avoids turning an advantage into a scramble.
Template 4: The Objective Re-Clear
When re-entering a contested zone, do not flood it with speed. Clear the most valuable angle first, then expand. Keep cover near you and avoid exposing yourself to the full room immediately.
Templates matter because they reduce mental noise. Under pressure, habits decide more than intention. Train good templates until they feel normal.
How to Review Your Own Gameplay Efficiently
Self-review becomes powerful when you stop asking “Did I hit my shots?” and start asking “Why was this aim problem created?”
When you die, review the engagement through this sequence:
- Where was my reticle before contact?
- Did I expect this enemy or was I surprised by a predictable angle?
- Did my movement make the aim task easier or harder?
- Was the slide purposeful or unnecessary?
- Did I expose too much space at once?
- Where could I have held or reached cover?
This method shows you whether the problem was really aim, or whether it started with poor centering, weak pre-aim, bad pathing, or reckless entry discipline.
One of the best habits is to label each lost fight with one main cause. Examples: “low centering,” “late pre-aim,” “panic slide,” “wide swing,” “bad cover,” “chased too hard.” Over time, patterns become obvious. Once patterns are obvious, improvement becomes much easier.
How to Build Consistency Instead of Random Pop-Offs
Anyone can have a hot map. The harder skill is repeating decent performance when your hands do not feel magical. Consistency comes from fundamentals because fundamentals reduce dependence on perfect conditions.
Here is what consistent BO6 play usually looks like:
- You rarely enter common angles unprepared.
- Your reticle spends most of the match in relevant space.
- Your slides have reasons behind them.
- Your first burst is often on time.
- You know when to slow down and simplify the next fight.
- You make enemies beat structure, not just reflexes.
That last line matters a lot. When your game has structure, opponents have to break through good positioning, prepared crosshair placement, and controlled timing. When your game lacks structure, every duel becomes a reflex contest. Reflex-only gameplay is unstable.
If you want more stable performance, stop chasing a feeling. Build a process. Center better. Pre-aim better. Slide with intent. Review mistakes honestly. Do this long enough, and your floor rises. Once the floor rises, your ceiling becomes easier to reach.
Advanced Habits That Separate Good From Great
Once your basics improve, a few advanced habits add even more reliability.
Threat prioritization. Good players know which angle matters most first. They do not try to cover everything equally. They handle the highest-probability threat before widening their focus.
Reticle patience. Great players do not twitch at every visual cue. They keep the reticle calm and meaningful. This protects accuracy during chaotic sequences.
Timing awareness. They understand when an enemy is likely to re-peek, rotate, or overextend. This makes pre-aim more informed and less guess-based.
Re-entry discipline. After breaking line of sight, they do not automatically repeat the same challenge the same way. They vary timing and angle while keeping the fight structurally sound.
Mechanical economy. They do not use more movement or mouse/stick travel than necessary. Their actions are efficient. Efficient actions are easier to reproduce under stress.
This is what high-level improvement feels like: less wasted motion, more deliberate timing, and fewer situations where you need heroics to survive.
7-Day Improvement Plan
If you want a simple practical framework, use this for one week.
Day 1: Centering Only
Ignore kill count. Focus entirely on keeping your reticle at useful height and relevant angle entry points. Review one match and note every time the crosshair drifted into dead space.
Day 2: Pre-Aim Discipline
Approach every major doorway, lane, and objective entry as if someone is there. Do not slow to a crawl—just become prepared sooner.
Day 3: Slide Timing Cleanup
Only slide when crossing space, breaking a line, or moving to planned cover. Remove every panic slide you can.
Day 4: Cover-Based Fighting
Take as many fights as possible from the edge of cover. Ask after each death: did I fight from a useful place?
Day 5: First-Bullet Focus
Judge yourself by opening burst quality, not overall spray. Were your first bullets early and stable?
Day 6: Review and Pattern Finding
Watch a few lost fights and label each one with the primary cause. Keep the labels simple and repetitive.
Day 7: Full Integration
Play normally, but maintain one checklist in your head: relevant reticle, expected angle, purposeful movement, clean entry, useful cover. This is where your new habits start merging into real gameplay.
Repeat that cycle and you will usually notice a clearer feel in your matches before you notice dramatic stat changes. That is normal. Better structure often arrives before bigger numbers.
Final Thoughts
CoD BO6 improvement becomes much easier when you stop treating mechanics as mysterious. Most players do not truly need a miracle sensitivity, a secret movement exploit, or impossible reaction speed. They need cleaner entries into fights.
That is what centering, pre-aim, and slide timing really are: methods for entering fights cleanly.
Centering keeps your reticle where danger is likely to appear. Pre-aim lets you arrive early to expected fights. Slide timing makes movement solve real problems instead of creating new ones. Together, they reduce panic, improve first-bullet quality, and make your overall gameplay more stable.
The beauty of these skills is that they remain valuable across balance changes, map rotations, and different weapons. They are not trend-based mechanics. They are foundational mechanics. And foundational mechanics are where lasting progress comes from.
So the next time you review a bad map, resist the urge to say, “My aim was off today.” Ask something more useful. Was my reticle in relevant places? Did I respect predictable angles? Did my movement help my aim or sabotage it? Did my slide create value?
Those questions lead to real answers. Real answers lead to better habits. Better habits lead to more winnable fights.
And in BO6, more winnable fights are what improvement looks like.