Marvel Rivals Teamfight Guide: Cooldowns, Focus Fire, Resets
Marvel Rivals — Teamfight Fundamentals: Cooldown Cycles, Focus Fire, Resets
Marvel Rivals rewards flashy mechanics, but ranked matches are usually decided by something much less glamorous: which team understands fights better. Mechanical skill helps you win duels, land burst, and survive pressure. Teamfight structure is what turns those individual moments into consistent wins. If your team keeps losing battles even when aim feels fine, the issue is often not damage output alone. It is usually timing, target selection, discipline, or reset quality.
This guide breaks down the three fundamentals that keep showing up in almost every strong Marvel Rivals teamfight: cooldown cycles, focus fire, and resets. These concepts stay relevant even when heroes are buffed, nerfed, or rotated in and out of popularity, because they sit underneath every meta. A dive team still needs clean cooldown timing. A poke team still needs focus fire. A brawl composition still needs to know when to reset instead of feeding late.
If you are new to the game, it helps to first understand the broader Marvel Rivals ecosystem through the official Marvel Rivals website, the Marvel game page, and the Steam listing. For extra comp examples and macro ideas, resources like Mobalytics’ Marvel Rivals guides can also be useful. But if your goal is simple, repeatable improvement in ranked, start here: learn how winning teams cycle pressure, commit to the same target, and exit bad fights before the game spirals.
Table of Contents
- What Teamfights Really Are in Marvel Rivals
- The Four Phases of a Teamfight
- Cooldown Cycles: The Hidden Engine of Every Fight
- Focus Fire: How Teams Actually Secure Eliminations
- Resets: The Difference Between One Lost Fight and a Lost Round
- Positioning, Angles, and Space Control
- Role-by-Role Teamfight Jobs
- Ult Economy Without Patch Dependence
- Common Teamfight Mistakes
- Practical Drills to Build Better Fights
- How to Review Your Own Fights
- How to Turn Better Fights Into Rank Gains
- Final Thoughts
What Teamfights Really Are in Marvel Rivals
A teamfight is not just “everyone using abilities at once.” It is a contest over time, space, resources, and kill windows. In Marvel Rivals, those layers matter even more because fights can swing quickly. One defensive cooldown can stall a burst window. One mobility ability can break a front line. One coordinated collapse can erase a target before healing arrives. One poor reset can turn a lost skirmish into staggered deaths and total map loss.
At a basic level, every fight asks four questions:
- Which team has the better setup?
- Which team spends important cooldowns first, and was that spending efficient?
- Which team focuses the same target or the same timing window?
- Which team knows when to leave instead of donating extra eliminations?
Players often think they lost because the enemy composition was stronger. Sometimes that is true. More often, the stronger comp only looks unbeatable because it is being piloted with better structure. A coordinated average composition will frequently outperform a mechanically better team that stacks cooldowns, splits targets, and refuses to disengage.
That is why timeless improvement in Marvel Rivals should start with fundamentals instead of hero-specific tricks. Hero-specific tricks age quickly. Teamfight structure ages slowly.
The Four Phases of a Teamfight
Before talking about cooldown cycles, focus fire, and resets individually, it helps to understand where they appear inside the full fight.
1. Setup
This is the phase before full contact. Teams take angles, scout positions, poke, test sightlines, and look for who is overextended. The biggest mistake here is treating setup as downtime. Setup is where you build your advantage. If your team enters every fight from low ground, in open space, without cooldowns ready, you are already fighting uphill.
2. Engage
This is when one team decides to force the issue. They may dive, walk through a choke, collapse onto a split target, or convert poke damage into a hard commit. Clean engages are rarely random. They happen when a target is isolated, a cooldown is missing, or a movement tool opens a line.
3. Swing
This is the moment where the fight becomes winnable or losable. Important cooldowns are traded. Someone gets low. Defensive tools are forced. Ultimates may come online. Teams that understand focus fire identify the swing instantly and all accelerate into it together.
4. Exit or Chase
Once the fight is won or lost, the best teams make fast decisions. They either stabilize, clean up efficiently, or disengage. Weak teams hesitate. They chase too far after winning or trickle one by one after losing. This phase is where reset discipline matters.
Everything in this guide plugs into one or more of these phases. Cooldown cycles shape the engage and swing. Focus fire converts the swing. Resets control the exit.
Cooldown Cycles: The Hidden Engine of Every Fight
If you only improve one thing after reading this guide, improve your understanding of cooldown cycles. Most players notice damage. Better players notice availability. They know which tools are live, which are missing, and which side can actually sustain pressure for the next five seconds.
A cooldown cycle is the rhythm of how a team spends, recovers, and reuses its important tools. When people say a team looks “clean,” they usually mean its members are not wasting abilities at the same time or solving the same problem twice.
What Counts as a High-Value Cooldown?
Not all abilities are equal. Some are poke tools. Some are positioning tools. Some are fight-defining buttons. In general, the most important cooldowns fall into a few categories:
- Engage tools that start fights or cross dangerous space.
- Survival tools that deny burst, heal through pressure, or let a teammate escape.
- Confirm tools that finish kills once someone is low or trapped.
- Control tools that displace, stun, zone, wall off, or break movement patterns.
- Tempo tools that let your team keep initiative and force the enemy to react.
When you burn two or three of these at once to solve a one-tool problem, you create a weak second wave. That is how teams look powerful for three seconds and then suddenly collapse. They had an opening burst, but no sequence behind it.
Layering Beats Stacking
One of the most common ranked errors is stacking. Two teammates panic and use defensive tools at the same time. Two players commit burst into a target that was already one shot. Two zoning abilities cover the same area. Two mobility tools are used to enter, which leaves no exit. The fight may still look explosive, but the team has quietly cut its own staying power in half.
Layering is different. Layering means one ability creates the condition for the next. A peel tool buys one second. A heal keeps the target alive through that second. A control ability punishes the enemy for overcommitting. A counter-engage tool flips the fight after the enemy has already spent to enter. That is a cycle. Stacking is panic. Layering is structure.
Think in Waves, Not Buttons
Most good fights are won in waves:
- First wave: scouting, poke, angle pressure.
- Second wave: engage or anti-engage cooldowns.
- Third wave: burst, control, and kill confirm.
- Fourth wave: stabilization or chase.
If your team spends every important resource in the second wave, there is no third wave. If you save everything forever, you never create pressure. The goal is to enter the fight with a plan for what comes after first contact.
How to Read Enemy Cooldown States
You do not need perfect tracking to get value. Even rough awareness changes everything. Train yourself to notice:
- Who used mobility recently?
- Who no longer has a defensive answer?
- Which healer or support-style hero just spent a major save tool?
- Which frontliner is standing confidently only because a peel cooldown is still behind them?
- Which enemy just overstepped because they assumed backup still existed?
In ranked, many “sudden” kills are not sudden at all. They happen because one team recognized a missing answer. A target with no escape, no cover, and no nearby support is not tanky. It is just late to die.
Cooldown Trading Is a Resource Battle
Sometimes you do not need a kill to win the next five seconds. If you force an important defensive tool while keeping your own engage intact, you have improved your future fight state. This is especially important in Marvel Rivals because destructible environments and changing sightlines can quickly make weak positioning look worse. A team without key defensive resources is much easier to collapse on when space opens up.
Strong teams often ask: “Can we force more than we spend?” If yes, the next window is theirs.
Never Spend Your Last Exit for a Maybe Kill
A classic throw happens when a player sees a low enemy and uses their final mobility or survival cooldown to chase. Sometimes they get the elimination. Then they die anyway, or their team loses the next part of the fight because they no longer have a safe angle, escape option, or peel timing.
Value is not just “did we kill someone?” Value is “what did that kill cost us?”
Simple Cooldown Rules That Always Help
- Do not stack two defensive answers unless one alone clearly will not save the target.
- Do not use your best engage tool before your team is in range to follow.
- Do not commit your last survival tool for a target your team cannot actually finish.
- Do not take a second duel immediately after spending your full kit on the first one.
- After forcing key enemy cooldowns, speed up. That is the moment to pressure.
- After your team spends several major cooldowns, slow down unless a kill is guaranteed.
Good cooldown management does not make fights look dramatic. It makes them look unfair. That is the point.
Focus Fire: How Teams Actually Secure Eliminations
Focus fire is often misunderstood. Many players hear “focus fire” and think it just means “everyone shoot the same target.” That is part of it, but the real concept is deeper. Focus fire means multiple players committing pressure to the same vulnerable moment. Sometimes that is the same target from the same angle. Sometimes it is a coordinated collapse from two angles. Sometimes it is front-to-back pressure that lands all at once as the enemy support window closes.
The core idea is simple: isolated damage gets healed, blocked, or escaped. Layered damage arriving in the same second secures kills.
Why Ranked Teams Fail to Convert Pressure
Most failed teamfights contain a familiar pattern. One player is low. Another enemy is pressured. A third enemy is out of position. Instead of agreeing on one fast, realistic kill, the team splits. One chases the low target. One continues shooting the tank. One tries a flank. One uses a big cooldown on a different angle. The result is a lot of “almost.”
Almost is the enemy of teamfight consistency.
Pick the Right Target, Not the Most Exciting One
Good target selection is not about ego. It is about probability. The right target is usually the one that is:
- already missing a key cooldown,
- currently exposed to more than one angle,
- far enough from healing or peel,
- forced into a narrow path,
- low enough that burst can finish before help arrives,
- or strategically important enough that removing them breaks the enemy fight plan.
Sometimes that target is a squishy backliner. Sometimes it is an overextended duelist. Sometimes it is the frontline anchor whose resources are gone. What matters is not the role name. What matters is whether the elimination is realistic and high value.
Focus the Window, Then the Hero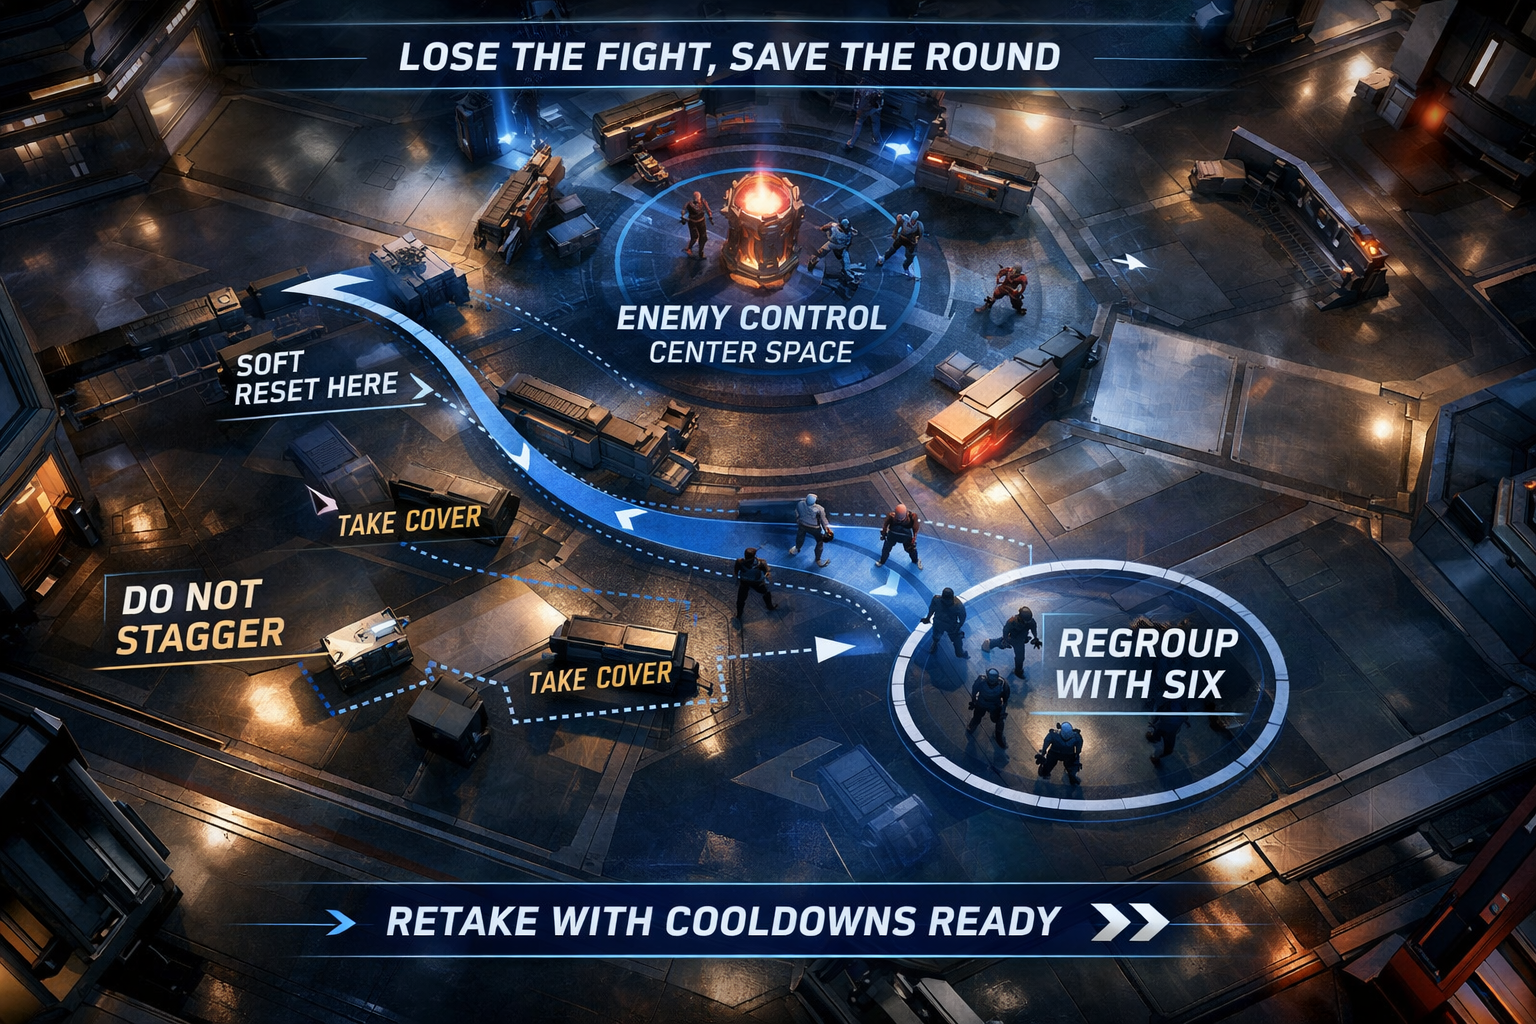
One useful mental shift is this: call the window first, then the hero. For example:
- “No mobility on left.”
- “Frontline used protection.”
- “Backline isolated high ground.”
- “Support alone for three seconds.”
These calls are stronger than random names because they explain why the team should commit. Teams react faster when the vulnerability is obvious.
Front-to-Back Is Not Cowardly
Some players think disciplined front-to-back teamfighting is passive. In reality, it is often the highest percentage way to win. If the enemy front line has already used key resources and your team has clean spacing, deleting the first player who steps too far is excellent teamfight play. You do not always need a spectacular backline dive. You need a winnable fight.
Front-to-back is especially strong when:
- your team has better sustained damage,
- the enemy dive lacks clean exits,
- your supports or backliners are threatened by overextending,
- the objective forces the enemy to enter your space,
- or the enemy anchor is the easiest hero to isolate.
Crossfires Create Easier Focus Fire
Focus fire gets much stronger when it comes from different angles. A target can often survive one lane of damage by backing up, shielding, or line-of-sighting. Two coordinated angles remove that comfort. This is where good positioning supports focus fire. You do not always need six players stacked together. You need six players threatening the same problem.
A clean crossfire creates three advantages:
- The target has fewer safe movement options.
- Enemy support players have to split attention.
- Your team can commit less total cooldown investment to secure the same kill.
Don’t Overfocus a Dead Fight
Focus fire is good. Tunnel vision is not. Once the elimination is secured or clearly lost, your attention should move immediately. Good teams snap from target to target without emotional lag. Weak teams keep dumping resources into someone already safe, already dead, or already gone.
Every second you continue the wrong chase, the enemy gets a chance to stabilize, return cooldowns, or punish your bad spacing.
Simple Communication for Better Focus Fire
You do not need pro-level comms. Short, repeatable language works best:
- “Left side low.”
- “No escape on backline.”
- “Pressure front now.”
- “Same target, same target.”
- “Swap, swap, swap.”
- “Don’t chase, hold space.”
Long speeches usually arrive too late. Teamfights reward compressed information.
Resets: The Difference Between One Lost Fight and a Lost Round
If cooldown cycles decide how cleanly you spend resources, and focus fire decides how cleanly you secure eliminations, resets decide how much damage a lost fight does to your next one. Resets are one of the biggest hidden rank separators because they are less glamorous than mechanics, yet they control tempo over entire rounds.
A reset is the process of ending an unfavorable fight, regrouping, restoring formation, and re-entering on equal timing. Teams that cannot reset keep fighting after the fight is already over. They trickle. They take 2v5s. They burn ultimates in desperation. They arrive late to the next engage and call it bad luck.
Know the Difference Between a Fight That Is Hard and a Fight That Is Lost
Not every bad fight should be abandoned. Some fights are still recoverable if key ultimates or positional advantages exist. But many fights become unwinnable earlier than players admit. Signs a fight is often lost:
- You lost first pick and have no immediate trade angle.
- Multiple major cooldowns are gone while the enemy still has theirs.
- Your supports or utility core are dead or forced far out.
- You are split across multiple positions with no way to rejoin quickly.
- The enemy owns objective space and your only entry is predictable.
- Any attempt to continue requires solo heroics instead of team structure.
The earlier you accept a lost fight, the more often you save the next one.
Hard Reset vs Soft Reset
Hard reset: fully leave, die fast if escape is impossible, regroup cleanly, and re-enter together.
Soft reset: step back, give up some space, wait for cooldowns or a teammate to return, then retake without fully surrendering the map.
Many ranked players only understand the hard reset after disaster. Better teams use soft resets constantly. They drop pressure for a few seconds, restore resources, and then fight again before the enemy can fully capitalize.
Do Not Drip-Feed the Enemy
One of the most expensive habits in any hero shooter is late re-entry. A player spawns, sees teammates still “kind of fighting,” and runs in alone. Then another does the same. Soon the team has spent twenty seconds donating stagger kills and never gets a real 6v6. This is not aggression. It is tempo sabotage.
If the team cannot arrive together with resources, wait. The few seconds you “lose” by regrouping are often less than the time you lose by trickling three separate deaths.
Winning Teams Reset After Wins Too
Reset discipline is not only for losing. After a won fight, teams still need to reset their shape. Common post-win errors include chasing too deep, splitting for cleanup kills, using important cooldowns after the outcome is already decided, and forgetting to reclaim strong positions before the enemy respawns.
A clean post-win reset means:
- finish only the kills that are free or strategically useful,
- stop spending key resources once the fight is decided,
- retake power positions and safe angles,
- reload, heal, and prepare the next engage window,
- track what the enemy is likely to bring next.
The best teams treat the end of one fight as the beginning of the next setup phase.
When to Sacrifice and Die Fast
This sounds counterintuitive, but sometimes the smartest play in a lost fight is to die quickly instead of attempting a dramatic escape that fails six seconds later. A late death can destroy your team’s regroup timing. A fast death syncs respawns and creates a cleaner recontest window.
This is especially important when the objective, map geometry, or spawn path punishes staggered returns. Do not turn one lost fight into three half-fights.
Reset Calls Win Games
Some of the highest value comms in ranked are boring:
- “Back out.”
- “Fight is done.”
- “Don’t touch yet.”
- “Regroup left.”
- “Wait for six.”
- “Soft reset, hold corner.”
These calls prevent emotional play. Emotional play is one of the main causes of collapse in close matches.
Positioning, Angles, and Space Control
Cooldown cycles and focus fire become much easier when your positioning is good. Bad positioning makes every fight harder. It forces extra healing, consumes more defensive cooldowns, shortens your reaction time, and narrows your target options.
Use Angles to Create Decision Pressure
The goal of positioning is not just survival. It is pressure. Good angles make the enemy choose between bad answers. If they hide from one lane, another lane sees them. If they push one player, they expose themselves to someone else. If they protect the front, the side angle opens. This is how teamfights become easier before they become bloody.
Respect Line of Sight
A simple test for many teamfight losses: were you fightable by your own team? If you were too deep, too split, or too hidden from allies, then your death was not only about mechanics. It was about line of sight. The more your team can see and support each other while still holding distinct angles, the stronger your fight structure becomes.
Cover Is Better Than Healing
Healing is valuable, but preventable damage is always cheaper than repaired damage. Players who live around cover demand less from their team and keep more cooldowns available for real threats. In Marvel Rivals, where sightlines and terrain can change during combat, cover discipline matters even more. A position that was safe a moment ago may become vulnerable after the environment shifts or a wall breaks.
Take Space Before You Need It
A lot of teams only move once pressure arrives. Strong teams move earlier. They occupy the lane, angle, staircase, corner, or high ground before it becomes urgent. This gives them calmer setup and better engage choices.
Late movement is expensive because it often forces cooldown use just to reach a playable position.
Verticality Matters
Even if your composition is not built around airborne or highly mobile heroes, vertical pressure changes target priority and resource flow. High ground often improves focus fire, reduces incoming pressure from some angles, and forces the enemy to spend mobility or expose themselves. But high ground is only good if it remains connected to your team’s actual plan. A lone player on a strong angle with no support is not “taking space.” They are volunteering to be collapsed on.
Role-by-Role Teamfight Jobs
Vanguards / Frontline Anchors
Your job is not just to absorb damage. It is to organize the fight. You create stable entry paths, contest dangerous space, force enemy attention, and either lead engagement or deny theirs. A good frontline player makes the map feel smaller for the enemy and safer for teammates.
In teamfights, frontline players should ask:
- Am I taking space that my team can actually use?
- Am I forcing enemy cooldowns before my damage dealers commit?
- Am I overextending beyond support line of sight?
- If I engage now, can my team follow the same second?
Duelists / Damage Dealers
Your job is not only to top the damage chart. It is to convert pressure into eliminations. That means recognizing vulnerable windows, entering at the right timing, and not wasting your burst on targets that cannot realistically die. Great damage players understand patience. They do not reveal their strongest angle too early, and they do not chase kills that cost future pressure.
Strategists / Support and Utility Core
Your job is bigger than healing. You control pace, denial, stabilization, and fight extension. The strongest utility players know when to save, when to hold, and when to let a low-value target go so the rest of the team can win the actual fight. Over-saving is a real problem. If one teammate made a terrible entry, spending every defensive cooldown to rescue them can lose the battle for everyone else.
In strong teamfights, utility players are often the first to notice whether the fight should speed up or slow down.
Ult Economy Without Patch Dependence
Even in a guide focused on cooldown cycles, focus fire, and resets, ult economy deserves its own section because ultimates are simply the biggest cooldowns in the game. But the evergreen principle is not “use this exact combo.” Patch-specific combos change. The timeless rule is to use ultimates to solve a clear problem or force a clear advantage.
Strong ultimate usage usually does one of the following:
- breaks a stable enemy setup,
- rescues a fight that is still recoverable,
- guarantees a numbers lead,
- punishes grouped positioning,
- or secures the objective timing that matters most.
Weak ultimate usage looks like this:
- panic ulting after the fight is already over,
- stacking multiple fight-winning tools on the same solved problem,
- using an ultimate to chase one low target while losing objective shape,
- or forcing a hero play without support or follow-up.
A useful rule: before using an ultimate, ask what you expect to happen immediately after it lands. If the answer is vague, wait.
Common Teamfight Mistakes
1. Entering Before Everyone Is Ready
Not all six players need to stand in one spot, but they do need to be in a usable state. If your most important burst or save tool is still rotating in, forcing early usually weakens your own engage more than it surprises the enemy.
2. Mistaking Damage for Pressure
Damage that creates no decision is often just noise. Real pressure forces movement, cooldowns, or vulnerability.
3. Refusing to Swap Targets
Sometimes the original call becomes bad. Good teams adapt mid-fight. Bad teams stay loyal to a dead idea.
4. Overchasing After a Won Fight
Many rounds are thrown not by losing the hard fight, but by turning a clean win into bad spacing before the next one.
5. Saving Teammates Who Cannot Realistically Be Saved
This is a harsh lesson but a necessary one. Throwing two or three major cooldowns at a doomed target can lose the teamfight for everybody else.
6. Fighting While Split in Different Tempos
One player wants to dive now. One wants to poke. One wants to reset. If the team is operating on three rhythms, the enemy only needs one.
7. Ignoring Objective Timing
Sometimes the best teamfight is not the maximum kill attempt. It is the controlled play that preserves objective control, denies touch timing, or forces the enemy into a rushed entry.
Practical Drills to Build Better Fights
Improvement becomes much faster when you train concepts intentionally instead of hoping they appear naturally in ranked. Here are practical drills that work across patches and compositions.
Drill 1: Cooldown Trade Awareness
For five matches, stop worrying about perfect mechanics and simply track one enemy defensive tool per fight. Ask yourself: when was it used, and did your team punish the window after?
Drill 2: One-Call Focus Fire
In every meaningful fight, make one short target call and commit with it. Do not overtalk. Build the habit of clarity under pressure.
Drill 3: No-Stack Rule
If you play utility or frontline, spend a full session avoiding unnecessary defensive overlap. Review later and count how often multiple saves hit the same threat.
Drill 4: Early Reset Discipline
When your team loses first pick and has no immediate answer, call the reset instantly. Even if teammates ignore you sometimes, your own timing sense will improve.
Drill 5: Two-Angle Pressure
Practice holding positions where you can assist the main fight from a second lane without breaking line of sight from your team. This builds natural crossfire instincts.
Drill 6: Post-Win Shape Recovery
After every won fight, ask: did I chase, or did I help set the next fight? This one question alone can improve your macro awareness.
Drill 7: Window Identification
Instead of calling hero names first, call the vulnerability first: “no movement,” “isolated left,” “used defensive,” “support exposed.” This builds smarter aggression.
Drill 8: Death Audit
Every death must be labeled as one of three things: mechanical miss, bad position, or bad timing. Many players discover timing is the real problem far more often than they expected.
How to Review Your Own Fights
You do not need advanced analytics to review teamfights productively. A simple checklist is enough. After a loss, choose two or three key fights and ask:
- Who had better setup before contact?
- Which important cooldowns were used first?
- Did we stack or layer our resources?
- Did we all pressure the same target or the same timing window?
- Was there a better target after the first call failed?
- When did the fight become unwinnable?
- Did we reset immediately or trickle?
- After winning, did we recover shape or chase too far?
The point of review is not self-blame. It is pattern recognition. Once you see the same collapse pattern three or four times, it becomes much easier to fix in real matches.
How to Turn Better Fights Into Rank Gains
Climbing in Marvel Rivals is rarely about finding one secret trick. It is about reducing the number of bad fights you donate for free. Cleaner cooldown cycles make your engages stronger and your defenses more efficient. Better focus fire turns pressure into actual eliminations. Faster resets prevent one bad exchange from ruining the next minute of the round.
If you want a practical improvement plan, keep it simple:
- Spend one week focusing on cooldown discipline.
- Spend the next week focusing on target calls and finish timing.
- Spend the next week focusing on resets and regrouping.
- Then combine all three while reviewing one or two matches per session.
That approach is far more sustainable than constantly jumping between heroes, copying tier lists without context, or blaming compositions every time a fight goes badly.
And if your goal is faster ranked progress with more structure around comp play, macro decisions, and match execution, you can also review Marvel Rivals boosting prices on Boosteria to compare options and understand what kind of ranked support fits your needs.
Final Thoughts
Marvel Rivals can feel chaotic on the surface, but winning teamfights is usually much more methodical than it looks. The team that wins is often the one that spends abilities in a cleaner order, recognizes the real kill window faster, and exits the bad fight sooner. That is why cooldown cycles, focus fire, and resets matter so much. They are not side topics. They are the core grammar of teamfighting.
If you remember only a few ideas from this guide, remember these:
- Do not stack resources when you can layer them.
- Do not split pressure when one clean elimination is available.
- Do not stay in fights that are already over.
- Do not treat setup and recovery as downtime.
- Do make the fight easier before you try to make it spectacular.
That is the timeless path to better teamfights. Meta shifts will come and go. Individual heroes will rise and fall. But teams that cycle cooldowns properly, focus the right window, and reset on time will keep winning far more than teams that simply press buttons first.