CoD BO6 Objective Play 101: Setup, Trades, and Time
CoD BO6 — Objective Play 101: Setup, Trades, and Time Management
Table of Contents
- Introduction
- What Objective Play Really Means
- The Three Pillars: Setup, Trades, and Time
- Setup Basics: Winning Before the Fight Starts
- Space, Lanes, and Spawn Pressure
- How to Trade Kills the Right Way
- Time Management: The Skill Low-Ranked Teams Ignore
- Hardpoint Fundamentals
- Control Fundamentals
- Search and Destroy Fundamentals
- Simple Team Roles That Make Objective Play Easier
- Communication for Better Objective Play
- The Biggest Objective Mistakes in BO6
- How to Practice Objective Play Efficiently
- How to Play Objectives in Solo Queue
- Objective Mindset: Playing to Win, Not Just to Slay
- Conclusion
- Image Prompts
- Tags
Introduction
Call of Duty: Black Ops 6 rewards mechanical skill, but ranked and competitive-style matches are rarely decided by raw aim alone. Most close games are won by the team that understands objectives better: where to stand before the action begins, when to double a lane, when to abandon a bad fight, when to hit the hill together, and when to stop chasing kills because the clock matters more than ego. That is what objective play really is. It is the art of turning individual gunfights into team value.
Many players believe they are “doing the objective” because they touched the point, dove onto the bomb, or ran into a control zone at the last possible second. In reality, strong objective play starts earlier. It starts with getting to the right area on time. It continues with protecting the angles that matter. It becomes powerful when teammates are close enough to trade one another. And it becomes consistent when everyone understands the clock, the score, and the win condition.
This guide is built to stay useful even as patches, maps, and weapon balance change. Instead of leaning on temporary meta specifics, it focuses on timeless competitive Call of Duty habits: setup, trades, spacing, rotations, pressure, and time management. These are the skills that transfer from one mode to another, from one map pool to another, and from one season to the next. Whether you mainly play Hardpoint, Control, or Search and Destroy, the same question keeps appearing: are you making the map easier for your team, or harder?
If you want stronger ranked results, better consistency, and fewer matches that feel “unwinnable,” objective play is one of the highest-value improvements you can make. You do not need perfect aim to benefit from it. You need structure, discipline, and better decisions.
For additional official game resources, you can browse the official Black Ops 6 guide hub, the official Ranked Play overview, and the Call of Duty League competitive settings page. If your goal is faster rank progress with organized help, Boosteria also has a dedicated BO6 boosting prices page.
What Objective Play Really Means
Objective play is not the same as blindly jumping onto a point. It is the process of creating high-percentage situations around the win condition. In BO6, that usually means one of four things:
- Getting to the right area before the enemy does.
- Taking or denying key lanes that allow your team to enter safely.
- Positioning close enough to teammates so every death can become a trade.
- Making decisions based on time, score, lives, and map pressure instead of emotion.
Think of objective play as value stacking. A good kill is not just a kill. A good kill removes a blocker, opens a lane, flips pressure, buys seconds, secures a spawn, or enables a plant. A good death is not really good, but even a death can have value if it provides information, forces a defender off angle, or makes the next teammate’s kill easy. Meanwhile, many flashy kills have low impact. Winning a meaningless duel in a dead area while your team loses the hill is often worse than staying alive in a boring position that holds the spawn trap together.
This is why objective-focused players often seem calmer. They are not trying to “do everything.” They are trying to do the next important thing. Sometimes that is anchoring. Sometimes that is soaking time. Sometimes it is rotating early. Sometimes it is simply not overchasing a one-shot opponent because the real priority is protecting a teammate in point.
Objective play also improves consistency. Slaying-heavy styles can produce huge highs and frustrating lows. On your best day, you dominate. On your worst day, your team collapses because your decisions had no structure. Objective fundamentals reduce volatility. Even when your shot feels average, you can still create impact through positioning, timing, and trading.
If you want a clean mental model, use this: objective play means making every movement answer one of three questions. What space matters now? Who can trade me? What does the clock say? That framework alone will already improve how you approach BO6.
The Three Pillars: Setup, Trades, and Time
Everything in this guide comes back to three pillars: setup, trades, and time management. If your team is weak in all three, you will feel chaotic and inconsistent. If your team is strong in all three, matches become dramatically simpler.
1. Setup
Setup is what happens before the fight becomes messy. It is your early positioning, your coverage of likely routes, your spacing, your utility timing, and your map awareness. Good setup lets you fight from strength. Bad setup forces desperate hero plays. In objective modes, the team with better setup often looks “more talented,” but what you are really seeing is cleaner structure.
2. Trades
Trades are the glue of team play. Most objective breaks and defenses fail because players take isolated fights. If two teammates hit together, one death can still create progress. If everyone peeks one by one from different timings, even decent aim cannot save the push. Trading makes entries safer, holds stronger, and clutches easier. It also reduces the damage of bad luck. Getting prefired feels less terrible when your teammate instantly collects the return kill.
3. Time Management
Time management is the hidden win condition of objective Call of Duty. When to rotate, when to contest, when to stack, when to slow down, when to plant, when to force a retake, when to preserve lives, and when to sacrifice for a touch: these decisions define outcomes. Low-level teams often understand positions but misread the clock. They start a break too late, abandon a setup too early, or hunt kills when they should be draining time.
Together, these three pillars create a simple truth: BO6 objective play is less about finding miracle moments and more about reducing avoidable mistakes. You do not need perfect information to make good decisions. You need repeatable rules.
Setup Basics: Winning Before the Fight Starts
Setup begins with arrival timing. The first player into an area does not always win it, but late arrivals usually play from disadvantage. When you rotate early, you get first choice of cover, first look at likely lanes, and a chance to arrange crossfires. When you arrive late, you usually fight uphill into pre-aims and layered setups.
Strong setup is about more than being early. It is also about assigning purpose to positions. In any objective hold, each player should contribute one or more of the following:
- Hold the most dangerous lane.
- Watch a cut or flank route.
- Contest or soak the objective.
- Protect favorable spawns.
- Play close enough to assist and trade.
If two people stare at the same harmless doorway while no one watches the actual pinch, your team is not set up. If everyone is technically near the objective but nobody controls the outer routes, your team is not set up. If one player is far away taking a vanity angle while the rest are stacked in one pocket, your team is not set up. Good setups distribute responsibility intelligently.
Another major part of setup is layering. A layered hold means your team is not standing on one line. You want depth. One player may be on point, one slightly off-point covering a fast entry, one deeper protecting the route behind, and one floating between pressure points. That depth makes your team harder to break. Even if the front player dies, the next layer can stabilize the fight instead of collapsing instantly.
Setup also depends on discipline. Players often ruin good positions by getting impatient. They chase a weak enemy into a bad area, overpeek after one kill, or sprint forward without checking whether teammates can follow. In objective play, the best setup is often the one that feels slightly boring. It denies randomness. It forces the enemy to make the risky move first.
Ask yourself before every important engagement: Are we set up to fight together, or are we just nearby? That question exposes many hidden problems. Proximity is not structure. Setup is structure.
Space, Lanes, and Spawn Pressure
Objective play is really about space management. The objective itself matters, but the routes into it often matter more. If your team controls the right lanes, the point becomes comfortable. If the enemy controls the lanes, the objective feels impossible to hold no matter how many bodies you throw at it.
Space in BO6 usually breaks down into three categories:
- Entry space: the paths attackers use to enter the objective area.
- Support space: the nearby routes that allow trades, reinforcements, and quick pressure shifts.
- Spawn space: the zones that influence where enemies are likely to appear and how quickly they can re-enter the fight.
Most teams only think about entry space. They watch the obvious doors and windows. Better teams think one layer farther. They ask where the next wave is coming from and what territory must be held to keep the fight favorable. This is where spawn pressure becomes important. You do not need to memorize every exact spawn rule to benefit from spawn thinking. A timeless rule is enough: if your team pushes too deep or abandons key areas carelessly, you often give the enemy a better route back into the objective.
That means restraint matters. Sometimes the correct move after winning two kills is not to sprint into the enemy’s side of the map. It is to stop at the line that preserves favorable pressure. Overextension is one of the most common ways players throw away good setups. They feel momentum, chase more kills, and accidentally open the back door for the other team.
Lanes matter just as much as spawns. Every map has a few routes that decide how cleanly teams can move. The specific geometry changes, but the principle does not. Some lanes are high-speed but dangerous. Some are slower but safer. Some are power lanes because they see multiple routes at once. Learning objective play means learning which lanes your team must respect every time the hill rotates, the round starts, or the zone opens.
When in doubt, prioritize controlling the lane that threatens your team’s formation. If a route lets the enemy split your attention, pinch your hill, or hit your backline, that lane is probably more important than the one that just looks convenient for padding kills.
How to Trade Kills the Right Way
Trading is one of the clearest differences between organized teams and chaotic teams. In BO6, a trade means your teammate’s death is answered immediately or almost immediately by a return kill that keeps the situation stable. But great trading is not accidental. It comes from spacing, timing, and shared intent.
The first rule of trading is simple: do not play too far from support unless your role specifically requires it. Many players think they are being smart by taking a deep side angle, but if nobody can punish the opponent who kills them, that angle becomes low value. In objective fights, the best off-angle is one your teammate can capitalize on.
The second rule is to peek with purpose. Trading does not mean dry-challenging the same angle half a second after your teammate dies with no new information. It means understanding why the enemy is vulnerable after a kill. Maybe they are weak. Maybe they had to reload. Maybe their crosshair is displaced. Maybe they gave away their position. Good traders are not reckless; they are decisive.
The third rule is synchronized entry. If two players attack a hold from different timings, defenders can isolate both fights. If they hit together, the defender’s odds collapse. This matters enormously on hill breaks, bombsite hits, and control-zone retakes. Even a mechanically gifted defender struggles to handle layered pressure from two threats at once.
There is also an emotional side to trading. Players often become impatient after seeing a teammate fall. They sprint to “save the play” and die too fast. That is not trading; that is donating. Proper trading is fast but composed. It preserves your team’s chance of recovery instead of multiplying the disaster.
A useful habit is to ask, before every push: who is first, who is second, and who covers the cut? That tiny piece of structure turns random fights into trade windows. The first player forces attention. The second player secures the return kill or collapses on the distracted defender. The third player prevents the whole push from being flanked or counter-pinched.
If your team keeps losing “winnable” fights, watch the kill feed honestly. Are deaths happening close enough to be answered? Are pushes staggered? Are players crossing the same doorway at different moments? Most trade problems are spacing and timing problems disguised as aim issues.
Time Management: The Skill Low-Ranked Teams Ignore
Time management is where objective play becomes real strategy. Lots of players understand that objectives matter, but they still make clock-blind decisions. They chase old time instead of setting up new time. They take solo routes when the window for a coordinated break is already gone. They forget that ten seconds can be worth more than a kill. In BO6, strong clock awareness changes everything.
The first time principle is this: not all seconds are equal. Some seconds are easy to contest and low value. Others decide the next phase of the round. For example, early hill time can matter less than late rotation if the next setup is powerful. That does not mean you should ignore current time. It means you should understand the opportunity cost of staying too long in a bad area.
The second principle is that the clock changes optimal aggression. When there is lots of time, you can afford to clear methodically, regain map control, and work for trades. When time is low, speed becomes more important than perfection. Late-game objective fights often look messy not because players forget fundamentals, but because the clock forces condensed decisions. Knowing when to switch from clean structure to urgent pressure is a core skill.
The third principle is recognizing when a fight is no longer worth taking. This is one of the hardest habits to build because ego gets involved. Players hate giving up. But throwing three lives or staggered deaths into a lost objective often hurts more than conceding and preparing for the next phase. Smart teams know when the correct play is to back up, regroup, and arrive first to the next important space.
Time management also includes tempo denial. Sometimes you are not trying to win the whole fight immediately. You are trying to delay, force awkward entries, or burn enough clock that the opponent has to rush. A defender who buys five extra seconds without dying can sometimes create more value than a player who lunges for a low-percentage kill.
To improve here, constantly track three things: current score, time remaining on the objective or round, and how long your team needs to regroup. If your teammates are ten meters away, that is one kind of decision. If they just spawned across the map, that is another. The clock only matters in relation to team arrival time. Great objective players are always calculating that relationship.
Hardpoint Fundamentals
Hardpoint is the purest test of objective play because it combines setup, trading, spawn pressure, and timing into one continuous loop. Teams are constantly deciding whether to hold current time, pressure cuts, rotate early, or break together. Players who only think in terms of “get in hill” usually plateau here. Hardpoint rewards teams that understand both the point and the routes around it.
Hold current time, but do not become blind to the next hill
One of the biggest Hardpoint mistakes is overvaluing scrap time. If the current hill is weak, exposed, or nearly impossible to retake cleanly, you must ask whether those final seconds are worth arriving late to the next setup. Great teams think ahead. They treat the upcoming hill as part of the current decision.
Breaks should be layered, not desperate
Most bad Hardpoint breaks fail before the first player dies. Why? Because the team did not enter together. One player challs from front. Another waits. A third gets shot in the side trying to flank too late. A fourth is still crossing mid-map. Strong breaks compress time. They force defenders to look at multiple threats at once. Even if the first player falls, the trade path is ready.
Not everyone belongs inside the hill
Stacking four people in point often feels safe, but it usually weakens the hold. One player soaking while others hold doors, power lanes, and cuts is often stronger than everyone staring at the same choke. The objective must be protected from outside as much as inside.
Respect the anchor concept without becoming passive
Every Hardpoint team needs someone who understands the value of stable map presence. That does not mean hiding in the back forever. It means recognizing which position keeps your team’s pressure intact and prevents ugly spawn changes. A smart anchor thinks one rotation ahead without abandoning the present fight too early.
Use death information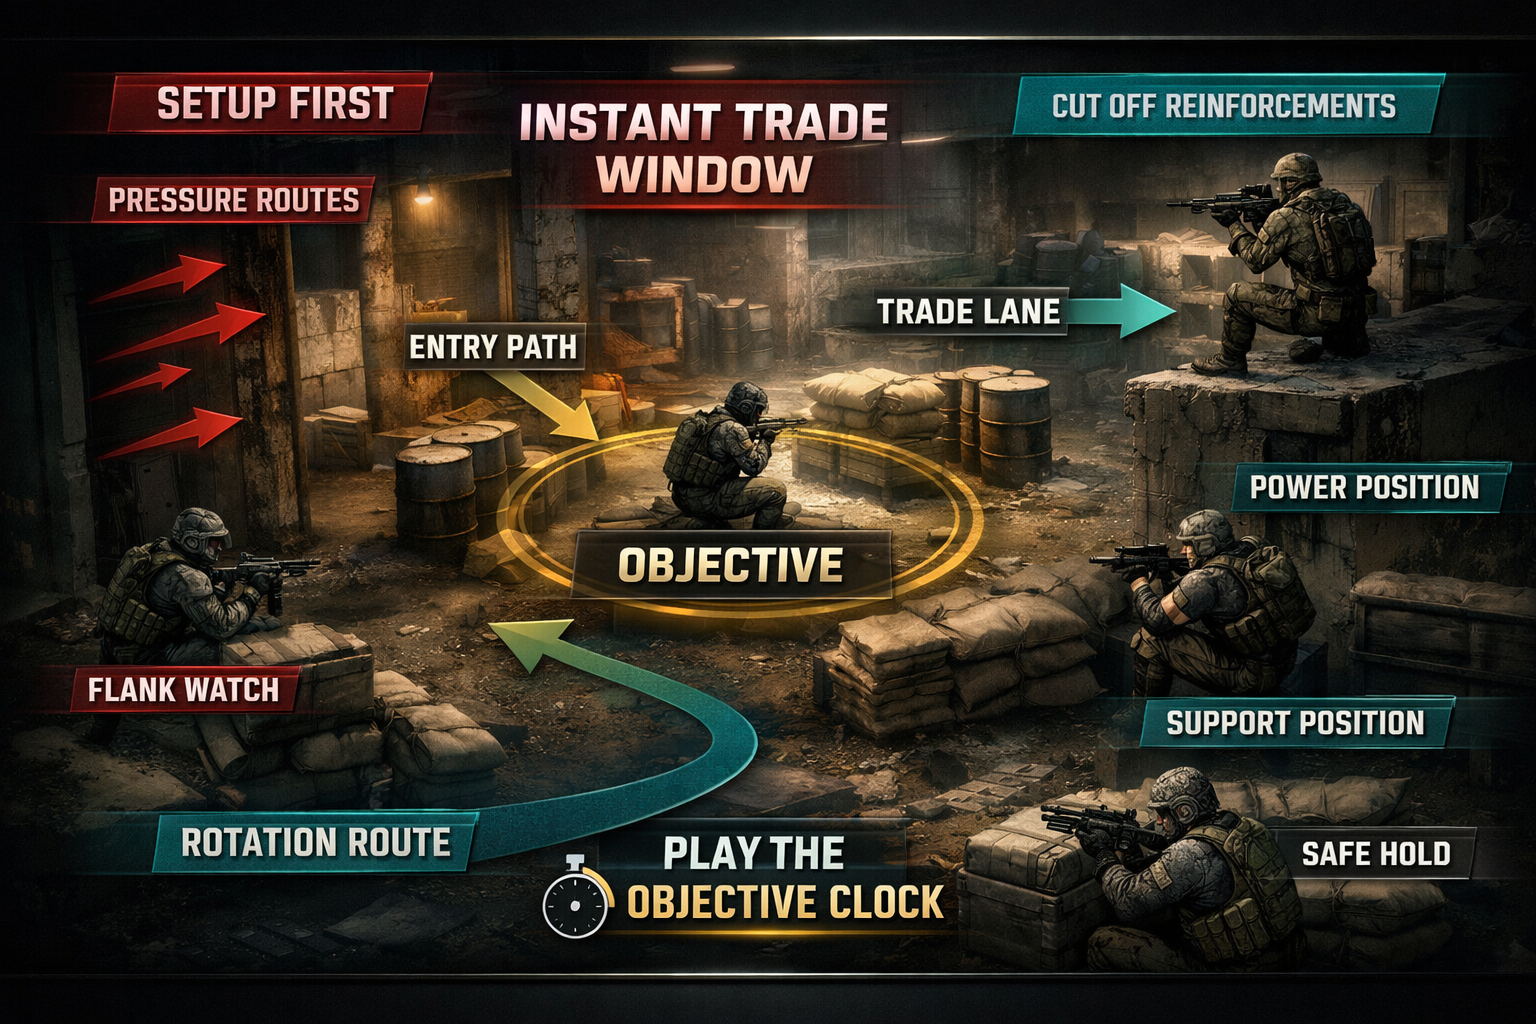
In Hardpoint, one teammate dying on a side route often tells you more than a UAV. It reveals timing, pressure, and likely flood direction. Good teams react instantly. They tighten the weak side, shift a player, or prepare the next trade. Poor teams ignore the information and act surprised when the break arrives exactly where it was telegraphed.
If you want a strong Hardpoint checklist, use this: know the next rotation window, arrive early enough to establish layers, keep players close enough to trade, avoid overextending past useful pressure lines, and never send isolated hero entries into a settled hold. Hardpoint rewards boring discipline more than dramatic risk.
Control Fundamentals
Control is often misunderstood because players focus too much on the zone itself and not enough on the map logic around it. The mode is a resource battle. Lives, pressure, and access routes all matter. The team that wins Control consistently is usually the team that understands when to commit hard and when to stabilize.
Lives are a strategic currency
Every unnecessary solo challenge in Control has a cost. A one-for-one can still be bad if it happens in a useless area or burns a life without advancing map position. Objective play in Control means making your deaths count. You want entries that open space, not entries that merely create action.
Zone pressure is strongest when lanes are controlled first
Trying to stack a zone without controlling the nearest threat lanes usually leads to disaster. Defenders get free angles into predictable bodies. Attackers feel like they are “on objective,” but they are actually volunteering. The correct sequence is usually pressure lanes, force defenders to turn, then flood or stack when the danger is split.
Do not confuse urgency with panic
Control does create clutch moments, especially when lives are low or time is fading. But panic collapses coordination. Teams rush one at a time, waste utility, and fight before support arrives. Good urgency still has structure. It understands who enters first, where the pressure is coming from, and what defender angle must be broken immediately.
Defensive discipline matters
On defense, many teams throw away advantages by chasing too far. If you own the stronger part of the map, there is no reason to turn the round into a random chase sequence. Force attackers to cross danger. Make them spend lives moving through known lanes. The longer you preserve structure, the more the mode works in your favor.
Play the numbers honestly
If your team is up lives and time is low for the enemy, you often do not need a flashy play. You need to avoid giving them isolated fights. If your team is down lives, you may need a coordinated burst to reset the round’s rhythm. Control punishes emotional decision-making because the resource count always matters.
A timeless Control lesson is this: the zone is not the objective until the surrounding space is manageable. Own the approach, then own the zone.
Search and Destroy Fundamentals
Search and Destroy is slower than respawn modes, but the same objective principles apply. Setup still matters. Trading still matters. Time still matters. The only difference is that mistakes are magnified because there are no respawns to absorb them.
Opening structure matters more than opening creativity
Players often overcomplicate S&D. They want surprise every round. In reality, strong opening structure wins more often than random gimmicks. Know who watches the cross, who contests early space, who protects the weak side, and who can trade the first fight. Even aggressive rounds should have a skeleton.
Information is part of objective play
In S&D, taking or denying information can be as valuable as getting a kill. If you force defenders off a line, spot a stack, clear a bomb route, or confirm that one side is weak, you have already improved the round. Information lets the clock work for you.
Trading is everything on site hits
Most failed bombsite hits are not lost because of bad aim. They are lost because entries were not connected. The first player dies alone. The second hesitates. The defenders recover. Strong site hits compress pressure and force defenders into unclean target priority. If the entry dies but draws two crosshairs, the second and third players must already be in position to punish that exposure.
The bomb creates time leverage
Once the bomb is planted, the round changes shape. Attackers no longer need to “make something happen.” Defenders do. That means attackers should often become harder to isolate, not more reckless. They should take post-plant positions that overlap, protect the defuse angle, and allow immediate refrags. Many teams plant well and then throw the round by ego-peeking instead of forcing the defenders to solve the problem.
On defense, avoid giving free 1v1s
When attackers are pressured by the clock, defenders should not rescue them by offering isolated challenges. Hold the map in pairs when possible. Protect the plant path. Delay. Force the execute to happen into crossfires. In S&D, time is a defender’s teammate unless you waste it.
If you remember one rule for S&D objective play, let it be this: the round is not about getting a kill first. It is about creating a more favorable decision tree than the enemy. Setup, information, trades, and the clock all combine to do that.
Simple Team Roles That Make Objective Play Easier
Many ranked teams resist roles because they think roles are restrictive. In reality, basic role clarity makes objective play much easier. Roles do not have to be rigid. They just need to answer who naturally handles which responsibility when the map gets messy.
1. The entry pressure player
This player is often first into fights, creates room, and forces defenders to reveal themselves. Their value is not only in kills. It is in making the next teammate’s job simpler.
2. The trade support player
This player follows pressure well, understands spacing, and is rarely too far from the action. They stabilize fights and convert chaos into numbers advantage.
3. The objective presence player
This player is comfortable soaking time, stacking when needed, and prioritizing the win condition over flashy routes. They know when staying alive in the right place matters more than hunting.
4. The map control or anchor player
This player thinks ahead, protects valuable space, and understands how overextensions can ruin the next phase. They are often the quiet reason a good setup holds together.
One player can fill more than one role depending on the situation, but role awareness reduces overlap. Without it, everyone tries to make the same play at once. That is how hills lose all coverage, bombs get planted with no post-plant structure, and control rounds devolve into random chal battles.
If your team keeps stepping on each other’s toes, talk in simple language: who is soaking, who is cutting, who is watching the flank, who is first in, and who is rotating? Even imperfect role clarity is better than none.
Communication for Better Objective Play
Good communication in BO6 is not constant talking. It is useful talking. Objective comms should help teammates decide faster, not overwhelm them. The best comms are short, specific, and connected to action.
Here are the most useful categories of communication in objective modes:
- Damage: “One weak top,” “absolute on cross,” “two tagged left.”
- Numbers: “Two here,” “only one point,” “three pushing front.”
- Direction: “Back lane,” “pinching mid,” “one hit our cut.”
- Timing: “Wait for me,” “go now,” “rotate now,” “play time.”
- Responsibility: “I have flank,” “I’m soaking,” “watch the cross,” “I’ll pinch late.”
Bad comms are late, vague, or emotional. Saying “they’re everywhere” helps nobody. Screaming after death helps nobody. Talking over a teammate’s clear call helps nobody. The goal is to reduce uncertainty. If your team knows where the pressure is and when to act, trading becomes easier and objective timing improves automatically.
A great habit is to comm intent before the fight starts. “I’m first in.” “Wait, I’m pinching.” “Don’t flood yet.” “One more second, then hit.” These small calls prevent staggered pushes and wasted entries. Communication is not only about reporting what happened. It is about shaping what happens next.
The Biggest Objective Mistakes in BO6
Most players do not lose objective modes because they misunderstand the basics completely. They lose because they repeat a handful of expensive mistakes. If you remove these, your win rate often jumps before your mechanics even improve.
1. Chasing kills after winning space
This is one of the classic throws. Your team secures the right side of the map, then someone pushes too deep trying to farm one more kill. The pressure line breaks, spawns get messy, and the enemy gets a free way back in.
2. Hitting one by one
Nothing ruins objective breaks faster than stagger. If teammates are arriving at different times, the defense gets a series of easy 1v1s instead of one difficult sequence.
3. Ignoring the clock
Teams stay too long, rotate too late, rush too early, or forget that the bomb/zone/hill timer defines the next best action. Playing well without clock awareness is like aiming well with bad crosshair placement: some rounds still work, but the process is flawed.
4. Confusing presence with pressure
Standing near an objective is not always helping. Sometimes the real value comes from holding the route that stops the flood. If everyone is physically close but no one controls the approach, the setup is fake.
5. Refusing to give up lost situations
Objective modes punish stubbornness. Not every hill scrap is worth it. Not every post-plant is recoverable. Not every control retake should cost four lives. Smart concessions create stronger next phases.
6. Silent assumptions
Players often think someone else is watching the flank, soaking time, or rotating early. If the role is not spoken or naturally established, the gap appears at the worst possible moment.
Cleaning up these mistakes does not require a patch note. It requires honesty. Review your matches and find the repeated decision errors. Most teams are closer to good objective play than they think. They are just leaking value in predictable places.
How to Practice Objective Play Efficiently
Objective play improves fastest when you practice it deliberately instead of hoping it appears during ranked. Many players spam matches and assume experience alone will fix their decisions. Experience helps, but targeted review helps far more.
Review deaths by context, not by ego
After a session, look at a few key rounds or hills and ask: why did I die there? Was I untradeable? Was I late to the setup? Did I push beyond useful pressure? Did I challenge when the clock said to hold? This kind of review reveals decision patterns much faster than simply blaming aim.
Track your spacing
In replay or live review, pause before your team enters a fight. Are players close enough to help? Are two people accidentally hitting the same angle from the same line? Is anyone isolated? Spacing errors are some of the easiest to spot once you train your eye for them.
Build rotation habits
When you learn a map, do not only learn where the objective sits. Learn how teams move into it, what lanes tend to matter first, and what positions become valuable when the next phase begins. Objective play becomes easier when your movement is pre-planned instead of improvised.
Use simple review questions
- Did we arrive on time?
- Did we hold the right lanes?
- Could we trade each other?
- Did we respect the clock?
- Did we overchase after gaining control?
You do not need a complicated VOD process to improve. Five honest questions after each session can change your results quickly. Objective skill grows when you turn vague frustration into specific corrections.
How to Play Objectives in Solo Queue
Solo queue BO6 can feel random, but objective play still works there. You just need a more adaptable version of it. The biggest mistake solo players make is giving up on structure entirely because teammates are uncoordinated. That usually makes the chaos worse.
In solo queue, focus on three high-value habits:
- Be the player who rotates on time.
- Stay close enough to trade the most useful teammate.
- Make the win-condition call even if nobody else speaks.
You cannot force strangers into perfect teamwork, but you can improve their odds. If one teammate is actually entering well, follow them and secure the trade. If everyone is overfighting old time, quietly rotate and set up next. If your team is ahead, call to play time instead of ego-challing. Small leadership creates surprising value.
Another solo-queue trick is prioritizing reliability over idealism. You may know the textbook setup, but if no one is holding point and everyone is flying out for kills, you might need to become the stabilizer. Conversely, if the whole team is scared to enter, you may need to create first pressure so they have something to follow. Solo queue objective play is flexible responsibility.
Do not let bad teammates pull you into bad logic. Even if the match becomes scrappy, the timeless rules still apply: avoid isolated deaths, respect the clock, and value space over highlight plays.
Objective Mindset: Playing to Win, Not Just to Slay
The final step in learning objective play is mental. Many players understand the theory but betray it in live matches because they still evaluate themselves through kills first and impact second. That mindset creates subtle mistakes. You chase because you want to feel active. You overpeek because backing off feels passive. You ignore the hill because anchoring feels invisible. But winning objective modes often requires invisible value.
Strong objective players are comfortable doing the less glamorous job if it is the correct one. They know that soaking sixty clean seconds can matter more than two extra kills. They know that protecting a cut route can win a break before the break starts. They know that not dying at the wrong time can be more valuable than making a flashy entry at the wrong angle.
This mindset also improves composure. When you stop measuring every life by immediate excitement, you become harder to tilt. A death becomes information. A lost hill becomes a rotation decision. A failed hit becomes a review point about spacing and timing. The game slows down because your brain is no longer reacting only through ego.
If you want to climb in BO6, ask a different question after every match. Not “Did I shoot well?” Ask “Did my decisions make objective play easier for my team?” Sometimes the answer will be yes even in a loss. Sometimes the answer will be no even in a win. That honesty is how long-term improvement happens.
Conclusion
Objective play in CoD BO6 is not complicated because the rules are mysterious. It is complicated because the game moves fast and punishes hesitation, ego, and poor structure. But the core ideas stay simple. Arrive early enough to matter. Set up with purpose. Hold useful space, not random space. Stay close enough to trade. Respect the clock. Know when to commit and when to concede. Build rounds and hills around the win condition instead of around individual highlights.
These habits translate across modes. In Hardpoint, they improve breaks, holds, and rotations. In Control, they improve life management, zone pressure, and discipline. In Search and Destroy, they improve entries, post-plants, and defensive composure. Even when BO6 evolves, these fundamentals will remain valuable because competitive Call of Duty always rewards teams that manage space, numbers, and time better than the opponent.
If your goal is to rank up, play more consistently, or understand why some lobbies feel so much easier for organized teams, objective play is one of the best areas to study. Mechanics can win moments. Objective fundamentals win matches.