CoD BO6 Spawn Logic Basics: Read Spawns and Hold Lanes
CoD BO6 Spawn Logic Basics: Reading Spawns and Holding Lanes
In Call of Duty, players often talk about aim, movement, and reaction time as if those are the only skills that matter. They matter a lot, of course. But in objective modes and ranked-style environments, a huge part of winning comes from something less flashy and far more reliable: understanding where enemies are likely to appear next, why they appear there, and how your team’s positioning changes the whole map.
That is the foundation of spawn logic.
If you can read spawns well, the match slows down in your mind even when it looks chaotic on screen. You stop getting surprised by enemies sprinting into your side. You start predicting where pressure will come from. You begin rotating earlier, holding smarter lanes, and avoiding pointless ego challs that only flip the map for the other team.
This guide breaks down the timeless principles behind spawn logic in CoD BO6, with a focus on reading spawns and holding lanes. Instead of relying on fragile, patch-specific details, we will focus on principles that stay useful across maps, modes, and seasons. That makes this guide relevant for public matches, competitive-minded play, and anyone trying to improve their consistency over time.
Whether you mainly play Hardpoint, Domination, Control-style modes, or simply want more command over map flow in BO6, these concepts will help you win more fights before they even happen.
Table of Contents
- What Spawn Logic Really Means
- Why So Many Players Misread Spawns
- The Timeless Rules That Shape Spawns
- Safe Space vs Unsafe Space
- The Hidden Importance of the Anchor Role
- How Spawn Flips Actually Happen
- How to Read Spawns Live During a Match
- Holding Lanes Without Overextending
- Spawn Logic in Objective Modes
- Hardpoint: Rotations, Blocking, and Early Positioning
- Domination: Map Pressure Without Breaking Structure
- Control and Single-Life Pressure Concepts
- Public Matches vs Organized Play
- The Most Common Spawn Logic Mistakes
- Drills to Improve Your Spawn Reads
- How to Communicate Spawn Information
- Advanced Patterns Good Players Notice
- Final Thoughts
What Spawn Logic Really Means
Spawn logic is the set of rules the game uses to decide where players re-enter the map after dying. While the exact system can differ slightly from one mode or title to another, the broad logic is always recognizable: the game tries to place players in areas that make sense relative to teammates, enemy pressure, available space, and immediate danger.
That sounds simple, but the practical effect is huge. Every gunfight changes the invisible balance of the map. Every push into enemy territory changes which parts of the map feel “safe” to the system. Every teammate’s location affects whether a spawn stays stable or collapses. If you understand those shifts, you gain a strategic edge before the next engagement even starts.
Put differently, spawn logic is not just about where enemies will appear. It is about how the whole map breathes.
Newer players often think of spawning as random. Better players know that spawns are not random at all. They are reactive. They respond to pressure, line of sight, occupancy, danger, and control. The more accurately you read those pressures, the more predictable the match becomes.
This is why top players seem to “know” where enemies are coming from. They are not guessing in the dark. They are reading the structure underneath the chaos.
Why So Many Players Misread Spawns
Most players misread spawns for three reasons.
First, they focus too much on their own screen. They see the lane in front of them and forget that the game is evaluating the whole map. Spawn logic is never local. It is always global. You may be staring at one doorway, but the next spawn is being influenced by teammates across the map, enemies pushing through another lane, and whether certain back areas are still open.
Second, they confuse temporary control with real control. Just because you won a fight in the enemy side of the map does not mean you own it. In many cases, you have simply touched it. Real map control means your team has structure behind that forward pressure. If you sprint too deep without support, you often trigger the exact flip you did not want.
Third, they think kills are always good. Kills are good only when they support the correct map state. A flashy two-piece means much less if you pushed so far that you broke your team’s spawn and gave the enemy the better side of the next setup. Good Call of Duty is not just about winning fights. It is about winning fights that preserve or improve your team’s position.
That is why disciplined players are so annoying to play against. They may not always be the most aggressive, but they consistently turn fights into better future spawns, stronger lanes, and cleaner setups.
The Timeless Rules That Shape Spawns
Even when maps, weapons, and movement systems change, the core principles behind spawn behavior remain fairly stable. Here are the timeless rules to build around.
1. The game prefers to spawn players away from immediate danger
If a zone is under direct enemy pressure, visible through open lines of sight, or physically occupied in a threatening way, it becomes a weaker spawn candidate. The game tries to avoid placing players where they would die instantly.
2. Teammate presence usually stabilizes nearby spawn areas
Players tend to spawn closer to safe teammates than to isolated, contested space. This is why one disciplined player holding the back side of a map can act like an anchor for the whole team.
3. Deep enemy penetration can force the map to flip
When one or more players push too far into a back spawn or cut off the protected side of the map, the system begins looking for safer alternatives. That often means enemies start appearing behind your team or on the opposite end.
4. Line of sight matters as much as body location
You do not need to physically stand on a spawn point to influence it. Looking through a long lane into a spawn zone can make it less viable. Angles matter. Pressure matters. Visibility matters.
5. Open space matters
If the map still has one relatively calm section with teammate support and no direct threat, that section becomes likely for spawns. Good players learn to identify the “remaining safe pocket” before the game uses it.
6. Objectives can alter pressure priorities
In objective modes, teams move in more predictable patterns around hills, flags, or zones. That means spawn behavior is not just about empty space. It is about useful space. The game tends to reward areas that are viable without being immediately compromised.
These rules are more important than memorizing isolated map trivia. If you understand these principles, you can jump onto new BO6 maps faster, adapt to updated rotations, and make better decisions under pressure.
Safe Space vs Unsafe Space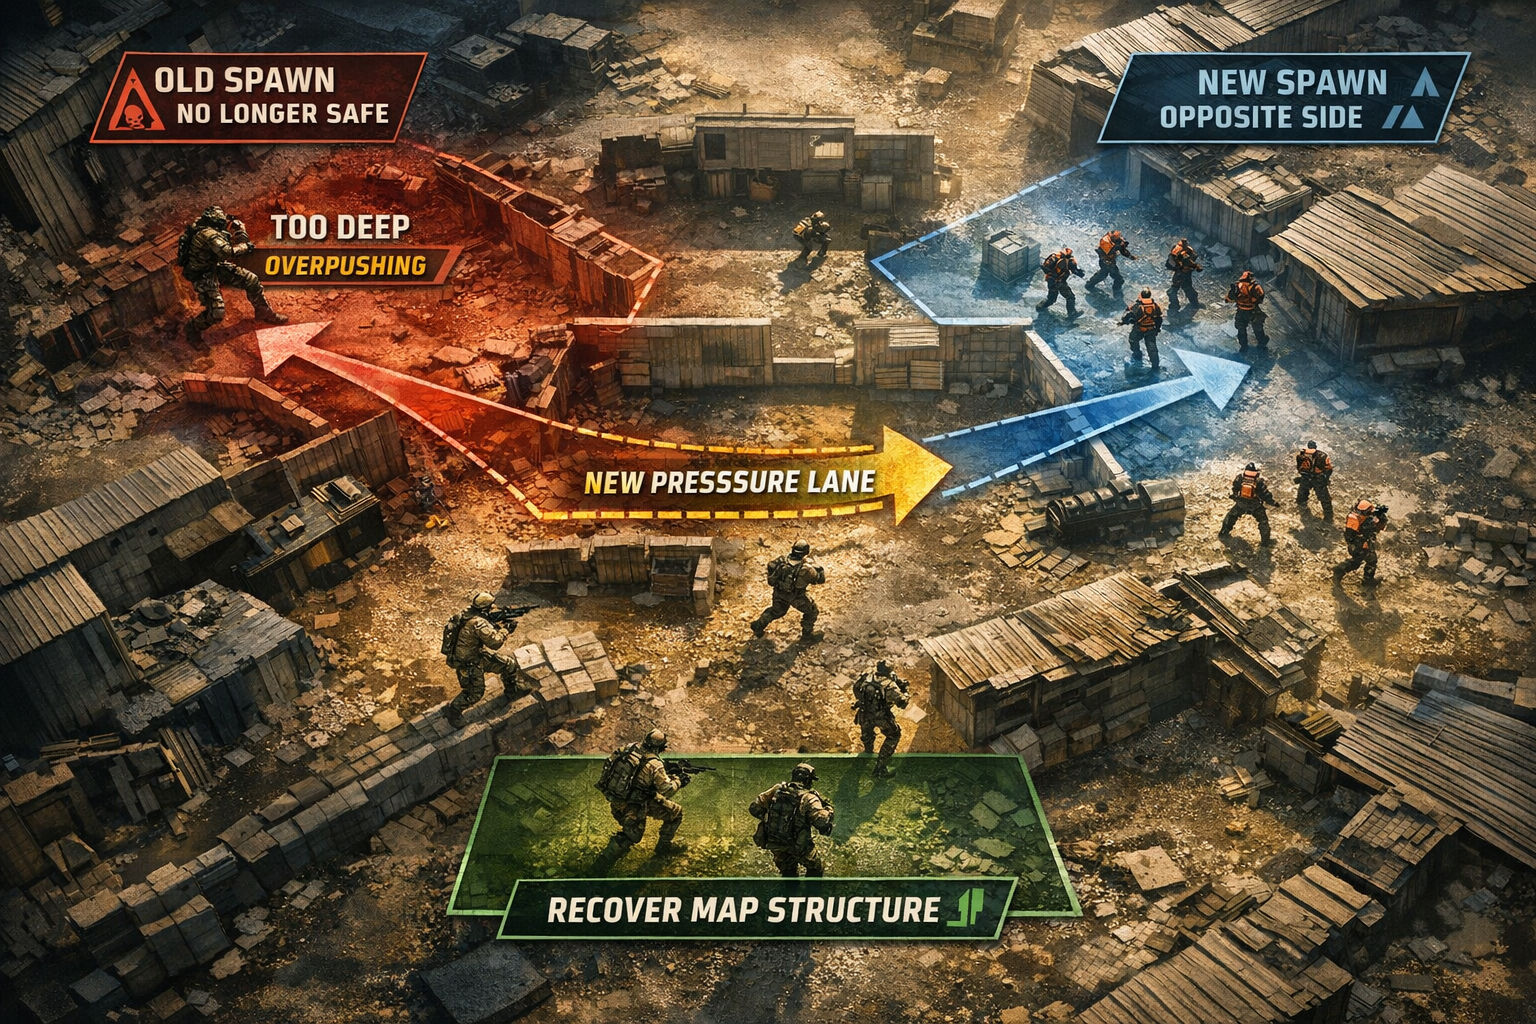
The easiest way to think about spawn logic is to divide the map into safe space and unsafe space.
Safe space is not just “our side.” It is the area that currently has the strongest combination of teammate presence, low enemy pressure, and limited exposure to direct sightlines. Unsafe space is any area that feels threatened, penetrated, or cut off.
This concept matters because spawns do not belong to locations forever. They belong to conditions. A back corner may be a strong spawn at one moment and a terrible spawn five seconds later. The area itself did not change. The conditions did.
Imagine your team is holding one side of the map in an objective mode. One teammate is deep in the rear, one is watching the central cross, and the others are contesting near the objective. In that moment, your back side is safe. If your most advanced slayer suddenly sprints through mid, reaches the enemy rear, and starts looking into the far back lane, the map state changes. Now both backsides may be under pressure. The game has to choose a new safe pocket, and that is when strange-looking flips happen.
To become better at reading spawns, stop asking, “Where do enemies usually spawn?”
Start asking, “Which area is safest for them right now?”
That is a much stronger question.
The Hidden Importance of the Anchor Role
One of the most underrated concepts in CoD map control is anchoring. An anchor is the player who stabilizes the preferred spawn side by holding a safe, disciplined position rather than chasing every available kill.
Anchoring is not passive play. It is strategic play.
The anchor’s job is to stay alive in a position that keeps spawns favorable for the team. That often means watching the flank, holding a back lane, or remaining just far enough from the objective to preserve structure. In many matches, the best anchor is not the player with the highest kill count. It is the player who quietly prevents bad flips and gives the rest of the team reliable reinforcements.
This role is especially important in modes where the next setup matters more than the current fight. If your team is about to rotate, the anchor can determine whether your teammates spawn into help or into chaos. A good anchor turns a lost fight into a manageable retake. A bad anchor chases one extra kill and accidentally hands over the best spawn on the map.
Many players sabotage their own team because they do not respect this function. They assume every player should collapse onto the same lane or crash into the hill together. That can work in messy public lobbies, but it often breaks down against coordinated opponents.
When you watch strong teams, you will notice that someone is almost always preserving shape. Someone is thinking one step ahead. Someone is protecting the spawn that keeps the whole setup alive.
How Spawn Flips Actually Happen
A spawn flip happens when the enemy team begins spawning on the opposite side of the map from where they were spawning before. Players often talk about flips like they are sudden bugs or random surprises, but most flips are readable if you know what to watch.
Here are the most common causes:
Over-pushing into the enemy back area
This is the classic mistake. You win a few fights, get excited, and push directly into the enemy’s last safe spawn pocket. Instead of trapping them, you remove the system’s ability to place them there safely. The result is a flip behind or beside your team.
Losing your backline control
If your anchor dies or abandons the back side, your team may unintentionally open space that the enemy can use. This can weaken your current spawn and create instability.
Multiple players crossing the midpoint without structure
One controlled push can be fine. Three players flooding through center with no thought to spacing often destroys the map geometry. Now the game sees pressure everywhere and uses the only remaining safe zone, which may be inconvenient for your team.
Holding too many aggressive sightlines at once
Some flips happen because a team is not physically in the enemy spawn, but is effectively looking into every route that would support it. Remember that spawn logic reacts to threat and visibility, not only direct occupation.
The best way to avoid accidental flips is simple: pressure forward lanes without swallowing the enemy backline whole unless that flip is intentional and useful.
Good players do not just ask whether they can push. They ask whether pushing helps the next 20 seconds.
How to Read Spawns Live During a Match
Reading spawns live is a skill you build through fast pattern recognition. Here is the mental checklist that works in real matches.
1. Where are my teammates?
This is always the first question. Teammates tell you which side of the map is likely being stabilized and which lanes are being influenced. If two teammates are deep on one side and one is near mid, the enemy is unlikely to keep spawning directly into that pressure unless another safe pocket exists.
2. Which areas are currently dangerous?
Danger includes enemy body presence, line of sight, explosives, active gunfire, and contested objectives. Ask yourself which zones the game would want to avoid for fresh spawns.
3. Where is the remaining safe pocket?
Usually there is one obvious answer. Sometimes there are two possible areas, and the game picks one depending on who moves first. If you can identify the remaining safe pocket before the spawn happens, you can pre-aim the correct lane rather than guessing.
4. Did someone on my team push too far?
If yes, expect instability. A deep push into the far side often creates weird timings because the enemy may now appear in places that felt impossible two seconds earlier.
5. Where would I spawn if I died right now?
This is a powerful habit. It forces you to evaluate the map from the system’s perspective rather than your own tunnel vision. If you think, “I would probably spawn back left,” there is a good chance enemies are about to do something similar on their side.
When you use this checklist consistently, enemy routes start feeling more obvious. You stop reacting late and start arriving early.
Holding Lanes Without Overextending
Holding lanes is where spawn logic becomes practical. It is one thing to predict where enemies will appear. It is another to convert that prediction into a winning setup.
Most players misunderstand lane holding. They think it means staring at one angle forever. In reality, good lane holding means controlling the route the enemy wants without giving them the map state they need. That requires discipline.
What a good lane hold looks like
- You control a high-probability route from a safe, tradeable position.
- You influence movement without diving into enemy spawn depth.
- You can back up, re-peak, or reposition if pressure changes.
- Your angle supports teammates instead of isolating you.
What a bad lane hold looks like
- You stand too far forward and force a flip.
- You watch a low-value angle while the important route stays open.
- You cannot be traded if you die.
- You are technically “holding” a lane, but one grenade or slide breaks your entire position.
The goal is not to freeze the map completely. The goal is to funnel enemy movement into readable, punishable routes while preserving team structure.
Think of lane holding like building traffic. You are trying to make the enemy come through the route you expect, on the timing you expect, from the side of the map you expect. That is how you turn spawn knowledge into control.
Spawn Logic in Objective Modes
Spawn logic matters in every mode, but objective modes are where it becomes most valuable. Objectives create repeated pressure points, and repeated pressure points create patterns.
Once you understand how players rotate around hills, flags, and control zones, the match stops feeling random. Instead, it starts feeling like a series of map-state puzzles. Where should your team be to hold the strong side? Which player needs to block? Which lane matters most? When do you contest, and when do you preserve spawn for the next setup?
Objective awareness turns raw slaying into meaningful pressure. A player who gets 25 kills with no regard for spawns can lose the game. A player who gets fewer kills but protects the correct side of the map can quietly carry the win condition.
That is why spawn logic scales so well with skill. The better the lobby, the more valuable structure becomes.
Hardpoint: Rotations, Blocking, and Early Positioning
Hardpoint is where spawn logic becomes brutally obvious. The mode rewards teams that think ahead, not just teams that crash the current hill hardest.
The biggest Hardpoint truth
The current hill matters, but the next hill often matters more.
Many players throw away winning positions because they stay obsessed with the final scraps of time on a weak hill while the other team quietly rotates, stabilizes the next spawn, and sets up crossfires. You win ten seconds and lose forty. That is not efficient CoD.
Blocking spawns
Blocking means positioning yourself so the enemy cannot safely spawn in the preferred area near the next objective. This does not always mean standing on the exact spot. More often, it means holding the approach lanes, denying visibility, and preserving teammate presence in the correct section of the map.
Good blocking is careful. You want to influence the enemy spawn without running so far that you flip them somewhere even better. This is a subtle skill. The best blockers understand distance, sightlines, and timing. They know when to back up half a step rather than greed one extra gunfight.
Early rotation
Early rotation wins games because it gives you first claim on safe space. When your team reaches the next hill first and sets an anchor behind it, the enemy often has to attack from predictable lanes. Now your lane holds become cleaner, your trades become easier, and your spawn reads become stronger.
Late teams are forced to improvise. Early teams get to design the fight.
Breaking a setup
When you are the team trying to break, spawn reading still matters. You need to identify whether the enemy is fully stabilized or whether there is a weak point. Did they over-stack the front? Did they abandon a back route? Did their anchor die? A single kill in the right place can destabilize their entire structure and open a better respawn for your team.
The wrong break is four players hitting the same choke with no flank timing and no thought about where the next life will appear. The right break creates pressure from multiple lanes while protecting the possibility of a favorable respawn afterward.
Hardpoint summary
- Rotate before panic sets in.
- Anchor the next hill with discipline.
- Block intelligently, not greedily.
- Hold the highest-probability lanes.
- Do not sacrifice future spawns for one low-value fight.
If you are serious about climbing and becoming more consistent, this mode alone makes spawn logic worth mastering. And if your goal is faster progression in ranked-style shooters, structured decision-making matters far more than highlight plays. That is one reason many players who want cleaner results look for services like BO6 boosting prices when they want efficient, high-level execution around winning conditions.
Domination: Map Pressure Without Breaking Structure
Domination looks simpler than it is. Many players think the mode is just about capturing flags and farming kills. In reality, smart Domination is about owning the right two flags while controlling the routes that matter most between them.
Spawn logic is central here because bad pressure can ruin a comfortable setup. If your team holds two flags and begins swarming the enemy home spawn with no restraint, you often cause unnecessary flips, open back routes, and turn a stable lead into a coin flip.
The trap of over-capping
Not every flag is worth taking at every moment. Sometimes chasing a triple cap destroys your structure. You gain a moment of scoreboard satisfaction but lose the stable spawn pattern that was making the game easy.
Good Domination players understand the value of a controlled map. Two flags with strong lane control usually beat reckless three-flag greed.
Lane priorities in Domination
Because flags create fixed value points, the important lanes are the ones that connect likely spawn zones to the center of control. Your job is to hold those routes from positions that keep enemies bottled without flipping them carelessly.
This means watching the routes that actually matter, not chasing every red dot. Sometimes the best play is to let an enemy stay trapped in a low-value corner while your team holds the decisive lanes. Impatience is what frees them.
When to force pressure
If your team is behind, controlled aggression can be correct. You may need to trigger a flip, break the trap, or overload one side to change the state of the map. But even then, the goal is not random chaos. The goal is useful chaos. Pressure with a reason. Push with a destination.
Good Domination is less about constant fighting and more about using spawn logic to make the enemy’s path to relevance long, predictable, and expensive.
Control and Single-Life Pressure Concepts
Even in modes with different respawn pacing or more structured attack-defense patterns, the same core logic applies: safe space, pressure, and route denial define what comes next.
In limited-life or more tactical modes, spawn logic blends with reinforcement timing. Now the question is not only where enemies appear, but how quickly they can support a fight from that side of the map. That changes lane value dramatically.
A lane is not important just because enemies can use it. It is important because it determines how fast they can rejoin pressure on the objective. The more you understand those timing routes, the better you can prioritize which space to hold and which fights to avoid.
Control-like modes reward players who can think in layers:
- Where is the next push likely to come from?
- Which lane supports that push fastest?
- Which player on our team should hold the stabilizing route?
- What happens if we overextend after one kill?
The answers usually come back to the same principle: do not break the geometry of a good setup just because you see an isolated fight.
Public Matches vs Organized Play
It is important to understand that spawn logic feels different in public lobbies than in organized teams, but the principles do not disappear. They just become noisier.
In public matches
Teammates are less predictable. Players chase kills. People leave lanes open by accident. This creates more chaotic flips and stranger timings. However, that does not mean spawn logic stops existing. It means your reads must become broader. Instead of expecting perfect structure, expect the most likely safe pocket after inevitable mistakes.
Ironically, understanding spawn logic can be even more valuable in public matches because it lets you stabilize chaos that others create. If your team is wild, you can still anchor. You can still hold the most important lane. You can still read the likely route after a flip and farm cleaner fights than the lobby average.
In ranked or organized play
Everything becomes tighter. Teams rotate earlier. Anchors matter more. Lane holds are more deliberate. The cost of one bad overextension is higher because the enemy knows how to punish it.
This is where disciplined spawn awareness separates average players from truly strong ones. Raw mechanics are never enough for long. If you cannot preserve structure, better teams will keep forcing you into bad fights from bad spawns.
That is also why learning from official guides and structured resources helps. Activision’s own BO6 material emphasizes map guides, Tac-Maps, and learning the field rather than treating fights as pure randomness. For broader map-study habits, the official BO6 guide hub is a useful starting point, and mode/map breakdowns can help players learn how routes and spawn sides are described in the game’s own terminology.
You can explore those official resources here:
The Most Common Spawn Logic Mistakes
If you want quick improvement, eliminate these first.
Mistake 1: Chasing too deep after a winning fight
You get two kills, smell blood, and sprint into the enemy back area. Instead of trapping them, you force a flip. This is probably the single most common mistake in objective Call of Duty.
Mistake 2: Everyone hitting the same front lane
When all four players crash the same route, no one preserves shape. If the push fails, the respawn is weak. If the push succeeds, the map often flips. Either way, structure disappears.
Mistake 3: No one watching the cut
The “cut” lane is the route enemies use to re-enter the map quickly or break your setup from the side. Ignoring it often makes your strong position weaker than it looks.
Mistake 4: Confusing pressure with control
Touching the enemy side is not the same as owning it. If you cannot hold it safely, you probably should not be there yet.
Mistake 5: Not noticing the anchor died
One death can matter more than three kills if it was the player stabilizing your spawn. Pay attention to who died, not just how many died.
Mistake 6: Holding a lane from a non-tradeable spot
You may get one kill, but if the enemy instantly removes you and opens the whole route, the position was not good enough.
Mistake 7: Fighting for useless scrap time
This is especially painful in Hardpoint. Players stay glued to a hill that is already lost while the next setup goes uncontested. They win the wrong fight and lose the next forty seconds.
Mistake 8: Refusing to adapt after a flip
Once the map flips, denial helps nobody. Good players instantly update their expectations. Bad players keep staring at the old lane and die from behind.
Improvement begins when you stop seeing these as isolated mistakes and start seeing them as one category: failure to respect map state.
Drills to Improve Your Spawn Reads
You do not need to improve spawn logic only through vague experience. You can train it directly.
Drill 1: The death prediction habit
Every time you die, predict where you will respawn before the screen fades in. Then check whether you were right. This teaches you to think like the spawn system instead of reacting after the fact.
Drill 2: One-lane focus sessions
Spend several games consciously tracking one key lane on each map. Ask yourself what causes traffic through it, what shuts it down, and how flips change its importance. This builds map memory fast.
Drill 3: Anchor awareness
In objective modes, identify who is anchoring each setup. If it is you, think about survival first. If it is a teammate, play in a way that supports them. This improves your understanding of structure.
Drill 4: Early rotation review
After each Hardpoint game, think back to two or three hills and ask: did we rotate early enough to claim safe space? If not, where did the enemy stabilize first?
Drill 5: VOD pause test
If you watch your own gameplay, pause before each respawn wave and guess where the enemy team is about to appear. This is one of the best ways to build spawn intuition without live pressure.
These drills sound simple, but they create powerful pattern recognition over time. The goal is not to memorize every spawn point. The goal is to understand why the game prefers one side over another in a given moment.
How to Communicate Spawn Information
Even basic communication makes spawn logic much stronger. You do not need long speeches. In fact, short calls are better.
Good spawn calls include:
- “They should be back left.”
- “Careful, we’re flipping them.”
- “Hold our back side.”
- “One hit deep, don’t overpush.”
- “They’re spawning out, watch mid.”
- “Anchor died, play your life.”
Bad communication usually sounds like emotion instead of information. Shouting that the game is random does not help. Telling your team that the back spawn is open does.
The best spawn communication is proactive. You call what is about to happen, not only what already happened. That is the whole point of understanding spawn logic in the first place.
Advanced Patterns Good Players Notice
Once your basics are solid, you start noticing more subtle patterns.
Pattern 1: Weak-side traffic before the full flip
Sometimes enemies do not fully flip all at once. You may first see one player leak through a weak-side route before the rest of the team stabilizes elsewhere. Strong players notice this as an early warning sign.
Pattern 2: The delayed punishment after a greedy push
You may overpush and not get punished immediately. That tricks players into thinking the move was good. But ten seconds later the enemy spawns into a side lane, breaks your setup, and now the whole hill collapses. Good players judge pushes by outcomes over time, not only instant kills.
Pattern 3: Spawn trapping without overcommitting
The best traps are not suffocating chaos. They are controlled funnels. You let the enemy have exactly enough space to appear where you want, and no more. That is much more stable than piling into their back corner.
Pattern 4: Dead zones between lanes
Every map has awkward transition space where players are vulnerable moving from one meaningful area to another. These spaces are gold for lane holders because they let you punish predictable movement without being too deep.
Pattern 5: Different players distort spawns differently
A disciplined AR-style player holding back structure influences the map differently than a hyper-aggressive SMG-style player flying through cuts. Understanding your own tendency helps you avoid causing accidental flips.
This is where real map IQ starts to show. Not in memorizing trivia, but in seeing the consequences of movement before they fully appear.
How to Think About Mid Map
Mid map is often where players make their biggest spawn-related mistakes because it feels like the most powerful part of the map. Sometimes it is. But mid is also dangerous because it connects everything. The more central your position, the more likely you are to influence both sides of the map at once.
That means mid control must be purposeful. If you hold mid with safe cover and useful sightlines, you can cut rotations and feed information to your team. If you recklessly sprint through mid every life, you often turn the map into spaghetti.
Ask yourself these questions before taking a deep mid position:
- Does this help us read or block a likely spawn?
- Can teammates support me if I get challenged?
- Am I watching a high-value cross or just hunting a random kill?
- Will this position accidentally pressure both spawns at once?
Mid is strongest when it supports structure, not when it replaces it.
Slaying vs Structuring: Which Wins More?
The best answer is both, but if you have to choose, structured slaying wins more consistently than chaotic slaying.
Chaotic slaying is when you are constantly in fights but your kills do not improve the map. Structured slaying is when your kills open the correct route, secure the correct timing, or protect the correct spawn. One looks exciting. The other wins.
This is why some players feel “impactless” even with strong stats. Their numbers are real, but they are not attached to map value. Meanwhile, another player goes 24-19 and seems to control the whole match because every kill mattered to spawns, lanes, or setup timing.
If you want to climb in BO6, stop judging your impact only by K/D. Ask whether your fights made the next wave easier for your team. That is the right standard.
How BO6 Movement Changes the Feeling of Spawn Reads
Even though the timeless logic of spawns remains familiar, BO6’s fast movement and fluid pathing can make bad reads feel extra punishing. Players can hit routes quickly, challenge from unexpected timings, and capitalize on weak-side openings before you mentally recover from the last fight.
That means your spawn reads need to become earlier, not just accurate. In older, slower-feeling situations, a correct read bought you time. In faster games, a correct read buys you maybe a second or two. That makes pre-aim discipline, lane selection, and positioning even more important.
The takeaway is simple: on faster maps and faster titles, late understanding is almost the same as no understanding.
Studying Maps the Smart Way
You do not need to memorize every corner name before improving. But you do need a repeatable way to study maps.
The smartest method is to learn each map through four questions:
- Where are the likely back spawns?
- Which lanes connect those spawns to the objective?
- Which positions stabilize those spawns?
- Which overextensions usually trigger flips?
If you can answer those questions on a map, you already understand much more than the average player. Official map guides can help you identify how the game itself labels major points of interest and main spawn areas, which is useful for faster communication and faster learning. The official BO6 map guide pages are a solid reference for that kind of study.
For competitive-minded players who enjoy broader structured FPS learning, resources that emphasize map knowledge and positional discipline in other titles can also sharpen your thinking. For example, concepts around lane control, rotations, and pressure management show up across tactical and arena-style shooters too. If you enjoy that kind of progression, Boosteria also has pages for games like CS2 boosting, Apex Legends boosting, and Overwatch boosting, where decision-making and map reads matter just as much as mechanics.
When to Intentionally Force a Flip
Not all flips are bad. Intentional flips can be smart when your current spawn is weak, trapped, or badly aligned with the next objective. The key is intention.
A good intentional flip happens when:
- Your team recognizes the current side is lost or low value.
- You push with numbers and timing.
- You understand where the enemy will likely appear after the shift.
- You can actually benefit from the new arrangement.
A bad flip happens when one player chases kills with no plan and the other three are still playing for the old map state.
So yes, sometimes you should force a flip. But flipping without a shared purpose is just handing the game a new problem.
What Great Spawn Players Feel That Others Miss
At high level, spawn logic becomes less about memorized answers and more about feel. Great players develop a sense for when the map is stable and when it is fragile.
Stable maps feel like this:
- You know the next two likely routes.
- Your team has a backline.
- Your lane holds support each other.
- Enemy traffic arrives predictably.
Fragile maps feel like this:
- Everyone is too far forward.
- No one is protecting the rear.
- The enemy could appear from multiple bad angles.
- One death might collapse the whole setup.
Learning to feel that fragility is a major step forward. It teaches you when to slow down, when to stop chasing, and when to prioritize survival over one more challenge.
Final Thoughts
Spawn logic is one of the biggest skill multipliers in CoD BO6 because it improves everything else. Better reads create easier gunfights. Better lane holds create safer setups. Better setups create better respawns. Better respawns create more control over the pace of the game.
And the best part is that spawn knowledge ages well. Weapons get tuned. maps rotate in and out of focus. Meta picks change. But the underlying logic of safe space, pressure, anchoring, flips, and disciplined lane control keeps paying value.
If you remember only a few things from this guide, make them these:
- Spawns are reactive, not random.
- The game looks for safe space, not your feelings.
- Overpushing is the fastest way to ruin a good map state.
- Anchors matter more than most scoreboards show.
- Good lane holding controls routes without forcing useless flips.
- The next setup is often more important than the last scrap of the current fight.
Once you start thinking this way, BO6 becomes much clearer. You stop asking why enemies “randomly” appeared somewhere and start seeing the decisions that made it happen. That shift in perspective is what turns improving players into reliable ones.
Master your reads, respect the map, and hold the lanes that matter.