CS2 T-Side Fundamentals Guide 2026: Takes, Fakes, Executes
CS2 T-Side Fundamentals Guide 2026: Takes, Fakes and Executes
Winning on the Terrorist side in CS2 is rarely about one perfect strat. Most rounds are decided by a chain of smaller things done correctly: taking useful space, forcing defenders to reveal information, trading cleanly, using utility with purpose, and choosing the right pace at the right time. A great T side is not just “rush A” or “default then hit B.” It is the ability to create pressure across the map, read the CT response, and turn that information into a high-percentage finish.
This guide is built to stay evergreen. Instead of focusing on patch-specific gimmicks or temporary map trends, it explains the principles that make T sides work across levels of play. Whether you queue solo, play with a stack, or are trying to understand why your team’s attacks feel random, the same foundations apply. Good T-side Counter-Strike is structured aggression. You gather info without donating picks, you apply pressure without overcommitting too early, and you execute with clarity instead of chaos.
CS2 especially rewards teams that understand coordination. Utility matters, but utility without timing is waste. Space matters, but space without purpose often leads to isolated deaths. Fakes matter, but only if the defenders are forced to respect them. If your team can understand the relationship between map control, pressure, timing, trading, and post-plant structure, your T side becomes far more reliable. The goal of this guide is to help you build that reliability.
For official game information and current updates, you can review the official Counter-Strike 2 page and the CS2 Steam News Hub. For studying pro matches and understanding how top teams structure rounds, HLTV remains one of the best places to start. If your goal is also to climb faster while sharpening match discipline, Boosteria’s CS2 boosting prices page is the most relevant service link for this topic.
Table of Contents
- Why T-Side Is Hard in CS2
- The Core Principles of a Good T Side
- Defaults and Early Map Control
- Understanding Site Takes
- Spacing, Trading and Entry Flow
- Utility Fundamentals for T Sides
- How Fakes Actually Work
- How to Build Clean Executes
- Mid-Round Decision Making
- Playing Against Common CT Reactions
- Solo Queue vs Team Play
- Post-Plant Fundamentals
- Common T-Side Mistakes
- Practice Routine for Better T Sides
- How to Review Your T-Side Rounds
- A Simple T-Side Checklist
- Conclusion
Why T-Side Is Hard in CS2
CT sides look easier because defenders begin the round with territory. They already control bombsites, important choke points, and many of the fastest rotation routes. Terrorists must earn access. That means every attacking round starts with a disadvantage in geography. You are walking into prepared angles, defensive utility, crossfires, and information traps. The T side wins by making that defensive structure uncomfortable.
There are three big reasons players struggle on attack. First, many teams confuse activity with pressure. They make noise, throw random grenades, or take aim duels without a larger plan. Second, they overcommit too early. The round becomes locked in after twenty seconds, even though the defenders have not revealed enough information yet. Third, they do not understand the difference between map control and commitment. Taking one area of the map should expand your options, not force your hand.
Good T sides feel difficult to play against because they create uncertainty. The CTs never know whether the presence they feel is the real hit, a setup for a late split, or a pressure tool designed to pull utility and rotations. When defenders are uncertain, they waste grenades, reposition early, rotate nervously, or hold passive lines. That is when attacks become much easier.
It also matters that CS2 punishes sloppy execution. Spacing errors, poor smoke timing, isolated lurks, and bad post-plant positioning are all exposed quickly. If one player enters too early, he dies before the flash. If one player is too far back, the entry has no trade. If utility lands too soon, the CTs simply wait it out. If utility lands too late, the first contact gets deleted. The T side is less forgiving because it demands sequencing.
That is why fundamentals matter so much. A team with average aim and great structure can win many T rounds. A team with better aim but weak structure often looks lost. If your goal is long-term improvement, build an attack around repeatable habits rather than miracle entries.
The Core Principles of a Good T Side
Every strong T side is built on five ideas: information, pressure, space, timing, and conversion.
Information is the base. Before you commit, you want to know as much as possible: where utility is being spent, where CTs are fighting, which areas feel weak, whether an anchor is isolated, whether a rotator has shown, and whether there is a gap you can exploit. Not every round gives full information, but good attacks are always trying to improve the quality of their read.
Pressure means making defenders react. Pressure is not always damage. Sometimes it is a smoke that forces respect. Sometimes it is a body presence that keeps a rotator honest. Sometimes it is a lurker threatening a timing. Pressure matters because CTs cannot comfortably stack or gamble if multiple areas of the map remain dangerous.
Space is the territory you control well enough to use. There is a difference between peeking a lane once and actually owning that lane. Real control means your team can stand there, hold the push, threaten the next step, and use the area for a split or fallback. Space expands your tactical menu.
Timing is the glue. The same execute can look incredible or terrible depending on timing. Entries, flashes, lurks, contact pressure, and late-round hits all rely on synchronization. The more complex the round, the more important timing becomes.
Conversion is the ability to turn an advantage into a round win. Many teams get opening picks and still lose. Why? Because they do not know how to convert. They overpeek after the first kill, forget the bomb, fail to clear a final pocket, or plant into a bad post-plant. A good T side is not just about creating winning situations. It is about closing them.
When you review your games, almost every failed T round can be traced back to one of those five pillars. Either the information was poor, the pressure was fake but not believable, the space was not maintained, the timing was broken, or the conversion after entry was messy. This is useful because it gives you a way to fix problems without blaming aim alone.
Defaults and Early Map Control
The default is the most misunderstood phase of the T round. Many players think a default means “everyone spread out and wait.” That is incomplete. A good default is a flexible early-round structure designed to gather information, deny pushes, force defensive utility, and preserve multiple finish options.
In most rounds, the default should answer four questions:
- Can the CTs push for free anywhere?
- Where are the defenders investing utility early?
- Which area seems heavily defended, and which feels lighter?
- Do we have enough control to threaten a split, late explode, or fake?
A default is not passive if it is doing those jobs. Even a quiet default can be productive. Holding anti-push angles, contesting one key lane, and maintaining bomb flexibility may look slow, but it creates value. The worst default is the one where everyone is separated without interaction. If no one can trade, no one is gathering meaningful information, and no pressure is applied, then the “default” is just five isolated players hoping something happens.
Early map control should be selective. You do not need to take every area. You need enough control to make the defenders uncomfortable. Sometimes that means leaning into one side with utility while maintaining a lurk elsewhere. Sometimes it means taking one choke, stabilizing, then re-clearing another area later. Sometimes it means showing presence on one side purely to freeze a rotator. The key is intention.
Here is what a useful early-round T structure often looks like in principle:
- One or two players hold for aggressive CT pushes.
- Two players work together to contest a key lane with utility support.
- One player maintains opposite-side presence or lurk potential.
- The bomb stays flexible until the round gains enough information.
The best defaults also preserve numbers. If you lose a player alone in the first twenty seconds, the rest of the round becomes harder. That does not mean never challenge early. It means early challenges should have a purpose, a trade path, and some utility support. Dry fighting a strong CT angle with no layer behind it is not “taking initiative.” It is just donating control.
Another important concept is re-clearing. A lot of teams assume one early peek or grenade proves a zone is safe forever. It does not. A position can be empty at 1:35 and dangerous again at 0:55 because the CTs rotated back, pushed late, or reclaimed it with utility. Smart T sides understand that control is temporary unless actively maintained.
Understanding Site Takes
A site take is not simply the moment the team runs in. It is the full sequence that turns pressure into entry and entry into plant control. Strong takes are usually built from six stages:
- Preparation
- Isolation of defender vision
- Entry contact
- Trading through the first layer
- Site stabilization
- Plant and post-plant setup
Preparation includes regrouping, confirming bomb path, assigning roles, and making sure everyone understands the order of action. This is where bad rounds often begin. If the bomb is too far behind, if the lurker does not know whether to pinch or hold, or if the support player is unsure when to flash, the take will feel disjointed before it even starts.
Isolation of defender vision usually comes from smokes, flashes, mollies, or angle pressure. You do not need to remove every CT angle at once, but you need to reduce how many defenders can fight at full strength. Clean takes shrink the number of threats the entries face at the point of contact.
Entry contact should be decisive. The first player’s job is rarely to survive at all costs. It is to break the line, force a response, and create tradeable contact. Some entries get the kill, some get one-for-one, and some simply drag the crosshair to allow the second player through. That is still value if the structure behind it is correct.
Trading through the first layer is where many pugs fail. The first player enters, but the second player is half a second late. That gap is enough for the defender to reset and kill both. Good takes are built on tight but not stacked spacing. The second and third players must flow through the same pressure window while support utility is still active.
Site stabilization means clearing the remaining danger zones after initial contact. Too many teams get the first two kills and instantly think the site is won. Then one hidden anchor, rotator, or late flank destroys the round. Stabilization means confirming the scary pockets, denying fast retakes, and making sure the planter is protected.
Plant and post-plant setup determine whether the take becomes a round win. A good plant is not just “get the bomb down.” It is a plant that supports the positions you actually control. If you plant for an angle nobody can realistically hold, the plant is weak. If you force the planter into exposure because the site was not stabilized first, the take was incomplete.
The central lesson is this: a site take is a chain, not a moment. If any link is weak, the round can collapse even after a good opening kill.
Spacing, Trading and Entry Flow
Spacing is one of the biggest separators between messy T sides and effective ones. Good spacing lets you trade without handing two kills to one defender. Bad spacing does one of two things: either the team is too spread out to trade, or too close together and dies to the same spray, grenade, or spam angle.
The ideal spacing changes by location, but the idea is simple. The second player should be close enough to punish the first defender immediately, but not so close that both players are fully visible on the same line at the same moment. The third player should support the second layer, not stare at the first player’s back from five steps away.
Think of entry flow as waves:
- Wave one creates contact.
- Wave two secures or trades the first duel.
- Wave three clears secondary positions and protects the plant.
If all five players try to do the same thing at the same time, you get body blocks and confusion. If everyone waits for someone else to go first, the hit loses force. Clean T-side movement feels like one idea passing from player to player.
Trading also depends on crosshair discipline. If the entry is checking a close angle, the second player should often be ready for the swing or the wider response, not duplicate the exact same check unless the position demands it. This is how pairs become much stronger. One player forces the first reaction. The next player punishes the next likely move.
A useful rule for T entries is this: the first player clears the obvious threat, the second player clears the punish angle, the third player secures space and bomb safety. That rule is not perfect in every site, but it creates much cleaner role separation.
Many players also forget verbal spacing. Good teams communicate who is first, second, flash-ready, holding flank, or planting. A five-man hit does not need complicated language, but it does need clear sequencing. “I’m first.” “Flash over now.” “I’m trading.” “Bomb coming.” “Hold smoke push.” These short calls prevent the most common disasters.
Utility Fundamentals for T Sides
Utility is not there to make your strat look organized. It is there to increase the odds of specific actions succeeding. Every grenade should answer a question: what is this helping us do right now?
Smokes usually serve one of four purposes:
- Cut defender vision during a take
- Deny information while repositioning
- Force a defender to play blind or guess
- Create space for a plant or post-plant reposition
Flashes serve two main purposes: enabling contact and protecting transitions. The best flashes are often the ones that support a movement window. A flash that lands while nobody swings is wasted. A flash that arrives too late turns into a spectator grenade. The key is pairing flash timing with movement timing.
Molotovs are control tools. They flush anchors, delay retake lanes, deny aggressive pushes, and force defenders into predictable movement. Their real value is not only damage. It is the decision they force. A defender in a molly must move, stay and burn, or counter-utility. Each option creates information and pressure.
HE grenades are often undervalued. They are excellent for softening likely anchor spots, punishing close anti-rush setups, and adding damage during transitional chaos. A player at 48 HP is much easier to trade through during a hit than a player at full health. Damage utility improves conversion even when it does not kill.
On attack, utility usage should be layered rather than dumped. This means not throwing every grenade in the first half of the round unless the plan demands it. Many weak teams reach the final 30 seconds with no smokes, no flashes, and no way to isolate angles. Stronger teams use enough utility early to gain respect and control, but still keep enough for the finish.
Another major principle is utility credibility. If your team always throws the same two smokes and never commits, defenders stop respecting them. If you fake too often with no punishment, the CTs learn they can sit still. Good T sides vary the meaning of similar utility patterns. Sometimes the same early smoke is a setup for map control, sometimes for a fake, sometimes for the real hit. That uncertainty is priceless.
CS2 also makes utility interaction especially important. Smokes, vision denial, spam pressure, and explosive timing can dramatically change a fight. If you want to improve faster, start treating grenades as part of your round identity rather than optional extras. Teams with better utility logic make easier gunfights for themselves.
How Fakes Actually Work
Most players think a fake is just noise on one site and a hit on the other. Real fakes are more specific than that. A successful fake convinces defenders that a commitment is either already happening or about to happen. That means the fake must create a believable cost for ignoring it.
There are several kinds of fakes:
- Micro fake: a small utility or sound cue to freeze one defender
- Pressure fake: repeated presence that keeps rotations honest while the real hit develops elsewhere
- Sell fake: utility, movement, and contact designed to pull actual rotations
- Delayed fake: an early suggestion of intent followed by a late re-hit somewhere else
Not every round needs a full fake. In fact, many rounds are won by tiny false signals. One smoke, one lurk presence, one flash, or one contact kill can hold a rotator in place long enough for the real attack to gain favorable numbers. The best fakes are often subtle because they exploit defender fear rather than demanding defender panic.
A fake becomes believable when it has at least two of these elements:
- Utility that matches a known threat pattern
- Body presence or sound cues that imply scale
- Timing that matches a real hit window
- Contact pressure that punishes disrespect
If the fake side has zero body presence and only one lonely smoke, strong CTs may ignore it. If the fake happens too early, defenders will simply wait. If the fake happens too late, the other side may not have enough time to complete the hit. This is why timing is everything. A good fake should force doubt at the exact moment the real hit begins to matter.
One of the smartest uses of fakes is to isolate the most important rotator. You do not always need to pull the entire defense. Sometimes freezing one player is enough. If the B rotator hesitates for three seconds because he heard pressure elsewhere, that may be all your A hit needs.
Another truth: bad teams overfake. They keep pretending while never taking the map away. At some point, you must convert pressure into ownership. Fakes are tools, not a substitute for entries. If your team loves “outsmarting” the defense but constantly loses to anchors still alive on site, you probably need cleaner real hits rather than cleverer fakes.
How to Build Clean Executes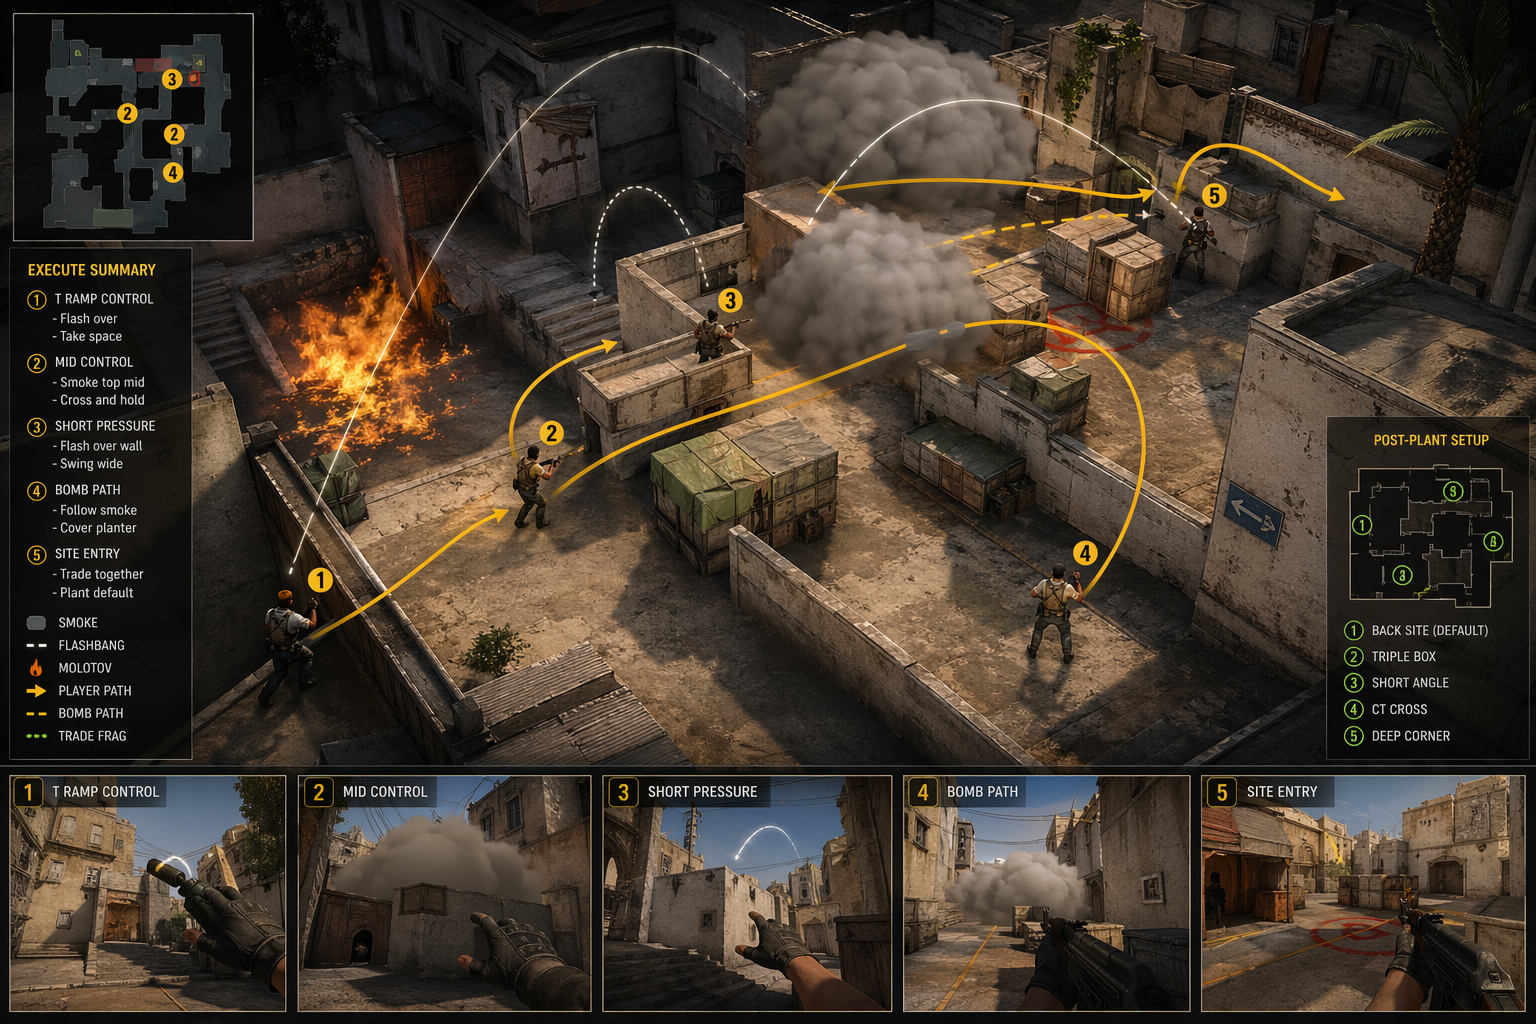
An execute is a coordinated site hit built around pre-planned utility and movement. The reason executes are powerful is not because they are flashy. It is because they simplify the fight. A clean execute reduces the number of independent decisions players need to make in the most dangerous part of the round.
A strong execute usually includes these ingredients:
- A trigger condition
- Assigned utility roles
- Defined first, second, and third man responsibilities
- A lurk or flank-management plan
- A clear plant intention
- An immediate post-plant shape
The trigger condition is underrated. Not every execute should launch at the same time every round. Sometimes the trigger is an early pick. Sometimes it is a defender’s smoke fading. Sometimes it is forcing a key CT grenade out. Sometimes it is simply the round clock reaching a planned moment. When players know what starts the execute, hesitation drops.
Assigned utility roles prevent overlap and panic. If three players all think they are responsible for the same smoke, you either waste grenades or delay the hit. If nobody owns the anti-retake molly, the first CT retake path opens immediately. Even basic team structure benefits from one sentence of clarity: “You smoke this, I flash over, he entries, bomb is fourth.”
Defined responsibilities turn chaos into flow. First man breaks the line. Second man trades. Third man secures the plant zone or checks the emergency angle. Lurk either activates on timing or stays to catch the rotation. This kind of clarity is why even simple executes can feel suffocating when well-drilled.
Executions should also include contingency thinking. What if the entry dies instantly? What if one smoke misses? What if the anchor counter-flashes through? Good teams do not collapse because one thing goes wrong. They know which part of the hit is essential and which part can be adapted on the fly.
Another underrated execute principle is tempo change. A lot of teams default slowly, then hit slowly. That gives defenders too much comfort. One of the most powerful T-side skills is moving from stillness to explosion. If your default has forced the CTs into static positions and then you suddenly accelerate into a committed execute, the defenders often lose the first duel simply because the round’s rhythm changed.
Remember that executes are not automatically “better” than contact plays or late splits. They are just one way to solve the bombsite. Use executes when your team benefits from pre-structured utility and clearly defined space creation. Use looser approaches when the defenders are already stressed, under-rotating, or giving openings without needing heavy investment.
Mid-Round Decision Making
Mid-rounding is where T rounds become real Counter-Strike instead of rehearsed theater. The opening structure gets you information. The mid-round decides what that information means. Great T sides separate themselves by making better decisions after the first thirty to fifty seconds.
Ask these questions in the mid-round:
- What defender utility has been spent?
- Where have we seen players or heard reactions?
- What space do we genuinely control right now?
- Is there a weak side, isolated anchor, or timing window?
- Do we have enough utility left for a full hit?
- Is a split, fake, contact finish, or fast explode most likely to work?
Mid-round calling should not be random creativity. It should be guided by probability. If the CTs used a lot to defend one zone, that side may be easier later if you can revisit after cooldown. If one defender showed alone and the other side stayed silent, a split may punish the rotation pattern. If your lurker hears aggression behind a smoke, the defenders may be nervous and easier to pull out of shape with pressure.
One of the most valuable mid-round skills is recognizing when not to overthink. Some teams gain a 5v4 with strong map control and then spend twenty seconds trying to create a genius fake. Often the correct answer is simple: regroup, use the advantage, hit the weaker site with structure, and trade cleanly. Complexity is only worth it when it improves the odds. Fancy does not always mean better.
At the same time, predictable teams are easy to read. If your squad always ends on the side where it got the first small opening, defenders will adjust. Good mid-rounding includes the ability to abandon the obvious finish when the CT response overcommits. Sometimes the most valuable thing a default gives you is not a site to hit, but a defender reaction to punish somewhere else.
Clock awareness matters here too. If you want to pivot, fake, regroup, and execute, you need time. A strong T side understands how much round clock is required for each type of finish. Running out of time makes even good ideas fail. Many bad “calls” are actually good ideas made too late.
Playing Against Common CT Reactions
To attack well, you need to understand what defenders usually do under pressure. CTs generally respond to T pressure in a few common ways:
1. They dump utility early to deny space.
The answer is patience and layered re-pressure. If the CTs spend heavily to stop one lane, do not stubbornly force it instantly unless the plan requires it. Let the utility fade, maintain map presence, and revisit the area later with fresh timing.
2. They push elsewhere for information.
This is why anti-push structure matters. Punishing a late CT info push often wins the round before the site hit begins. The moment defenders feel blind, they take risks. Be ready for that.
3. They rotate too early.
Early rotations are punished by convincing pressure and fast pivots. If you can identify nervous rotator behavior, sell one side and hit the other with pace.
4. They refuse to rotate at all.
This is when you need stronger site-breaking tools. Against disciplined anchors and patient rotators, shallow fakes do less. You win by isolating the site, clearing properly, and forcing the anchor into unwinnable fights.
5. They retake aggressively through utility.
Some defenders counter-flash, spam through smokes, or swing into fading molotovs rather than waiting. Against that style, your execute must include punish layers. Do not assume utility alone makes space safe. Be ready to trade through the push.
6. They gamble stack late.
This usually happens when your default lacks credibility or the CTs have read your patterns. To punish late stacks, maintain believable opposite-side presence and vary your round endings. If defenders think they know your finish, your T side is already compromised.
The more you notice these reactions, the easier T-side calling becomes. Counter-Strike often looks complicated, but many rounds boil down to simple emotional truths: pressure makes defenders impatient, uncertainty makes them hesitant, and predictability makes them brave.
Solo Queue vs Team Play
T-side fundamentals apply everywhere, but how you use them changes between solo queue and organized play.
In solo queue, you should value simplicity, fast communication, and low-maintenance structure. Instead of trying to run ten-step executes with strangers, focus on things that work with limited trust:
- Two-man map control pairs
- Simple contact timings
- One or two key support flashes
- Clear bomb path calls
- Basic anti-push discipline
Solo queue T sides improve massively when players stop overcalling and start sequencing better. “Hold for push, take this lane together, regroup, flash out, trade.” That level of structure is enough to win many rounds without sounding like a tactical timeout.
In team play, you can build deeper layers: preset utility packages, role-specific pathing, more detailed fake timing, and post-plant role assignments. Teams can rehearse responses to common CT setups. They can run the same execute from different defaults. They can create conditioning patterns across a half. This is where T sides become truly difficult to defend because the same surface actions can lead to different endings.
However, even in team play, do not confuse complexity with quality. The best attacks are still readable internally. Every player understands the goal of the round, not just the utility script. If a strat only works when every detail is perfect, it may be too brittle for real matches.
Post-Plant Fundamentals
Too many players think the T round ends once the bomb is planted. In reality, many attacking rounds are lost after a successful take because the post-plant is unstructured. Great T sides know that the plant is just the handoff from entry phase to defense phase.
Strong post-plants follow a few rules:
- Do not give unnecessary duels immediately after planting
- Play from positions that support the plant you chose
- Maintain crossfires rather than isolated hero angles
- Track likely CT retake paths
- Use leftover utility to delay or split the retake
- Be ready for smoke taps, flash retakes, and spam clears
One of the most common mistakes is everyone wanting information at once. Three players peek for the same retake cue, one dies, and the CTs now have an opening. Instead, assign jobs. One player listens for tap pressure. One holds the most dangerous swing lane. One plays anti-defuse timing. One protects from a flank or late smoke push.
The plant itself should match your control. If you cleared one half of the site and own certain post-plant angles, plant for those. Do not choose a “default plant” mindlessly every time. The best plant is the one your living players can actually defend under pressure.
Post-plants also reward patience. If the CTs have to move toward the bomb, the burden is on them. Let them take the risk first. Make them clear you. Make them burn flashes. Make them reveal which player is tapping and which player is covering. Many T players throw away good rounds because they feel compelled to swing before the CTs truly threaten the defuse.
Common T-Side Mistakes
If your T side feels weak, chances are you are making at least a few of these mistakes regularly:
Dry peeking strong angles with no trade plan.
Sometimes you need a dry duel, but too many teams do it by habit rather than necessity. If the duel is important, support it properly.
Using utility with no follow-up.
A flash nobody swings on, a smoke with no pressure behind it, or a molly thrown after the defender already escaped is just resource loss.
Confusing noise with map control.
Making sound is not the same as owning territory. Real control must be held and usable.
Overcommitting after small success.
One opening kill does not mean five players must sprint into the nearest bombsite. Use the advantage intelligently.
Entering with broken spacing.
The first player dies alone and the second player arrives too late. This is one of the biggest causes of failed executes.
Ignoring lurk timing.
A lurk that activates too early dies before the hit. A lurk that activates too late contributes nothing. Lurking is timing, not hiding.
Planting without site stabilization.
If dangerous positions are still alive, the bomb is often bait rather than progress.
Wasting the clock.
Many teams spend too long deciding after the default and then are forced into a rushed, low-quality finish.
Repeating the same attack shape every round.
If your T side is predictable, even average CTs become confident and proactive.
Blaming aim for structural problems.
Sometimes aim really is the issue. But very often, the duel was bad because the setup was bad. Fix the structure first.
Practice Routine for Better T Sides
You do not need endless theory to improve your attack. You need focused repetition. A useful practice routine for T-side growth can be divided into four parts.
1. Utility rehearsal
Learn a small set of high-value smokes, flashes, and mollies that support your favorite map routes and site finishes. Do not try to memorize everything at once. Choose the grenades that repeatedly create real round value.
2. Two-man coordination
Practice entry-trade pairs. Work on swing timing, anti-flash turning, close-far angle division, and simple contact protocols. Teams do not become dangerous because all five players are brilliant. They become dangerous because pairs function well.
3. Mid-round review
After scrims or matches, pause on rounds around the 1:00 mark and ask: what did we know, what did we control, and what were our real options? This builds better decision quality faster than only reviewing final deaths.
4. Post-plant discipline
Review lost post-plants carefully. Were players peeking too early? Was the plant mismatched to positions? Did someone abandon a crucial lane? Many “close losses” are actually repeatable post-plant mistakes.
If you play mostly pugs, you can still improve by adopting a personal checklist: hold for pushes, preserve utility, communicate simple roles, follow the entry at tradeable distance, and do not overpeek after the bomb goes down. Even personal discipline can stabilize chaotic team environments.
How to Review Your T-Side Rounds
Reviewing demos is one of the fastest ways to fix T-side issues because it removes the emotional fog of the live match. A lost round often feels like “we got unlucky,” but the demo usually shows a more useful truth.
When reviewing your T side, ask these questions:
- Did we deny early CT information well enough?
- Did we gain real map control or just make noise?
- Did our utility create a movement window, or was it wasted?
- Was the commit based on information, timing, or panic?
- Were our entry and trade distances correct?
- Did we stabilize site before planting?
- Did our post-plant positions match the plant?
You should also identify round patterns across an entire half. Maybe your defaults are fine, but your late-round commits are always rushed. Maybe your executes work, but you never punish pushes. Maybe your lurks are too disconnected from the main pack. These are strategic habits, not one-off mistakes.
Watching pro CS can help here too, especially if you focus less on highlights and more on sequence. Study how top teams hold map control without overfighting, how they use one small pressure tool to keep a rotator frozen, how their second players are always close enough to trade, and how calm their post-plants look after explosive entries. That kind of learning transfers much better than just copying smoke lineups without context.
A Simple T-Side Checklist
If you want one compact framework to remember in real matches, use this:
- Deny free CT pushes.
- Take only the map control you can hold.
- Keep the bomb flexible until the round gives you a reason.
- Make your pressure believable.
- Use utility for a purpose, not for decoration.
- Enter in waves, not as isolated individuals.
- Trade fast.
- Stabilize site before planting.
- Play post-plant with patience.
- Change pace often enough to stay unreadable.
This checklist works because it captures the full life of a T round: safety, control, pressure, commit, conversion, and closure. If you keep returning to those basics, your attack will become much more consistent.
Conclusion
The best CS2 T sides are not built on constant heroics. They are built on reliable habits. Teams that attack well understand when to gather information and when to explode, when to pressure and when to wait, when to fake and when to simply hit the site with confidence. They know that site takes are chains, not moments. They know that utility must create movement windows. They know that entries need trade support, and that post-plants need the same level of planning as the hit itself.
If you want better T sides, stop thinking only in terms of strats and start thinking in terms of round architecture. How are you taking space? What reactions are you forcing? How are you protecting your first contact? Are your fakes believable? Does your execute actually simplify the fight? Are you winning the round after the plant, not just getting there?
That is the real foundation of attacking Counter-Strike. The maps may evolve, utility trends may shift, and teams may invent new patterns, but the core remains the same: gather useful information, apply credible pressure, take meaningful space, commit with timing, and convert with discipline. Master those five ideas, and your T side will always have a chance to win rounds against stronger defenders.
In the long run, consistent T-side improvement does more for rank climbing than chasing flashy tricks. Better defaults create better calls. Better calls create cleaner entries. Cleaner entries create easier post-plants. And easier post-plants create more round wins. That is how strong attackers are built in CS2.