How to Hold Sites as CT in CS2: Setups and Rotations 2026
How to Hold Sites as CT in CS2 2026: Default Setups and Rotations
Holding bombsites as a Counter-Terrorist in CS2 is not just about aim. Good mechanics help, but the teams that defend well over hundreds of games usually win because their structure is better. They understand spacing, they know when to use utility, they rotate on real information instead of fear, and they avoid the biggest CT mistake of all: giving the Terrorists easy isolated fights. If your defensive halves often feel chaotic, this guide is designed to fix that.
The goal of a strong CT side is simple: make every T-round expensive, uncomfortable, and predictable. You want to slow map control, deny clean entries, force utility investment, create crossfires, and funnel the attack into areas where your teammates can trade. That does not mean holding every inch of the map forever. In high-quality CS2, good defense is often about controlled concession. You show presence, take useful information, delay the hit, and then collapse at the right time.
This article focuses on timeless fundamentals rather than gimmicks that disappear after one patch or one meta swing. Whether you are playing solo queue, duo, or full stack, the core questions of CT defense stay the same: Who is anchoring? Who can help first? What utility is reserved for contact? What triggers a rotation? What part of the map can be given up? And when should you commit to the retake instead of dying on site?
If you want to improve your overall CS2 structure beyond this guide, it is worth following the official Counter-Strike 2 page, checking the official update notes, and reviewing the game’s Steam page for official resources and ecosystem updates. If your goal is ranking up faster while improving your in-game decision-making, you can also review CS2 boosting prices as an additional option.
Table of Contents
- 1. The Real Philosophy of CT Defense
- 2. What a Default CT Setup Actually Means
- 3. CT Roles: Anchor, Support, Rotator, Lurker Catcher
- 4. Core Site-Holding Principles That Work on Every Map
- 5. Default Setup Blueprints for Different Map Shapes
- 6. Utility Discipline: How CTs Waste Rounds With Bad Nades
- 7. Mid Control Without Overcommitting
- 8. Rotations: When to Lean, When to Leave, When to Freeze
- 9. Retake vs Save: The Decision That Changes Your Half
- 10. Economy Logic for Better CT Holds
- 11. Communication That Makes Rotations Work
- 12. The Most Common CT Mistakes in CS2
- 13. Practice Routine for Better Site Holds
- 14. How to Adjust in Solo Queue, Duo, and 5-Stacks
- 15. Final Thoughts
1. The Real Philosophy of CT Defense
Many players think defending means standing your ground until you either win the duel or die. That is too simplistic. A strong CT defense is built around layers. First, you contest space early enough that the T side cannot walk everywhere for free. Second, you force the attack to reveal information through noise, grenades, or bodies. Third, you decide whether the best response is to hold, delay, reinforce, or concede and retake.
Think of defense as a sequence rather than a single moment. The first layer is map presence. The second layer is denial utility. The third layer is crossfire resistance. The fourth layer is rotation timing. If one layer fails, the next one should still be useful. For example, even if your A anchor loses first contact, a good setup can still survive because the support flashes, the rotator arrives through a safe route, and the remaining players choose a clean retake instead of trickling in one by one.
The best CT teams also understand that “holding site” does not always mean “staying on site.” Sometimes the strongest site hold begins by playing just off the site itself. Deep passive angles, anti-flash off-angles, and delayed peek positions can be stronger than obvious front-line spots. If the Ts clear the front layer but still cannot plant safely or cannot exit the choke cleanly, your defense is still doing its job.
Your objective is not to top frag in the most heroic way possible. Your objective is to make the round structurally favorable. A one-for-one on an anchor can be great if it burns two T smokes, one molotov, and 25 seconds. A zero-kill anchor can still do a good job if he calls the hit early, survives long enough for the rotation, and forces the attackers into bad post-plant positions. Good CT rounds are often won by invisible value.
2. What a Default CT Setup Actually Means
A default CT setup is not a random spread. It is a planned allocation of bodies, utility, and responsibility that covers the most likely attack patterns while preserving rotation flexibility. When players say “play default,” they should mean: start in a stable structure that covers early aggression, protects critical lanes, and leaves room to react once real information appears.
On most maps, a default setup must answer five questions:
- Who is responsible for the first contact at each site?
- Who can throw the first delaying utility?
- Who watches the most dangerous connector, mid lane, or split route?
- Who rotates first if pressure appears?
- Who stays disciplined in case the pressure is fake?
The biggest misunderstanding in average-ranked games is that players copy pro starting positions without understanding the logic behind them. A setup only works if each player knows the trigger conditions. For example, a B support can rotate early only if the anchor has a smoke, an escape path, and a call that reliably confirms contact. A mid player can lean to A only if his absence does not open an instant split. A rotator can gamble stack only if some lane remains watched or trapped.
Good defaults also scale based on the round. Your pistol-round default is different from your full-gun default. Your anti-eco default should value spacing and anti-rush utility. Your low-buy default may play more passive because a saved rifle is worth more than one desperate duel. Your full-buy default can challenge more territory because your utility lets you survive the first wave and still retake late.
So when you build a default, think less about “where do we stand?” and more about “what information are we trying to secure, what timing are we trying to deny, and what kind of rotation do we want if the hit comes?” That mindset immediately makes your defense more consistent.
3. CT Roles: Anchor, Support, Rotator, Lurker Catcher
Every CT defense becomes clearer when roles are defined. Even in solo queue, someone is functionally doing these jobs whether you name them or not. The four most useful labels are anchor, support, rotator, and lurker catcher.
Anchor
The anchor is the player most committed to one bombsite. His job is not always to get multi-kills. His first priority is surviving contact long enough to call numbers, utility used, and likely site commitment. A good anchor knows where to fall back, which smoke is for the choke, which molotov is for default plant, and when it is smarter to stay alive for the retake than die for a low-percentage duel.
Support
The support player is the bridge between a site and the rest of the map. He might start slightly off-site, in a connector lane, or in a secondary angle. He should be close enough to trade, flash for the anchor, or help stop a split, but not so committed that both defenders die to the same opening utility. Support is often the most underappreciated defensive role because good support players prevent chaos before it starts.
Rotator
The rotator is the elasticity in your defense. This player often watches the highest-value connector, mid lane, or fast transition route. His responsibility is timing. Rotate too early and you get faked. Rotate too late and the anchor dies alone. Great rotators do not move because they are nervous; they move because the information pattern makes a site more likely. They also understand the difference between a lean and a full leave. Many rounds are lost because players abandon their lane completely when a slight shift would have been enough.
Lurker Catcher
Not every map or round has a dedicated lurker catcher, but every good CT side assigns the responsibility somehow. Someone must always think about the last T, the delayed flank, or the late split. This is especially important after early pressure. Ts love to condition rotations, freeze the defense, and then punish the player who stopped watching the dead space. If nobody owns this responsibility, your team will get backstabbed constantly.
When these roles are clear, your defaults become easier to execute. Players stop overrotating emotionally because they trust the structure. They know who has the first smoke, who has the trade flash, who can give ground, and who must remain disciplined. That trust is the heart of stable CT sides.
4. Core Site-Holding Principles That Work on Every Map
Every map has different choke points, timings, and elevation changes, but the core principles of a strong site hold are universal. If you master these, you will feel more comfortable on almost every active-duty style map and every community map with standard bombsite logic.
Play Complementary Angles, Not Duplicate Angles
Two defenders holding the same line rarely creates a strong defense. It often creates two easy kills for the attacker with one clean spray or flash. Instead, play angles that support each other. One player takes first contact, the second punishes the swing that clears the first player. Or one player denies plant while the other controls the strongest post-plant escape. Complementary angles force the Ts to clear more than one layer.
Always Build a Fall-Back Route Into the Hold
The strongest defensive positions are not necessarily the deepest or the riskiest. They are the positions that allow a decision after contact. Can you re-smoke? Can you tuck and survive the flash? Can you drop back to the next layer? If your opening position offers no second option, it must provide exceptional value to be worth it.
Do Not Spend All Utility at First Noise
Weak CT teams panic-nade. One step, one decoy, one smoke bloom, and three grenades disappear. Good attackers love this. They pull utility, reset, and hit later with no resistance left. You need discipline. Ask yourself: is this real pressure, map control pressure, conditioning pressure, or fake pressure? Use enough utility to deny easy space, but keep enough to fight the actual execute.
Information Is Part of the Hold
Holding site is not just killing the guy entering. It is identifying whether the attack is heavy, light, split-based, late, or fake. Count bodies. Track flashes. Listen for utility volume. Note whether the bomb is likely present. The faster your information becomes accurate, the faster your rotations improve.
Tradeability Beats Hero Spots
A flashy off-angle can win one round. A tradeable setup can win a half. If your teammate cannot punish the killer after you die, your position may be too isolated. CT defense becomes far stronger when your first duel is connected to someone else’s second duel.
Plant Denial Matters as Much as Entry Denial
Sometimes you will not stop the Ts from entering. That is okay. Your next job is to make the plant uncomfortable. A defender tucked on site, one hidden in the rotation lane, and one delaying from afar can still win if the plant timing is bad. Think about the bomb, not just the doorway.
5. Default Setup Blueprints for Different Map Shapes
Instead of memorizing one rigid layout for every map, it is more useful to understand a few defensive blueprints. Most CS2 defusal maps share one of several broad structures: two-site maps with strong mid influence, two-site maps with direct choke entries, and layered maps where vertical control or connector control changes rotation speed dramatically.
2-1-2 Default
This is the classic balanced setup: two players toward A, one toward mid or the central connector, and two toward B. It works best on maps where mid control can enable splits into both sites. The solo middle player does not always hard-fight mid. Often he delays, spots utility, and preserves information so the sides know whether to stay disciplined. The strength of 2-1-2 is flexibility. It can absorb standard defaults, punish dry pops, and still allow fast reinforcement.
Use 2-1-2 when:
- Both sites are vulnerable to fast hits.
- Mid is important but does not require a full commitment every round.
- Your team values balanced first-contact coverage.
2-0-3 or 3-0-2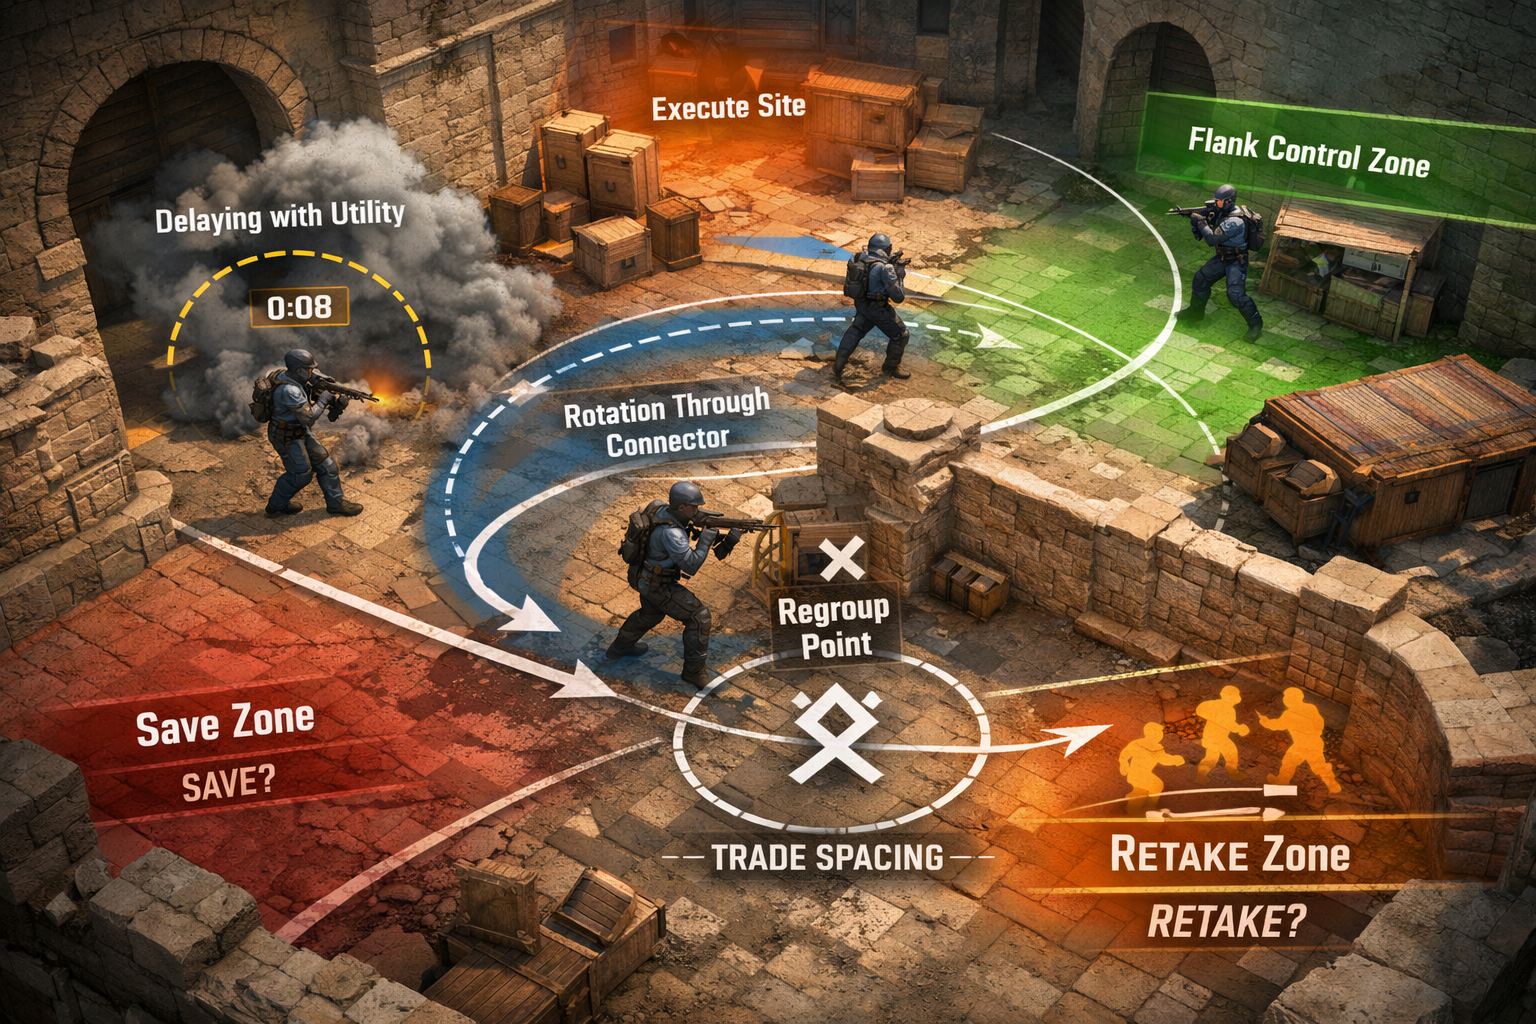
These heavier site defaults work when the opponent strongly favors one side of the map or when your central lane can be watched indirectly. For example, if a map allows one site to be hit explosively with little warning, loading three defenders there can be wise. But do not confuse these setups with blind stacking. The isolated side still needs a survival plan and the loaded side still needs anti-flash spacing.
Use a heavy-site default when:
- The enemy repeatedly targets one site.
- Your solo site player is excellent at delaying and escaping.
- Your central lane can be denied by utility, sound cues, or a fallback angle.
1-2-2 Mid-Respect Default
On maps where mid is the entire round, one site can be lightly held while two players influence mid routes and connectors. This setup is dangerous if done lazily, but powerful if your mid players know how to share space without feeding. The key is that these two players do not both need aggressive control. Often one contests and one supports from a safer anti-split angle.
Use this when:
- Mid splits are the enemy’s favorite win condition.
- Your mid duo communicates well.
- Your site anchors are disciplined and comfortable giving small amounts of ground.
Passive Retake-Oriented Default
Some rounds should begin with less ambition. On weak buys, low utility rounds, or against opponents with punishing anti-aggression protocols, a passive hold makes sense. This setup prioritizes survival, utility preservation, and retake utility over early fights. It is especially good when your economy cannot survive a reckless opener.
Passive defaults work when:
- You have weaker weapons or limited grenades.
- The T side is expecting your aggression.
- The site positions still allow crossfires and clean retake paths.
Map Archetype Advice
On maps like Mirage-style layouts, mid discipline defines everything. On Inferno-style layouts, utility timing around narrow chokes becomes the main skill. On Ancient- or Anubis-style layouts, lane control and layered site entrances make supportive spacing crucial. On Nuke- or Train-like environments, verticality, long rotations, and fake potential make communication and lean timings even more important. The specifics change, but the question remains the same: what is the shortest path from information to reinforcement without breaking another part of your defense?
If you understand that question, you can transfer your defensive skill across map pools much faster than players who only memorize exact starting spots.
6. Utility Discipline: How CTs Waste Rounds With Bad Nades
Utility is what lets CTs survive the opening wave of a hit. Without it, even excellent aimers get overrun. But many players misunderstand how defensive nades should function. They either spend them too early or too late. The result is the same: the execute lands when the site is weak.
The first rule is to categorize your utility before the round begins. Ask yourself which grenade is for early contest, which is for contact delay, which is for execute denial, and which is for retake. If you carry two smokes, they should rarely be used for the same job unless the round state demands it. One smoke might deny a choke on first contact. The other might be saved for the plant or for cutting the post-plant in half later.
The second rule is layering. A smoke alone often delays, but does not stop, a committed hit. A smoke plus a flash, or a molotov plus a swing threat, is much harder to break. The strongest CT utility sequences buy time while threatening punishment. If the Ts feel they can wait three seconds and enter cleanly, your grenade is not doing enough.
The third rule is timing relative to the round clock. Early utility is valuable when it denies default control, but late utility is often round-winning because it hits the execute window. If every defensive grenade disappears in the first 35 seconds, the attackers know exactly when the site becomes vulnerable. Good teams track this and hit on the timer. Strong CTs stagger utility usage so the Ts never get a clean timing read.
The fourth rule is anti-flash and anti-chain utility positioning. Many defenders throw a grenade and then stand in the most obvious punishable spot. That defeats the purpose. If you smoke a choke, instantly think about the flash that comes over it. If you molotov an entry, think about the swing timing after the flames fade. A good utility user is already positioned for the enemy’s response.
Finally, remember that utility is not just to stop a hit. It also helps define information. If you smoke one side and hear no reaction, that matters. If your HE tags multiple players, that matters. If the Ts use three pieces of utility to clear one angle, that matters. Nades shape the information landscape, and that information is what makes good rotations possible.
7. Mid Control Without Overcommitting
Many CT rounds collapse because mid control is misunderstood. Some teams ignore mid entirely and get split to pieces. Others overfight it, lose two players early, and hand the round away. The answer is not always “fight more” or “fight less.” The answer is to understand what mid control means on your map and in your current round economy.
Sometimes controlling mid means taking real ground. Other times it simply means denying a free path and preserving information. If a single player can spot utility, hear steps, throw a delaying smoke, and survive to a safer line, that can be enough. You do not always need a deep push or a duel for hard ownership.
Mid control becomes safer when two players share responsibility in different ways. One can peek for information while the other holds the punish angle. One can play anti-flash while the other throws the delay smoke. One can briefly challenge and then fall back while the other watches the connector that becomes dangerous afterward. This layered approach is much stronger than two players dry-swinging the same angle.
When should you give up mid? Usually when holding it would cost too much. If your utility is thin, if your A or B site is already showing pressure, or if the Ts have clearly invested to take the area, falling back to anti-split positions can be smart. The mistake is not giving up mid. The mistake is giving it up without updating the rest of the defense. Once middle falls, the side sites must adjust angles, spacing, and rotation expectations immediately.
When should you re-clear mid? Only when you have a reason. Blindly re-peeking after losing presence is how rounds spiral. Re-clearing is strongest when one side of the map is quiet, your utility supports the move, and your teammates are ready to react if contact appears. Otherwise, disciplined denial beats ego peeking.
8. Rotations: When to Lean, When to Leave, When to Freeze
Rotations decide more CT rounds than pure aim. A good team can survive average mechanics if its rotations are clean. A bad team can throw away strong aim because its movements are based on panic. The solution is to separate rotations into three categories: lean, full leave, and freeze.
Lean
A lean is a partial adjustment. You are not abandoning your original responsibility, but you are positioning to help faster if needed. This might mean one step closer to a connector, moving from a deep passive line to a more supportive one, or shifting your crosshair priority toward the threatened side. Leaning is useful when the information is suggestive but not definitive. It keeps the defense elastic without opening giant holes.
Full Leave
A full leave means your original zone is no longer the highest priority, and the probability of a committed hit elsewhere is high enough to justify the rotation. This should be triggered by strong information: multiple bodies seen, bomb confirmed, heavy utility volume, or a trusted teammate call that indicates genuine commitment. Full leaves are powerful, but they are also the most punishable if the call is wrong.
Freeze
Freeze is the discipline to not move. This matters more than many players realize. Sometimes the best rotation decision is no rotation at all because the attackers are clearly trying to manipulate you. Silence after early utility, a single lurk smoke, or one contact player making noise can bait weak defenders out of position. Freezing is not passivity. It is controlled skepticism.
To improve rotations, focus on trigger quality. Do not rotate because “it feels like A.” Rotate because you heard two flashes, a molotov, multiple rifles, and the anchor called at least three. Or because the mid player lost the split route and your weak site is now structurally exposed. Strong triggers create strong rotations.
Also, understand route quality. The shortest path is not always the best route. Sometimes the quickest rotation gets you killed crossing an exposed lane. Sometimes the safer route takes one second longer but preserves your HP and utility. Think about the fight you are rotating into. Do you need to arrive instantly for a trade, or safely for a retake setup?
Finally, avoid the worst CT rotation habit: the trickle. One player arrives and dies. Then the next. Then the next. That is not a rotation; that is a donation. If the site is already lost, regroup, wait for utility, and retake together. The round becomes dramatically easier when the remaining CTs enter the fight on the same timing.
9. Retake vs Save: The Decision That Changes Your Half
Many players obsess over how to stop the entry but give almost no thought to what happens after the plant. Yet a huge percentage of CT success comes from choosing correctly between an immediate retake, a delayed retake, and a save. The wrong choice does not just lose one round. It damages your economy and your future defenses.
You should retake when the numbers are reasonable, your utility still has value, the attackers are likely low or poorly placed, and the bombsite geometry lets you isolate fights. Retakes are strongest when you can enter from multiple directions, deny common post-plant lines with smokes, and force the Ts to split their attention. If your teammates are alive in different lanes, a retake may be better than it first appears.
You should save when the round state is structurally bad. Examples include a low-number disadvantage, almost no utility, weak HP, long rotation paths, or post-plant positions that favor the attackers heavily. Saving is not cowardice. It is economy management. A saved rifle, kit, or utility package can be the difference between a stable next round and a broken half.
The most common error is not choosing wrong in theory. It is choosing too late. Players hesitate in the no-man’s-land between the two options. They neither commit to the retake timing nor leave early enough to preserve equipment. This often produces the worst outcome: a failed low-percentage retake and no carryover guns.
A good retake begins with one question: where are the post-plant players likely positioned? If the bombsite allows obvious strongholds, use utility to cut them off or isolate one side first. Do not run in and hope mechanics solve everything. Trade order matters. The first player clears the most dangerous swing. The second player is ready to punish. The third covers the plant pressure or lurk route.
Kit awareness matters too. One player having a kit can convert a marginal retake into a real chance. But do not become tunnel-visioned on the defuse. Clear enough space first. Too many retakes fail because one player taps early while the others are not yet in control of the fight.
The strongest CT teams are emotionally stable about this decision. They do not force retakes because they are frustrated. They do not save because they are scared. They read the position and choose the line with the highest long-term value.
10. Economy Logic for Better CT Holds
CT defense changes dramatically with your buy quality. A full utility rifle round allows you to contest timing, slow entries, and retake with structure. A low-utility rifle round often requires more passive holds. A force-buy with mixed weapons may need tighter crossfires and shorter engagement distances. If you ignore buy context, even a smart setup can become fragile.
On full buys, build holds around utility preservation. Your rifles are strongest when the attackers cannot isolate them. Do not donate opening duels trying to make the round easier than it needs to be. Let your grenades create favorable timings first.
On half-buys and force-buys, value surprise, close ranges, and tradeability. You usually cannot stop a polished execute in open space with inferior weapons, so you need to compress the engagement. Stack the right layers, threaten a burst of damage, and deny clean plant control. Sometimes a passive bait setup is stronger than a proactive fight because it lets your weaker guns operate on your timing.
On anti-eco rounds, many CT teams become sloppy because they expect easy wins. This is exactly when structure matters. Hold anti-rush utility. Avoid isolated peeks into pistols at point-blank range. Maintain crossfires. Watch for lurk timing. Eco losses are often caused by disrespect, not bad luck.
The economy also affects rotation aggression. If your team has weak weapons, your first priority may be preserving enough resources for the retake or save decision. If your team has a massive economic lead, you can sometimes rotate faster and trade harder because the penalty for losing one rifle is smaller. Money changes the acceptable level of risk.
One overlooked detail is kit distribution. Not every round needs every player to have one, but your team should know who has it and which site is more likely to need it. A well-placed kit can buy confidence in retakes and change how anchors choose to survive. Likewise, dropping utility to the correct site anchor can matter more than upgrading one player’s weapon.
Strong CT sides treat the economy as part of the tactical plan, not a separate topic. Your setup is only correct if it matches the tools you actually have.
11. Communication That Makes Rotations Work
Good defensive communication is fast, specific, and useful. “They are here” is not enough. Your team needs the kind of information that changes positioning. The best calls answer three things: where, how many, and what kind of pressure.
Instead of vague panic, aim for calls like these:
- “Two spotted, one more likely behind, utility coming, not full yet.”
- “Bomb not seen, could still be split, I can smoke and fall.”
- “Mid lost, watch split timing, don’t overrotate.”
- “Three out, bomb here, commit now.”
- “Site lost, wait for me, retake together.”
The anchor’s job is especially important because the first call shapes the entire round. If the anchor overcalls every bit of pressure as a full hit, the whole defense becomes unstable. If the anchor undercalls and tries to be a hero, the rotation arrives too late. Calm accuracy beats emotional intensity.
Support players should also call what they can still do. Saying “I can flash in two,” “I have smoke for plant,” or “I cannot help, watching lurk” tells the team what resources exist. This is far more useful than silence followed by blame.
Rotators should communicate their movement, not just the information they hear. “Leaning A,” “still holding mid,” or “coming safe route” helps the rest of the team understand what is covered and what is not. These small updates prevent the classic problem where two players think the same lane is watched when it actually is not.
After the initial clash, communication should simplify again. Once the site is lost or stabilized, avoid flooding comms with emotional noise. At that point, what matters is numbers, health, utility, bomb position, and likely post-plant spots. The cleaner your communication, the cleaner your retake or save decision becomes.
12. The Most Common CT Mistakes in CS2
If your CT halves feel random, you are probably making one or more of these mistakes consistently.
Overrotating on Weak Information
This is the classic ranked error. One smoke lands, one player hears a step, and suddenly the far site is empty. Good T sides exploit this endlessly. Learn to distinguish pressure from commitment.
Double-Using Utility for the Same Problem
Two smokes on the same choke at the same timing often waste value unless the round is desperate. Layer your utility across different phases of the round instead of panic-dumping it together.
Playing Untradeable Hero Angles
It feels good when these work, but over time they make your defense fragile. If your first-contact player dies with no chance of punishment, the site becomes too easy to enter.
Ignoring the Lurk
Whenever the main hit appears, many defenders stop thinking about the last player. This leads to backstabs during rotations and ruined retakes. Somebody must own the anti-lurk responsibility every round.
Rotating Without a Plan
Not all rotations should arrive at the same depth. Sometimes you rotate to fight the execute. Sometimes you rotate to secure the retake lane. Sometimes you rotate only enough to support. Know what your arrival is supposed to accomplish.
Taking Extra Peeks After Advantage
A site hold often becomes easy after the CTs get the first kill and force utility. Then someone dry-peeks for more and loses the advantage. If the attackers are already under pressure, make them solve the hard part. Do not solve it for them.
Forgetting the Clock
Time pressure is a CT weapon. The longer the Ts spend taking map control and setting up, the more desperate their final execute becomes. Defenders who understand the clock can delay small amounts repeatedly and create huge pressure without massive risk.
Starting the Retake Too Early or Too Late
Either you trickle and die before your teammates arrive, or you wait so long that the post-plant becomes impossible. Good retakes hit a coordinated window, not a random one.
13. Practice Routine for Better Site Holds
Defensive structure improves fastest when you practice with intention. Simply grinding matches can help, but only if you review the right things. A simple routine can accelerate your CT development a lot.
1. Review Your Deaths by Category
After a session, do not just ask whether you missed shots. Ask why the duel happened. Were you untradeable? Did you waste your smoke before contact? Did you overrotate? Did you hold the wrong line after losing mid? Categorizing your deaths reveals structural errors much faster than raw stats.
2. Build Three Reliable Setups Per Site
For each common site you defend, create three default responses: one standard hold, one anti-rush hold, and one low-utility passive hold. This gives you a real playbook instead of improvising every round.
3. Practice Delaying Utility
Load into maps and rehearse the grenades that matter most: entry denial smokes, plant molotovs, anti-rush flashes, and retake smokes. The goal is not just to know a lineup, but to know when it is supposed to be used. Mechanical consistency removes panic from the round.
4. Train Crosshair Placement for Fallback Angles
Many players practice the obvious first-contact angles but ignore the second and third layers. Spend time on the positions you reach after giving ground. Good fallback aim is one of the biggest differences between stable anchors and reckless ones.
5. Review Rotations on the Demo Timeline
When you watch your own demo, pause the round the moment your team starts rotating. Ask: what did we know at this exact second? Was the movement justified by real information? This is one of the best ways to improve decision-making.
6. Use Callout Discipline
Even in pugs, try to keep comms structured. Clean communication becomes a habit. Teams that speak clearly rotate clearly.
If you do these six things consistently, your CT side will improve even if your raw mechanics remain the same. That is how strong defenders climb: they make each round easier before the shots are even fired.
14. How to Adjust in Solo Queue, Duo, and 5-Stacks
The best CT setup in theory is useless if your queue environment cannot support it. You must adapt your structure to the level of coordination available.
Solo Queue
In solo queue, prioritize self-sufficient positions and simple information patterns. Do not rely on perfect flashes or complex rotation chains. Choose setups where your value remains high even if teammates react late. Play tradeable angles when possible, but always have a fall-back plan you can execute alone.
Duo Queue
Duo is one of the best formats for CT defense because two connected players can stabilize an entire side of the map. You and your partner can form a trusted site pair, a mid-support duo, or an anchor-rotator combo. Agree on a few simple protocols: who uses first smoke, who swings off contact, who calls for the early lean, and who watches the lurk during retakes.
Three Stack
With three players, you can define the core of the defense. One site can be coordinated well, or mid plus one site can become very stable. The main danger is over-funneling resources into your stack while the other side becomes neglected. Make sure your coordinated players still play for whole-map structure.
Full Stack
In a 5-stack, you can build real defaults and rotation rules. This is where CT defense becomes most rewarding. You can assign exact anchor roles, utility chains, anti-rush rounds, and fake-resistant rotation triggers. But even then, avoid unnecessary complexity. The best systems are clear enough to function under pressure.
No matter the queue type, remember this: the simpler structure executed well is stronger than the perfect structure executed badly. Your CT side should match your communication level.
15. Final Thoughts
Holding sites as CT in CS2 is not about standing still and hoping your aim carries. It is about building a defense with layers: smart defaults, defined roles, disciplined utility, informed rotations, and confident retake decisions. The teams and players who defend consistently are not always the flashiest. They are the ones who make the round hard for the attackers from beginning to end.
If you take one lesson from this guide, let it be this: a good CT side is a system. The anchor delays. The support stabilizes. The rotator reads the information. The team preserves tradeability. Nobody overreacts to noise. Nobody donates isolated fights. Nobody tricks in one by one after the site is lost. When you approach defense this way, your halves become calmer, your communication becomes clearer, and your win rate becomes more stable.
Start by improving one thing at a time. Build a stronger default. Save one more smoke for the execute. Rotate one second later for better confirmation. Hold one more crossfire instead of one more hero angle. CS2 rewards players who make strong small decisions repeatedly. That is how you become a reliable CT defender on any map, in any season, and in any rank bracket.