Valorant Utility Fundamentals: Smokes, Flashes & Info
Valorant Utility Fundamentals: Trading Space With Smokes, Flashes, and Info
In Valorant, gun skill decides duels—but utility decides which duels happen, where they happen, and when they happen. If your team constantly “walks into bullets,” takes fights at the worst time, or loses man-advantage rounds, the problem is rarely aim alone. It’s usually that you are giving away space for free, taking space without a plan, or using utility without converting it into map control.
This guide builds a timeless mental model for utility: you are trading resources (smokes, flashes, recon, traps, mollies, movement) for space, time, and information. When you see utility as an economy, your rounds become repeatable. You stop improvising every 20 seconds and start running simple protocols that scale from solo queue to coordinated play.
We’ll focus on fundamentals that stay relevant across patches: the geometry of smokes, the timing rules of flashes, and the decision-making behind info tools. You’ll also get practical “if/then” checklists, comm templates, and drills you can run in custom games. If you want faster rank progress with structured improvement, you can also check Boosteria’s Valorant options here: https://boosteria.org/valorant-boosting/prices
Table of Contents
- 1) The Core Model: Space, Time, Info, Threat
- 2) The Utility Economy: Spend With a Purpose
- 3) Smokes Fundamentals: Shape, Edges, and Isolation
- 4) Flashes Fundamentals: Timing Windows and Conversion
- 5) Info Fundamentals: Recon, Traps, Sound, and “Truth”
- 6) The Trading Space Loop: Utility → Movement → Hold
- 7) Attacking: Default Protocols That Always Work
- 8) Attacking: Executing a Site With Layered Utility
- 9) Post-Plant: Winning With Denial and Crossfires
- 10) Defending: Delay, Disrupt, and Re-take
- 11) Retakes: Reclaiming Space Without Donating Bodies
- 12) Counter-Utility: How to Beat Smokes, Flashes, and Info
- 13) Communication Templates: Simple Calls That Win
- 14) Practice Plan: Drills for Controllers, Initiators, Sentinels, Duelists
- 15) Common Utility Mistakes and Fixes
- 16) A Timeless Rank-Up Plan Built on Utility
- 17) FAQ
1) The Core Model: Space, Time, Info, Threat
Utility isn’t “something you throw.” Utility is a tool that changes the map. Every piece of utility should be judged by what it buys you in one (or more) of four currencies:
- Space: physical territory you can stand in safely (or territory the enemy can’t occupy).
- Time: seconds you force the enemy to wait, rotate late, or retake under pressure.
- Information: knowledge that reduces uncertainty (where they are, what they’re holding, what they used).
- Threat: the pressure your utility creates (forcing movement, isolating angles, creating fear of being swung).
Here’s the timeless truth: you can’t “win” utility just by using more of it. You win utility by converting it. Conversion means you use utility to make a safe action possible:
- Use a smoke to cross a dangerous lane and actually cross it.
- Use a flash to force a defender off an angle and then take that angle.
- Use recon to reveal a stack and then rotate before you get trapped.
- Use a molly to delay a push and reposition into a better fight.
If you throw utility and then do nothing, you didn’t “use” utility—you donated it. Your new habit: every utility button needs a follow-up action, even if that action is simply “hold the space you just created.”
Space Is Not the Same as Kills
Many rounds are lost because a team chases kills instead of owning space. A single defender holding a narrow choke can delete three attackers. But if attackers take map control first—clear corners, force rotations, cut off lanes—then the same defender becomes predictable and easy to trade. That is why high-level teams look “slow” early: they’re buying space and info so the later fight is unfair.
Threat Is Your Invisible Utility
Even when you don’t press a key, you can represent utility. If you’re known for pop-flashing, enemies start giving you respect, turning away early, or falling back. If you’re known for consistent info utility, enemies start faking less, walking slower, and spending more to break your setup. Your goal is to build a reputation for clean, repeatable utility so your opponents play scared.
For official agent ability references and role overviews, keep a reliable baseline bookmarked: https://playvalorant.com/en-us/agents/
2) The Utility Economy: Spend With a Purpose
Think of each round as a budget. You start with a set of tools. Your opponent starts with a set of tools. Whoever spends better gets to choose the fight. The key is learning what “good spending” looks like.
A Simple Spending Rule: “One Tool, One Action”
When you spend one major piece of utility (a smoke, a flash, a drone, a dog, a recon dart, a wall), pair it with one clear team action:
- Smoke → cross, take a lane, plant, or isolate a defender.
- Flash → swing, clear a corner, take a duel, or force a drop.
- Info tool → rotate, stack, push, or hold a choke.
- Stall utility → reposition, call a rotate, or force a slow walk.
Utility Has Timing, Not Just Location
In most ranks, utility is wasted because it is early, late, or unpaired. For example:
- A smoke that lands too early fades before the entry.
- A flash that pops before teammates are ready saves the defender instead of blinding them.
- A recon that scans nothing gives false confidence, causing a push into a stack.
Instead, ask one question before using anything: “What happens immediately after this lands?” If the answer is vague (“we’ll see”), you’re about to waste it. If the answer is clear (“we swing together,” “we cross now,” “we rotate instantly”), your utility is doing real work.
Don’t Spend Utility to Feel Safe—Spend to Become Dangerous
A common trap is “comfort utility”: random smokes that don’t change anything, flashes thrown “just in case,” recon used with no follow-up. Comfort utility makes you feel like you played correctly, but it rarely wins rounds. Dangerous utility creates a moment where the enemy cannot reasonably respond without risk.
3) Smokes Fundamentals: Shape, Edges, and Isolation
Smokes are the purest “space trading” tool in Valorant. A smoke doesn’t kill anyone. It changes visibility, which changes options. The goal is not to “block vision” in general. The goal is to block vision in a way that:
- removes the most dangerous angle from the fight,
- forces defenders into predictable positions,
- creates a safe path for your team to move,
- or buys time for your plan to complete.
Smoke Geometry: The Edge Is the Weapon
Most fights around smokes happen at the edge. Whoever controls the edge controls the round. Your smoke placement should decide which team gets to own the edge.
Attacking principle: place smokes so your team can reach a new safe “edge” closer to site. That edge becomes your staging line for entry, trades, and plant.
Defending principle: place smokes so the attacker’s next edge is awkward, exposed, or easily spammed, forcing them to either wait or cross into danger.
Three Timeless Smoke Types
- Isolation smokes: cut off one defender angle so you can overwhelm the remaining angles. These are your “make the fight 5v1” smokes.
- Crossing smokes: create a temporary tunnel so the team can move through a dangerous lane without donating bodies.
- Delay smokes: slow a push, deny an instant hit, or force utility trades before the fight begins.
“Deep vs Shallow” Placement
When you smoke an entrance or doorway, you’re choosing who gets the advantage.
- Deeper smokes (farther into the defender side) often favor attackers: defenders must push out into unknown space to contest.
- Shallower smokes (closer to attackers) often favor defenders: attackers are forced to run through the smoke and get shot as they exit.
This isn’t absolute—timing, other utility, and positioning can flip it—but it’s a strong baseline. If your team is constantly dying “coming out of smoke,” check whether your smokes are too shallow for your entry plan.
Smoke Discipline: Don’t “Replace Vision,” Replace Decisions
A smoke is best when it removes a defender’s best decision. If a defender can simply move to another powerful angle for free, your smoke didn’t buy much. Pair smoke with one of these conversions:
- Flash the new angle they rotate into.
- Recon the fallback to punish the reposition.
- Take space fast so they don’t have time to reset.
- Use a second smoke to complete the isolation for a full execute.
Playing Around Smokes: The Three Edges
Whenever a smoke appears, label the edges in your head:
- Enemy edge: where defenders can swing out.
- Your edge: where attackers can swing out.
- Center: the “coin flip” zone where both teams can collide blind.
Your job is to avoid coin flips unless you have a clear advantage (numbers, timing, flash support). Good teams rarely gamble on the center. They either hold their own edge with crossfires or use other utility to force the opponent off theirs.
Controller Micro-Fundamentals That Scale
- Smoke timing: smokes should land 1–2 seconds before the entry action, not 6–8 seconds before.
- Smoke layering: if you need multiple smokes for an execute, don’t place them all too early. Stagger them so the final smoke is still full when the spike is planted.
- Second smoke value: a later re-smoke during plant/retake is often worth more than an early “pretty” smoke.
- Communicate fade: “smoke fades in 3” is one of the strongest calls in Valorant because it defines a window.
When in doubt, default to simple, high-reliability smokes that create a clean path and reduce the number of angles your entry must face. Fancy smoke tricks are optional. Reliable edges are not.
4) Flashes Fundamentals: Timing Windows and Conversion
Flashes exist to break crosshair discipline. A defender holding a tight angle with perfect aim is extremely hard to dislodge without a flash. But flashes only work if you treat them as timing windows, not as fireworks.
The Flash Window Concept
Every flash creates a small window where defenders are disadvantaged. Your goal is to maximize the window for your team and minimize it for the enemy. A good flash has:
- Surprise: minimal time to react and turn away.
- Coverage: hits the angle that matters (not the empty corner).
- Conversion: teammates are ready to swing within the window.
The most common mistake is a flash with no conversion: it blinds someone, but nobody swings. Then the defender recovers, re-peeks, and your team has spent a key resource for nothing.
Three Flash Jobs
- Entry flash: enables your first contact into a contested area.
- Clear flash: removes a specific strong angle so you can take space safely.
- Re-peek flash: supports a second swing after you’ve forced movement or gained info.
Pop Flash vs “Floaty” Flash
Even if you don’t use these names, you feel the difference:
- Pop flashes appear quickly and detonate fast, giving defenders less reaction time. They are strongest for close fights and quick swings.
- Floaty/slow flashes are easier to dodge but can cover deeper space or force defenders to give up a wide area for longer.
Your job is to match flash type to the goal. If you need a defender off a close choke right now, choose a fast detonation style. If you need to clear layered angles deeper into site, a slower flash might still work—if you pair it with movement and a second tool.
Flashing for Teammates: “3-2-1” Is Not Optional
The simplest comm in Valorant is also one of the strongest: a short countdown. It aligns crosshairs and movement. Examples:
- “Flashing close in 3…2…1.”
- “Pop in 2. Swing on it.”
- “Re-flash after contact. Ready?”
If you’re solo queue and nobody listens, keep it shorter: “Flashing now—swing.” Or use a ping + “flash” voice line. The goal is still synchronization.
Anti-Flash Fundamentals (So You Don’t Lose to One Button)
Players who master utility also master counterplay. Anti-flash is not only “turn away.” It is a package of habits:
- Play off-angle: stand where a flash can’t cover you and still hold the choke.
- Break line-of-sight: hold from positions with a quick wall/cover turn.
- Stagger teammates: don’t stack two players in the exact same flashable cone.
- Respect the second flash: the first flash often baits your turn; the second kills you.
Flash + Smoke Is a Complete System
Smokes remove vision. Flashes remove crosshair readiness. Together, they create entry conditions where defenders cannot see clearly and cannot aim cleanly. When people say “we have no entry,” the answer is often not “pick a duelist.” The answer is “pair the smoke timing with the flash timing, then move.”
As a baseline execute pattern:
- Smokes land.
- Info tool confirms the closest danger (or forces defenders off a power angle).
- Flash pops right as entry crosses the edge.
- Second player trades the entry, not “watches.”
This pattern is timeless because it’s built on geometry and human reaction time, not on specific agent balance.
5) Info Fundamentals: Recon, Traps, Sound, and “Truth”
Information is the least understood currency in ranked Valorant. Many players think “info” means “I saw one.” But info is broader: it includes what you see, what you hear, what utility reveals, what utility gets destroyed, and what is missing on the map.
Good Info Has Two Qualities: Reliability and Actionability
Reliability means it’s likely true (not a guess). Actionability means it tells you what to do next. “I think they might be B” is weak. “Two footsteps B long, spike sound, no presence A” is strong.
Info tools become powerful when you combine them with a plan. If recon spots three defenders stacking a site, the best conversion is often an immediate rotate or a delayed hit elsewhere, not an ego peek into the stack.
Info Is Also Negative
One of the strongest types of information is “nothing.” If you used a safe info tool and it saw nothing in a key region, that region is either empty or the enemy is playing around it. Both are useful.
Practice saying: “No contact here” and “No util here.” Those phrases tell your team that the enemy isn’t spending resources in that area, which often means their pressure is elsewhere.
“Info Forcing” vs “Info Checking”
- Info checking is scouting to reduce uncertainty (drone a lane, dart a corner, camera a choke).
- Info forcing is using utility to make the enemy reveal themselves by responding (shooting a drone, breaking a trap, using a counter-flash, tossing a smoke).
Info forcing is incredibly valuable because it costs the enemy attention and sometimes utility. If they shoot a drone, you learned their position and forced them to take a loud action. Even if you didn’t tag them, you gained time and threat.
Sentinel Info: Traps Are a Contract
Tripwires, cameras, turrets, alarms, and similar tools are not “set and forget.” They are contracts:
- If your trap triggers, you owe your team a response (rotate, hold, fight, or re-trap).
- If your trap is destroyed, that is also information—and you owe a call.
- If your trap is untouched for a long time, that is information—your team may be able to stack elsewhere.
Sound Is Utility You Always Have
Footsteps, reloads, weapon swaps, orb pickups, spike drops, and ability audio cues are always present. Build these habits:
- Call numbers (“two steps”) not vague (“some”).
- Call direction (“moving back”) not just location.
- Call pace (“running fast” vs “walking”).
Sound-based info becomes reliable when you pair it with map logic: if one side is silent and the other is loud, you likely found the pressure point. If everything is silent, expect a late hit or a slow default.
For official gameplay and foundational information straight from the source, the main Valorant site is a stable reference: https://playvalorant.com/
6) The Trading Space Loop: Utility → Movement → Hold
Here is the single most important concept in this entire guide:
Utility only matters if it changes your team’s position or the enemy’s position.
The easiest way to force that change is to run a simple loop:
- Utility: smoke/flash/info creates a temporary advantage.
- Movement: you move into the space that advantage makes available.
- Hold: you stabilize that space so it becomes “owned” and not instantly lost.
Why Most Ranked Rounds Collapse
In low and mid ranks, teams often do step 1 (utility) and skip step 2 (movement) or step 3 (hold). Examples:
- Smoke lands, nobody crosses. Smoke fades. Now you’re worse off because you revealed your plan.
- Flash pops, entry swings alone, dies, nobody trades. Utility is “used,” but space is lost.
- Recon tags one defender, team chases into the unknown and gets flanked. Info was gathered but not converted.
Define “Ownership” of Space
You own a piece of space when:
- you can stand there without being instantly killed by an unseen angle,
- you have at least one escape route or trade setup,
- your team knows who is watching which line,
- and the enemy must spend resources or bodies to take it back.
Ownership is a team concept. One player “taking space” alone is usually just a free kill for the enemy unless it’s supported by utility and trade positions.
7) Attacking: Default Protocols That Always Work
Attacking in Valorant is not “rush site” vs “slow play.” The real attacking skill is building a round: take some space, learn something, then commit with an advantage. The default is your foundation.
The Timeless Attack Default Goal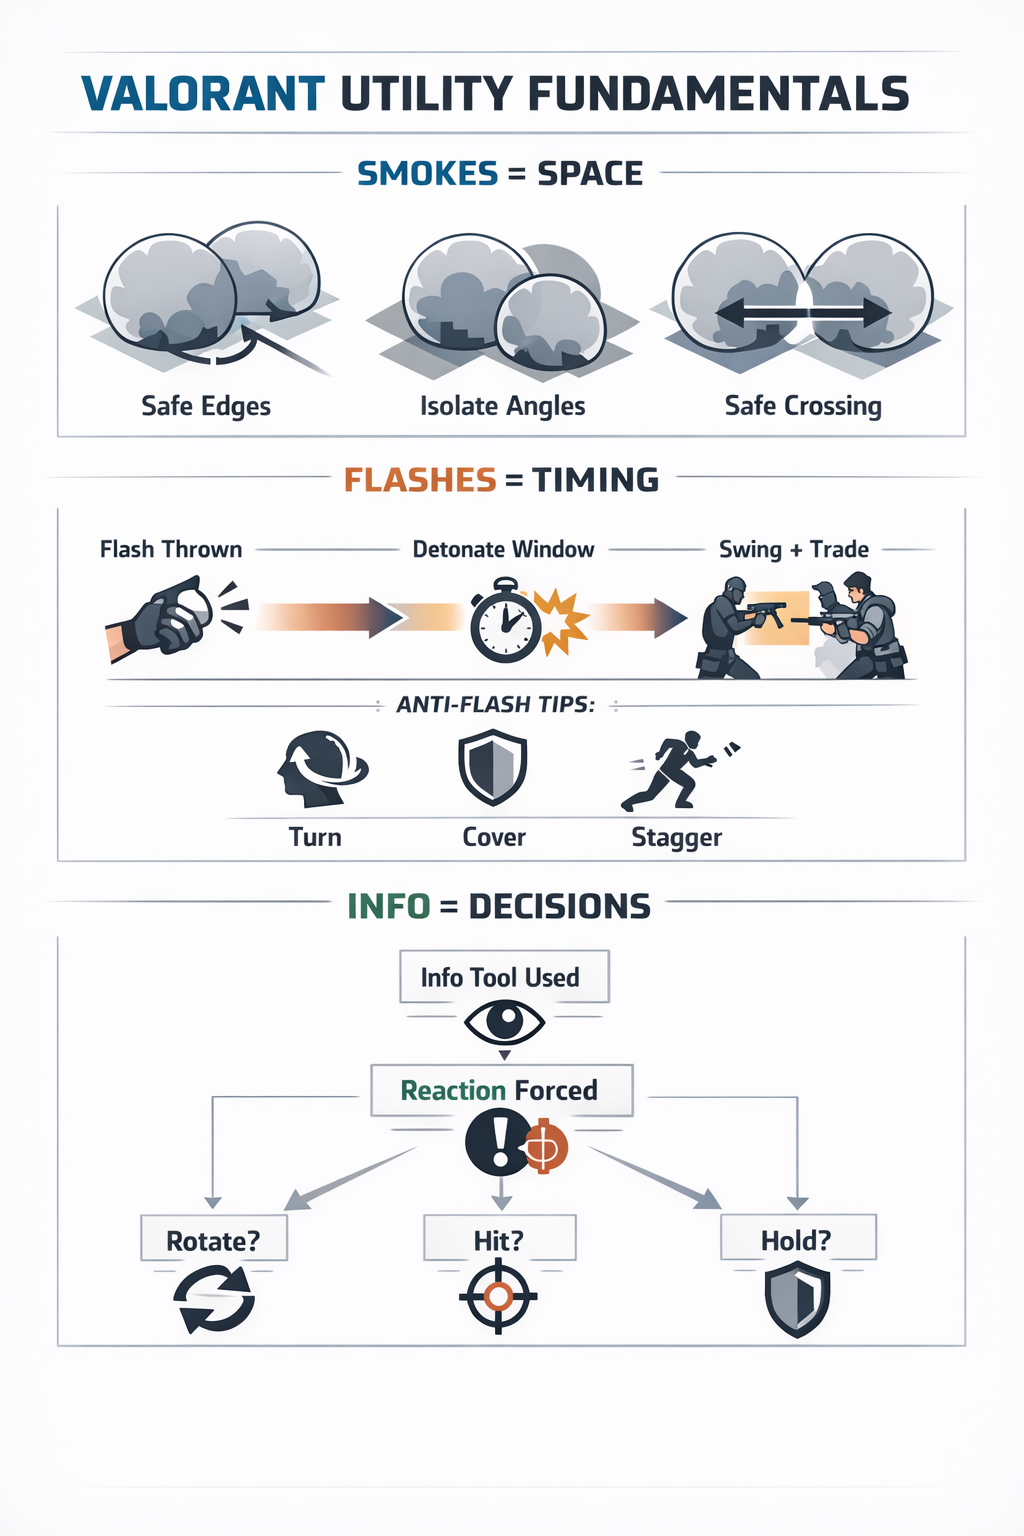
Your default should accomplish two things before you commit:
- Take at least one neutral space (a lane, a region, a key intersection).
- Gain at least one reliable info point (a spot, a trap contact, a utility trade).
Even if you don’t get a kill, a good default reduces uncertainty and forces defenders to show their shape.
Default Without Donating Utility
A classic mistake is spending all your best utility in the first 20 seconds of the round to “take map.” Then, when you actually hit a site, you have nothing left. Fix that by separating utility into two budgets:
- Early budget: 1–2 tools to safely claim space and gather info.
- Hit budget: the remaining tools reserved for the execute/plant/retake fight.
For example, an early recon to check a lane is fine. Throwing multiple smokes and flashes just to “feel safe” is not.
The “Contact → Decision” Default
A simple protocol for ranked teams:
- Spread into a standard formation (avoid five players in one choke).
- Take space until you meet resistance (utility, footsteps, spam, a defender holding).
- Once you meet resistance, don’t instantly fight. Use one tool (flash or recon) to force a reaction.
- Make a decision based on that reaction: commit, reset, or rotate.
This protocol stops the common ranked pattern of “we saw one so we all ran at them.” A single defender often wants you to do that. Make them prove they can hold the next layer.
How Smokes Support Defaults (Even Before Executes)
Controllers are not only “site smoke bots.” In defaults, smokes can:
- deny early defender information so they rotate late,
- cut off a sniper/long angle to allow safe early map control,
- fake pressure by implying a hit,
- protect your lurker as they take a key region.
But remember the economy: if you spend too much early, you lose the later fight. A strong controller uses minimum resources to secure maximum safety, then keeps the rest to decide the round.
8) Attacking: Executing a Site With Layered Utility
Executing is where the “trade space” concept becomes visible. A good execute is not chaotic. It is a controlled sequence where defenders lose the ability to hold strong angles and must fight from weak positions.
The Execute Blueprint: Isolate → Blind/Displace → Enter → Trade → Plant
- Isolate the strongest defender angles with smokes or walls.
- Blind or displace the remaining angles (flash, stun, recon forcing movement).
- Enter with a clear path and clear roles.
- Trade immediately—no spectators.
- Plant while holding the correct lines and preventing the easy retake.
Roles Matter More Than Agents
You don’t need the “perfect comp” to run good utility fundamentals. You need roles:
- Entry: first body into site, forcing contact and creating space.
- Trade: second body, attached to entry distance, ready to swing instantly.
- Support: provides flash/info/stall to make the entry survivable.
- Anchor/cutoff: holds rotation routes so defenders can’t flood retake instantly.
- Planter: ensures spike goes down and transitions into post-plant position.
In ranked, the biggest execute upgrade is simply declaring: “I’m entry, you trade me, you flash, you watch flank.” This turns five solo players into a temporary system.
Smoke Timing for Executes
Smokes should be treated like doors you open temporarily. They should land when your team is ready to walk through the doorway they create.
Practical rule:
- If your team is not in position to go within the next 2 seconds, do not place the execute smokes yet.
Another practical rule:
- Plan one re-smoke. On many rounds, the re-smoke wins the post-plant more often than the first smoke wins the entry.
Flash Timing for Executes
Entry flashes should detonate at the moment defenders must decide between turning, repositioning, or fighting blind. If your flash pops when defenders can simply hide and wait, it’s low value. If it pops when they must contest the choke, it’s high value.
A simple method:
- Let entry call: “Ready to go.”
- Support answers: “Flashing on your step.”
- Entry starts moving, and flash pops as entry reaches the edge of the smoke/doorway.
Info in Executes: Use It to Remove “Guess Corners”
Executions fail when entries must guess too many corners. Info tools reduce the number of guesses. Even if the info tool doesn’t tag a player, it often forces defenders to move or shoot, revealing themselves.
When you execute, define the “unknown corners” and decide how you will clear them:
- Cleared by flash + swing
- Cleared by recon/drone + wallbang or push
- Cleared by molly/stun to force them out
- Cleared by entry pre-aim + trade
If you cannot name how you clear a corner, that corner will kill you.
9) Post-Plant: Winning With Denial and Crossfires
Planting the spike is not the end of the round. It’s the start of a new phase: defenders must reclaim space under time pressure. Your utility job shifts from “take space” to “deny space.”
Post-Plant Is a Time Game
Once the spike is planted, time becomes your ally. The defenders must act. Your utility should either:
- delay the defuse attempt,
- force defenders into predictable clearing paths,
- or isolate the defuser so you can take a favorable duel.
The Two Post-Plant Archetypes
- Hold-and-fight: you keep multiple players near site and win with crossfires, trades, and re-smokes.
- Play-off-site: you back up to safer angles, using utility and numbers to punish the retake attempt.
Neither is “always correct.” The correct choice depends on your health, weapons, numbers, and utility remaining. What matters is that your team agrees and sets up properly.
Re-Smokes and “Defuse Denial”
Controllers often decide post-plants with one action: re-smoking the spike area or a key defender path. A re-smoke creates panic. Defenders either push through blind or waste time waiting.
Combine re-smokes with:
- a flash through the smoke edge,
- a recon scan that forces the defuser to move,
- or a stall tool that punishes a stick.
Crossfires: Utility’s Best Friend
Utility is strongest when it supports two players holding a crossfire. A single player holding alone is easy to flash, smoke, or overwhelm. Two players holding different angles can punish swings and force defenders to clear multiple lines under time pressure.
Post-plant checklist:
- Do we have a crossfire on the spike area?
- Do we have someone watching a rotate path?
- Do we have at least one piece of utility to stop a fast stick?
- Are we playing close enough to trade, or safe enough to survive?
10) Defending: Delay, Disrupt, and Re-take
Defense utility is often misunderstood as “hold site forever.” In reality, defense is about spending utility to control the attacker’s pace and then taking fights that are favorable. You can win defense rounds in three ways:
- Stop the hit (rare against good teams, but possible with perfect setups).
- Delay the hit until rotations arrive.
- Give space intentionally, then retake together with utility advantage.
Defense Smokes: Don’t Help Attackers Cross
Defensive smokes can be a trap if they give attackers a safe path to walk into site. A defensive smoke should either:
- force attackers to wait (time gain),
- force them to push through awkward edges (risk),
- or isolate their entry so you can focus fire.
If your smoke is allowing the enemy to “scale” forward for free, you’re donating space. Consider holding your smoke until you confirm a commit, or placing it so the attacker’s exit is exposed to your crossfire.
Defense Flashes: Save for the Moment They Must Commit
On defense, many flashes are wasted early, when attackers can simply stop and wait. Instead, keep flashes for:
- the moment attackers are entering a choke,
- the moment they are planting,
- or the moment they are trying to take your anchor out of position.
When used correctly, one defensive flash can stall an entire execute and buy rotations without you firing a shot.
Defense Info: Early Warning, Not Early Death
Info tools on defense should reduce uncertainty without forcing you into coin flips. Good defense info tells you:
- where the hit is likely coming from,
- what pace it is (fast vs slow),
- and whether attackers spent key resources to take space.
Once you have that info, the best play is often to reposition into a tradeable setup, not to dry-peek the choke.
Anchoring Fundamentals: “Live and Call”
Anchors throw rounds when they take unnecessary duels. The anchor’s primary job is to stay alive long enough to:
- call numbers and utility used,
- stall the plant timing,
- force attackers to clear extra angles,
- and create a retake window.
A dead anchor gives attackers space, info, and confidence. A living anchor forces uncertainty and time pressure.
11) Retakes: Reclaiming Space Without Donating Bodies
Retakes are where utility fundamentals win the most rounds, especially in ranked. Many teams lose retakes because they “trickle in” one by one. Utility can fix that—if you treat retake as a structured process.
The Retake Blueprint: Stop → Clear → Flood → Defuse
- Stop: use a smoke/stall/flash to prevent the enemy from freely holding all angles and to slow their swing timing.
- Clear: remove the most dangerous positions with coordinated utility.
- Flood: retake space together, trading bodies if needed.
- Defuse: create a defuse plan (bait taps, cover, utility denial).
Retake Smokes: Make the Site Smaller
On retake, your smoke job is often to reduce the site into a smaller playable space. You don’t want to fight a huge open area with 10 angles. You want to turn it into two or three simplified zones.
Strong retake smokes often:
- block the enemy’s best post-plant sightline,
- cover the spike so you can tap safely,
- or isolate one side so you can clear methodically.
Retake Flashes: Swing Together or Don’t Swing
Retake flashes are strongest when they enable a coordinated swing. If one player swings on the flash and everyone else hesitates, the swing becomes a sacrifice. Use short comms:
- “Flashing out—swing with me.”
- “Flash then clear close left.”
- “After flash, we flood.”
Retake Info: Remove the “One Hidden Guy” Problem
Retakes fail when one attacker is hiding in a corner while everyone fights the obvious angles. Use info tools to confirm which areas are clear so you can focus your guns on fewer threats.
Even if you don’t have a dedicated info ability available, you can force info by:
- tapping the spike to bait sound,
- throwing a smoke to force a push,
- or using a flash to force defenders to turn and reposition.
12) Counter-Utility: How to Beat Smokes, Flashes, and Info
Once you understand the fundamentals, you also learn how to beat them. Counterplay is about not panicking when utility appears. It’s about having default responses.
Beating Smokes
- Don’t autopush: pushing through smoke is a choice, not a reflex. Push only with a timing reason (flash support, numbers advantage, surprise).
- Hold the edge with a crossfire: make the smoke edge lethal for the team trying to exit.
- Reposition: if the smoke removes your angle, don’t stand still. Move to a new line that punishes their next step.
- Use info to “see” the smoke: if you can confirm whether someone is about to emerge, you can time your swing instead of guessing.
Beating Flashes
- Play turnable positions: choose spots with instant cover so you can break line-of-sight quickly.
- Stagger your defenders: don’t let one flash hit three people.
- Respect re-flashes: if you turn once, expect a second flash and be ready to disengage again.
- Punish flash timing: if an enemy always flashes before swinging, you can pre-aim the swing point and punish after the flash passes.
Beating Info
- Don’t give free confirmations: if an enemy drone enters, you can sometimes back up and let it pass instead of shooting instantly and revealing your exact position.
- Break traps with purpose: destroying a trap is loud information. If you break it, be ready for rotations or re-aggression.
- Change your rhythm: if the enemy uses info on a predictable timer, delay your push or hit a different lane to make their info stale.
The meta may change, but these counter rules remain because they are built on human attention, timing, and geometry.
13) Communication Templates: Simple Calls That Win
You don’t need perfect comms. You need useful comms. The most valuable calls are short, specific, and action-oriented.
Utility Calls
- “Smoking choke now—cross after.”
- “Smoke fades in 3—be ready.”
- “Flashing close in 2—swing.”
- “Reconing back site—play off scan.”
- “Trap broke flank—someone watch.”
Info Calls
- “Two here, running, spike sound.”
- “No contact A so far—possible rotate.”
- “They used smoke and flash—commit likely.”
- “One tagged low, fell back.”
Plan Calls (Best for Ranked)
- “Default first, then hit off info.”
- “We take lane, then exec with smokes.”
- “Play for plant, then fall back crossfire.”
- “Retake together on my flash.”
The point is to reduce uncertainty for your team. Utility becomes stronger when everyone understands the next two seconds.
14) Practice Plan: Drills for Controllers, Initiators, Sentinels, Duelists
Utility mastery is mostly repetition with feedback. You don’t need to memorize 100 lineups to become effective. You need consistent timing, spacing, and follow-up actions.
Universal Drill: “One Tool, One Space” (10 minutes)
- Load a custom game alone.
- Pick one area of any map you play often.
- Place one smoke or use one flash/info tool.
- Immediately practice the follow-up movement: cross to the next cover, swing the next angle, or take the next corner.
- Repeat until your movement is automatic and fast.
This drill trains conversion: utility → movement.
Controller Drill: Smoke Timing and Re-Smoke Habit (10 minutes)
- Practice placing two “execute” smokes quickly, then wait and place a third “re-smoke” on the spike area.
- Train yourself to keep one smoke for post-plant or retake whenever possible.
- Practice calling “smoke fades” even when alone, so it becomes a reflex in ranked.
Initiator Drill: Flash-to-Swing Sync (10 minutes)
- Stand at a choke, aim a flash path, then immediately swing to a pre-aim angle as the flash would detonate.
- Repeat until the swing timing feels automatic.
- Add a second “re-flash” and train yourself to swing on the second flash, not the first, to catch anti-flash habits.
Sentinel Drill: Info Contracts (10 minutes)
- Place traps to cover a lane and a flank.
- Practice your reaction plan: if trap triggers, where do you move and what do you call?
- Build the habit of replacing or adjusting traps after contact, not leaving them stale.
Duelist Drill: Entry With a Plan (10 minutes)
- Pick a common entry choke.
- Practice entering on a “countdown” (even if solo): step, swing, clear first corner, then second.
- Train your pathing so you are not stuck in the center of the choke with no cover.
Review Habit: Utility Conversion Check (After Matches)
When reviewing a round, ask only three questions:
- Did our utility create a clear advantage (space, time, info)?
- Did we convert it immediately (movement, swing, rotate)?
- Did we stabilize the space (trade setup, crossfire, cutoff)?
If the answer is “no” to #2 or #3, your improvement is simple: better follow-up, not “more utility.”
15) Common Utility Mistakes and Fixes
Mistake: Smokes That Help the Enemy
Symptom: your team dies exiting smokes or can’t enter site.
Fix: place smokes deeper to deny defender vision without forcing your team to exit into multiple guns. Pair with a flash timed at the exit.
Mistake: Flashes With No Swing
Symptom: “I flashed three!” but nothing happens.
Fix: shorten the comm and attach the swing to the flash: “Flashing now—swing.” Or “Pop in 2—go.”
Mistake: Info That Creates False Confidence
Symptom: you drone/dart, see nothing, then run in and die to a close corner.
Fix: treat “nothing” as “unknown until cleared.” Use your info to remove deep angles, then clear close angles with movement and trades.
Mistake: Spending Everything Early
Symptom: you have nothing left for execute, post-plant, or retake.
Fix: split into early budget and hit budget. Force yourself to keep one major tool for the final fight.
Mistake: Trickling Into Retakes
Symptom: you lose 1vX fights repeatedly while teammates arrive late.
Fix: call a full retake: “Wait for flash. We go together.” Use one tool to start the flood and commit as a group.
16) A Timeless Rank-Up Plan Built on Utility
If you want steady rank progress, focus on the skills that stay valuable regardless of patch notes:
- Conversion: every utility use must lead to movement, a swing, or a rotation.
- Edge control: smokes are about controlling edges, not hiding.
- Timing: flashes and smokes are strongest when synchronized with teammates.
- Trade discipline: utility enables trades, but trades still require spacing and commitment.
- Post-plant and retakes: these phases are repeatable and win huge amounts of rounds.
A practical weekly focus:
- Week 1: smoke timing + one re-smoke every round (if you play controller) or swing-on-flash timing (if you play initiator/duelist).
- Week 2: default protocol: take one neutral space + gain one info point before committing.
- Week 3: post-plant setups: crossfire + one utility denial tool reserved.
- Week 4: retake discipline: “wait, group, flash, flood” every time.
When you build your game around these fundamentals, you stop relying on “hope rounds.” You create rounds with structure. That’s what makes your performance consistent across maps, teammates, and metas.
If you want to accelerate improvement or remove the “stuck” feeling with structured help, Boosteria’s Valorant options are here: https://boosteria.org/valorant-boosting/prices
17) FAQ
How many smokes should we use for an execute?
Enough to isolate the highest-impact defender angles and create a safe path. In most cases, two well-placed smokes plus a flash/info layer is more effective than four rushed smokes with no timing. Always try to keep one smoke for post-plant or retake control.
Should I save flashes for later or use them early?
Use flashes when they create a clear conversion: a swing, a space take, a plant denial, or a retake flood. Early flashes are fine if they secure meaningful space or force a strong reaction. Random early flashes “for pressure” are usually wasted.
What if my team doesn’t follow my utility?
Keep your utility paired with your own action first: flash for your own swing, smoke for your own cross, recon for your own rotation decision. Use short comms and pings. Over time, consistent timing encourages teammates to naturally follow.
Is info utility still useful if it doesn’t tag anyone?
Yes—if it was used to reduce uncertainty and guide a decision. Info that forces reactions (utility breaks, shots, repositioning) is valuable even without a tag, because it shapes the enemy’s options and reveals their intent.
How do I get better at retakes?
Stop trickling and start running a simple retake plan: wait for teammates, use one smoke to simplify the site, use one flash to initiate the flood, then trade into the spike space together. Retakes are mostly teamwork and timing, not hero plays.