League: Warding Guide or Map control
Warding and vision control are some of the most important ranked skills in LoL. Proper warding gives you map control, protects you from ganks, lets you track the enemy jungler, and lets your team take Dragons, Rift Heralds, and Baron Nashor safely. In other words: good vision wins games, bad vision loses games.
In this updated 2025 LoL warding guide, we’ll explain how to ward in LoL, lane by lane, role by role, and stage by stage (lane phase, objective control, sieging). You’ll also see why certain ward spots matter and how they directly convert into LP gains in solo queue. This is the same logic high-Elo supports, junglers, and macro players use to quietly carry games.
If you want to go even deeper on champion-specific builds, rune pages, and matchups, sites like MobaFire can help you pick the right tools for your role so that your vision work actually translates into pressure. And if you’re a competitive player who also grinds other ladder systems (for example, card-game ladders like Hearthstone), you’ll recognize the same mindset from high-rank climbs, where information advantage decides games. You can even look at how professional players treat rank efficiency in other titles, e.g. structured services that focus on consistency and time saved. (See Hearthstone boosting prices for an example of how controlled climb services value decision-making, scouting, and tempo management.) The principle is identical in LoL: knowledge and discipline beat ego and chaos.
PROPER WARDING DURING LANE PHASE
Early game (laning phase) is when you’re at your most vulnerable. Teams are split across lanes, the enemy jungler is pathing for first blood, and nobody is grouped to peel for you. Your goal is simple: survive, farm, and avoid giving shutdown gold before 10 minutes.
That means: you must ward the entrances to your lane to spot incoming ganks. Let’s break down correct ward placement in LoL for each role and lane.
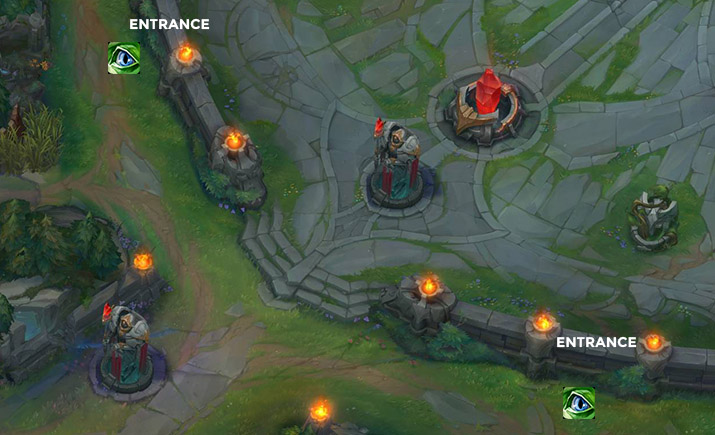
WARDING AT TOP LANE
Top lane is extremely snowball-prone. It’s long like bot lane, but unlike bot lane, you don’t have a support constantly dropping wards for you. Top is also far from early Dragon fights, so help arrives slowly. Because of this isolation, a single bad death can decide top lane for the next 15 minutes.
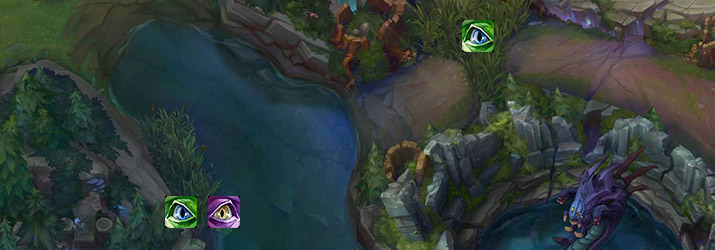
There are two main entrances the enemy jungler will use to gank top lane. The correct ward depends on which side you spawned:
- If you’re blue side (bot-side spawn): ward the river tribush.
- If you’re red side (top-side spawn): ward the lane bush toward river.
If you’re winning lane and playing aggressively (regardless of side), you can drop a

vision ward
in the forward lane bush. A Control Ward that lasts 4+ minutes is absolutely worth the gold because:
- It denies enemy vision (they have to clear it or play blind).
- It warns you if the jungler is trying a lane gank through the bush.
- It lets you keep pressure without facechecking fog.
Watch body language. If the enemy top laner was last-hitting safely and suddenly sprints at you the moment you step up, assume you’re about to get ganked. Do not ego-fight that. Back off and wait.
Timing tip: You should usually place your first trinket ward around 3:20–3:30, because that’s when most junglers finish their first clear and are healthy enough to gank top.
WARDING AT MID LANE
Mid lane vision is the heart of map control. Good mid lane wards see rotations to top, to bot, to river skirmishes, and invades in both jungles. If you control mid vision, you protect everybody.
There are two extremely efficient
Control Ward
spots in mid that often survive for several minutes in solo queue because most players don’t check them consistently:
Use the left-side ward spot if you spawned on the blue / bottom side. Use the right-side ward spot if you spawned on the red / top side.
Your mission in mid: control the river paths that lead to side lanes. That protects your bot lane from mid+jungler dives, protects your top from 3-man collapses, and protects you from direct river ganks. This is why mid laners who ward well silently carry games even without huge scores.
Serious ranked tip: Buy 1–2 extra wards every single recall. Yes, even as an assassin. Yes, even if you “need damage.” Preventing one death bot lane by spotting an incoming roam is often worth more than a Long Sword. This is the kind of macro discipline you also see in high-Elo guides and analysis content on sites like MobaFire, where roaming patterns and vision placement are part of matchup strategy, not “support duties only.”
Standard sight ward positions for the blue / bottom side mid laner. These cover common jungle gank angles and river pressure.
Sight ward positions for the red / top side. These protect from river ganks and give info for potential counter-roams.
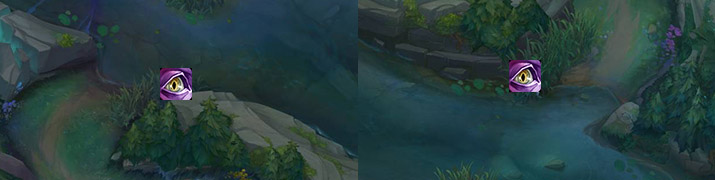
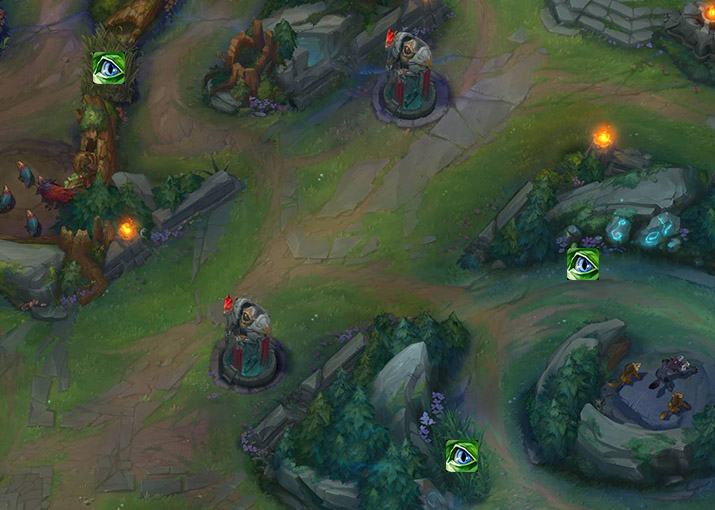
WARDING AS SUPPORT / BOT LANE VISION CONTROL
Support is the primary vision controller in LoL. Your job is not only to peel and engage, but also to control bot-side river and Dragon vision so your ADC can safely farm and so your jungler has clean access to bottom fights.
At level 1 / level 2, drop your trinket in the closest lane bush so the enemy support can’t sit in fog and spam poke for free. Later, your mission becomes what high-Elo players call the “ward war” — clearing their vision and replacing it with yours so you own bot side.
When you place a
control ward
in bot-side tribush, you:
- Give your jungler a perfect flank route.
- Deny enemy bot lane safety, since they can’t see if a dive is coming.
- Make it easier to punish them if they overpush.
This is easier to maintain on blue side, but if you’re on red side and you’re winning bot hard — or if your jungler is hovering — you can still safely control that bush for kill setups.
If you are behind in bot lane and getting shoved under turret, you probably won’t win the ward war. That’s fine. In that case, just get vision in the closest river bush. That gives you at least half the info on incoming ganks, and it’s enough to avoid a 4-man dive that ends the lane. You can also read our “playing from behind” mindset guide here:
what to do when you are behind.
Bottom lane on blue side has a natural positional advantage around Dragon early: easier access to tribush vision and better angles for jungle ganks through fog. This is why bot pressure often snowballs into first Dragon and then map control.
Lane ganks on bot are extremely common, especially with long-range engage supports like
![]() Amumu
Amumu
or
![]() Nautilus.
Nautilus.
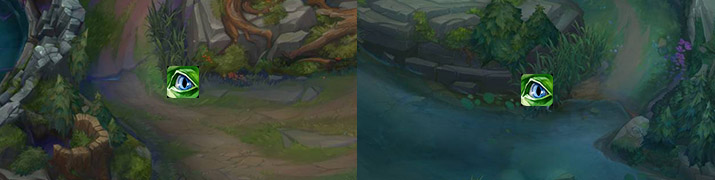
There are two main defensive ward patterns bot:
On the blue side, use the upper ward spot. On the red side, use the lower one. Place wards toward the edge of the bush when possible — this reveals incoming junglers early and even enables your top laner to Teleport behind the enemy bot lane for surprise collapses.
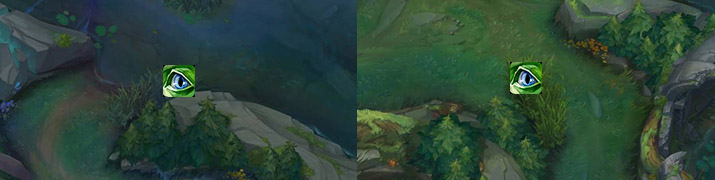
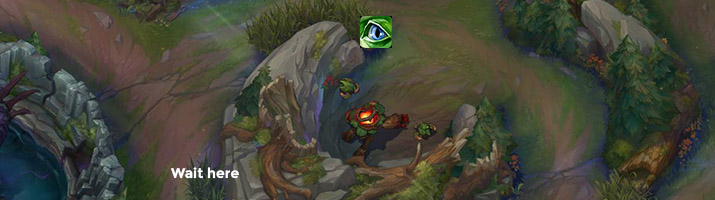
The second method is less common in low Elo but incredibly powerful: deeper defensive vision. If you can safely ward near Gromp / Krugs entrances, you’ll see the enemy jungler before they even path toward lane instead of when they’re already in hook range. This also leaks info to your entire team about where the enemy jungler is farming, which can lead to counter-ganks or invades.
First spot works best for the blue side. Second spot works best for the red side. These “advance warning” wards tell you about incoming danger before it reaches lane.
Dragon vision is also a support job in early game. Many junglers can sneak early Dragons solo. A ward inside Dragon pit gives more warning than a generic river ward because you’ll literally see HP dropping. Keep a
control ward
ready for when your team starts Dragon so you can deny enemy vision and reduce smite steal risk.
As ADC: Help. You’re not “vision exempt.” You can cover any nearby ward spot that your support can’t safely reach yet. Use your trinket when you arrive in lane, and later buy a spare ward or Control Ward before support finishes their first vision item

(Sightstone-style/ward item).
WARDING AS JUNGLER
Jungler vision = global pressure. You are mobile, you touch every lane, and you walk through the river constantly. This makes you the only role that can consistently place deep wards in the enemy jungle. Deep wards let you track the enemy jungler’s path, predict ganks before they happen, and set up counter-ganks that flip losing lanes.
Because you’re roaming nonstop, you should also buy 1–2 wards or Control Wards every recall. High-level macro junglers don’t rely only on Sweeper; they actively seed vision all over the map.

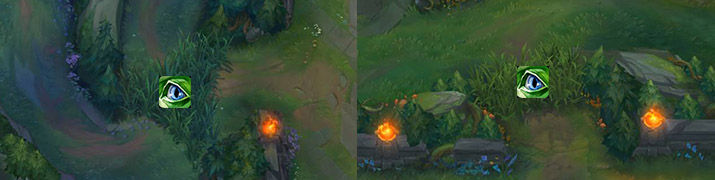
If you’re planning to invade, these ward spots reveal the enemy jungler while they farm camps. First image applies to the blue side perspective; second applies to the red side. You can also just ward directly on enemy buff spawn points.
If you know the enemy jungler wants red buff, ward it early and wait in the adjacent bush. They’ll walk in thinking they’re safe, but you’ll see them first. Even if they check the red buff bush itself, you’re hidden in the next brush — so you still get first hit and can burst.

Invading blue buff can be trickier, but it’s also a free mid gank opportunity. When the enemy jungler hands blue to their mid laner, both of them tend to stand still for a second. Ping your mid, drop vision ahead of time, and collapse together for a burst kill. Even a failed kill can burn Flash and completely slow the enemy tempo.
PROPER WARDING OF OBJECTIVES (DRAGON, BARON, MID-GAME ROTATIONS)
Mid game is when teams start grouping for fights around Dragon, Rift Herald, and Baron Nashor. At this stage, warding is everyone’s responsibility, not just support. ADC, jungle, and mid should help place vision and, more importantly, protect the support while they walk into fog to drop deep wards. If your support facechecks alone and dies, you often lose the next objective for free.
Keeping vision around major objectives also prevents desperate steals and lets you set up picks to create 5v4 situations. This is especially valuable if you’re trying to climb ranked quickly and efficiently in 2025, where objective control and macro discipline can matter as much as pure mechanics — exactly the kind of “win-more-with-less-risk” mentality that also appears in structured climb services for other competitive games (again, similar to how organized ladder pushes work in Hearthstone; see how they package guaranteed progress at Hearthstone boosting pricing and apply that mindset of controlled advantage to LoL vision and objective prep).
Having this “we move as a unit, we secure vision first” mindset is how coordinated stacks in high Elo consistently secure Baron without flipping it 50/50.
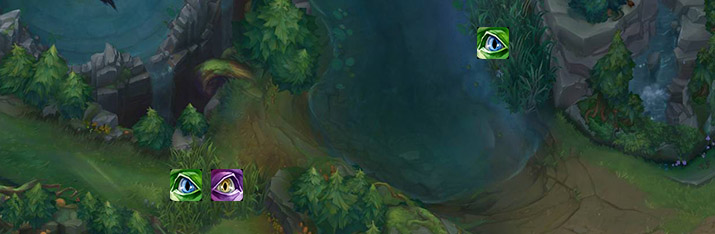
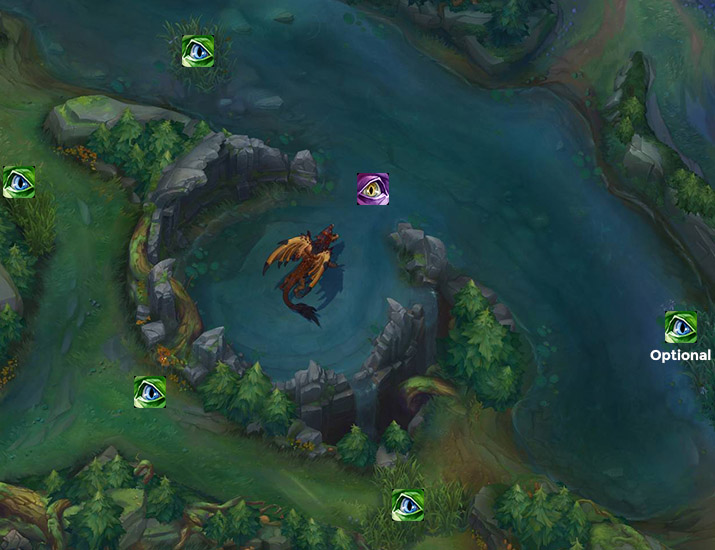
WARDING DRAGON’S AREA: BLUE SIDE
These ward placements help you spot any enemy rotation toward Dragon. You’ll see if they’re collapsing from mid, from river, or from bot tri. You can also drop an extra ward in river bush next to bot lane if their bot duo hasn’t reset yet and is still applying lane pressure.

WARDING DRAGON’S AREA: RED SIDE
Notice how different red side feels. Dragon pit positioning is naturally more comfortable for blue side, which is one reason blue side can sometimes have a slightly higher winrate in coordinated fights. Red side has more comfort around Baron pit later, but early Dragons are harder to control safely if you’re red.
Important Dragon rules:
- Pull Dragon out of the pit toward your team, so the enemy jungler can’t just Flash/Smite from behind the pit wall.
- Ward behind Dragon pit to catch flank TPs and assassins trying to wrap around.
- A ward in river bush is optional, but useful to track anyone approaching from bot side who’s out of standard vision range.
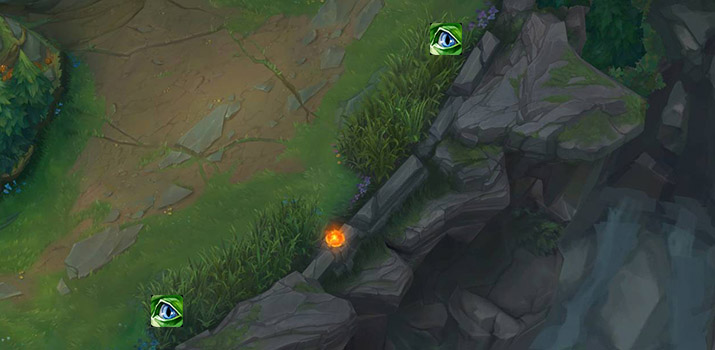
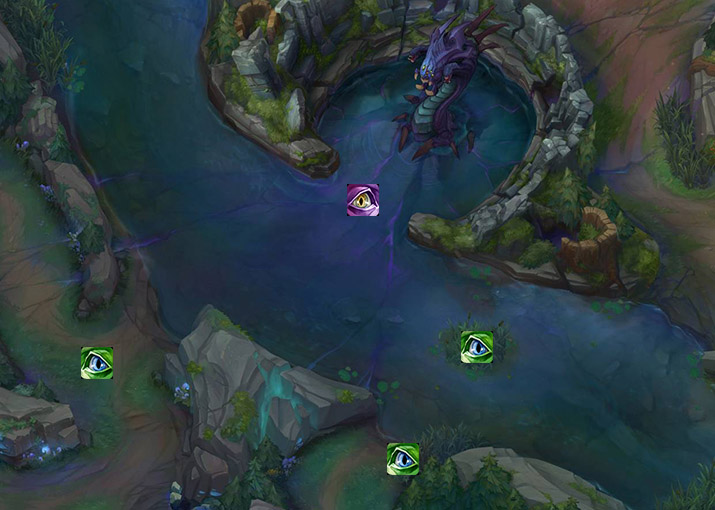
WARDING BARON’S AREA: BLUE SIDE
When Baron Nashor is live, vision becomes win-or-lose. One stolen Baron can flip a losing game instantly. Here are the four most important wards when you’re setting up Baron from blue side:
- Control Ward directly in front of Baron Nashor to deny enemy vision of the pit.
- Ward in the brush near Baron pit entrance to see enemies approaching.
- Two wards behind Baron pit so you can poke / disengage and to stop last-second steal attempts from assassins or junglers Flashing over the wall.
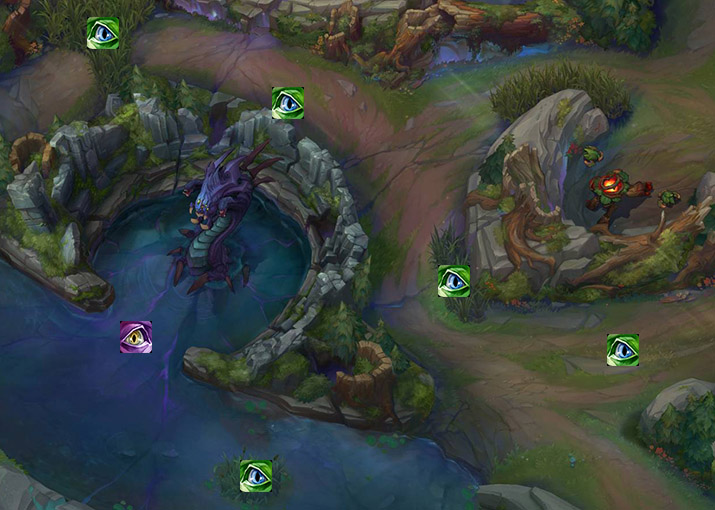
WARDING BARON’S AREA: RED SIDE
From red side, you need slightly fewer wards if you’re controlling the area, but every ward matters. Typical setup:
- One ward in pit or directly at Baron to track HP (or deny their sneak attempt).
- One ward in the river brush near Baron entrance.
- One ward deeper toward mid-side jungle to see rotations early.
If you’re ahead, you can also drop vision even deeper into the enemy jungle near their raptor/bush area to watch for flanks and to prepare a pick. That’s how you get the 5v4 pick that leads into “free Baron.”
PROPER WARDING DURING SIEGING (AND WHEN YOU’RE BEING SIEGED)
Siege = one team groups to take a turret and tries to poke/engage, while the other team is stuck under tower trying not to die. At this stage, vision is not just for gank safety — it’s for avoiding poke and stopping flank engages.
When you’re attacking, good wards let you predict where the enemy engage will come from. When you’re defending, good wards let you dodge spears, hooks, and long-range ultimates before they even appear on screen.
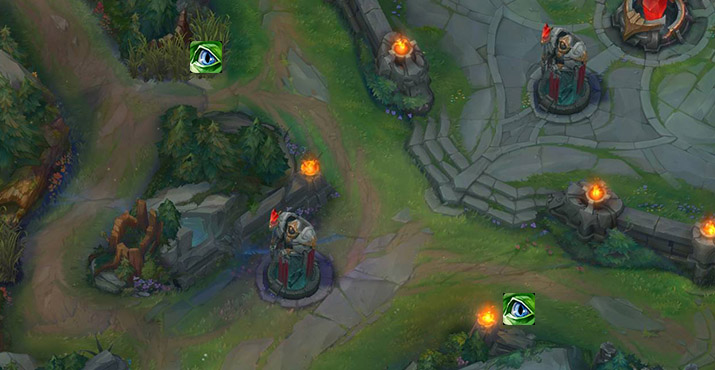
WARDING DURING INNER MID LANE TURRET SIEGING
When you’re sieging the inner mid lane tower, you need to control both sides of mid. Why?
- To prevent flank engages from assassins or tanks coming from fog.
- To see poke angles so you can dodge skillshots and answer with your own.
- To stop them from collapsing 5v4 on whoever’s slightly out of position.
WARDING DURING INHIBITOR SIEGING
When you’re at their inhibitor turret, vision around the sides and behind walls is mandatory. You want to:
- Track anyone trying to flank your carries.
- See when the enemy poke champions line up spears, lasers, rockets, etc.
- Find someone greedy or mispositioned and burst them before they retreat under Nexus towers.

WARDING WHEN YOU ARE SIEGED AT INNER MID LANE
When you’re the team under pressure, you still need vision. These three defensive wards give you full awareness of nearby danger so you can sidestep poke from champions like
![]() Nidalee
Nidalee
and react to long-range engage setups from
![]() Fiddlesticks,
Fiddlesticks,
![]() Amumu,
Amumu,
etc.
WARDING WHEN YOU ARE SIEGED AT INHIBITOR
Late game inhibitor defense feels hopeless when you’re blind. But if you ward correctly, you can sometimes:
- Catch a greedy enemy walking too close to a wall.
- Blow them up, get a shutdown, and suddenly win the game off that one pick.
This is literally how “unwinnable” games turn around in Diamond+ solo queue and even in pro play: one pick near inhibitor equals full map reset.
Final note: Map control is not optional in ranked LoL. Learning how to ward, where to ward, and when to refresh vision will directly increase your winrate over time. This is core macro skill, just like last-hitting or teamfighting. And if you’re serious about climbing — whether in LoL solo queue, or in other competitive ladders like Hearthstone where ranking is brutally time-sensitive — then you already understand the value of strategic advantage and information control.
Vision is strategic advantage.
More resources you may find useful
- MobaFire – champion builds, runes, lane matchups, power spikes
- Hearthstone boosting prices – structured ladder climb mindset applied to ranked systems
- Quick cast vs normal cast (improve reaction time)
- How to deal with trolls and keep mental stable
- Best LoL skins
- LoL Elo boosting / rank improvement services
Last updated: November 1, 2025.


